How to Start FxPro Trading in 2025: A Step-By-Step Guide for Beginners
Embarking on your journey into the world of trading with FxPro can be a rewarding experience, but it's essential to start with a solid foundation. This step-by-step guide is crafted to assist beginners in navigating the initial stages of FxPro trading, providing valuable insights and essential information to ensure a smooth and informed start.

How to Sign up on FxPro
How to Sign up for a FxPro Account [Web]
How to Sign up
First, visit the FxPro homepage and select "Register" to begin the account signing-up process.

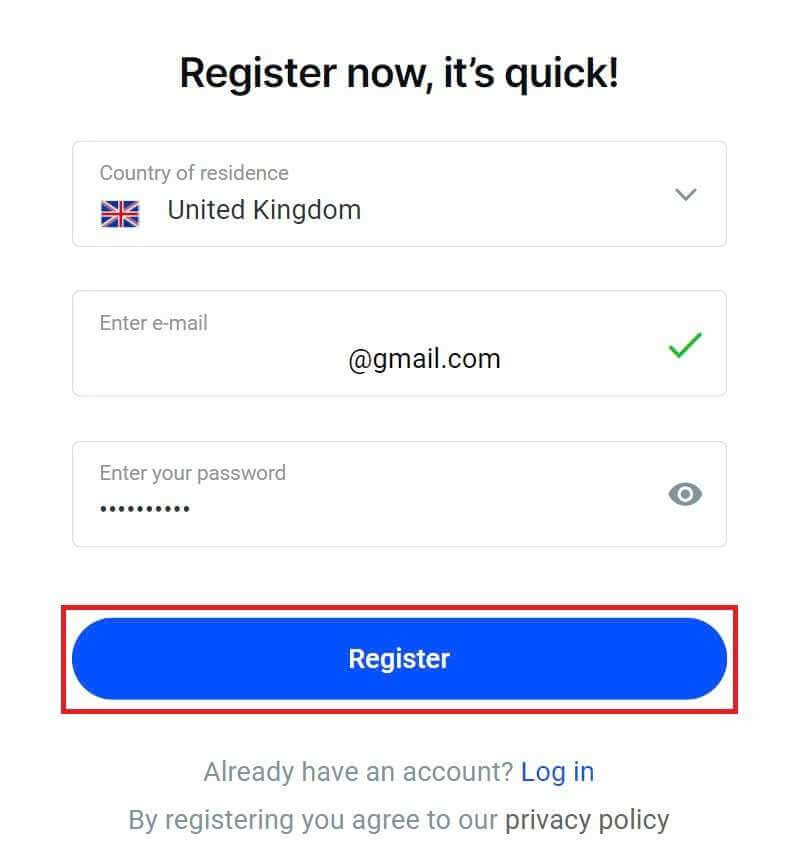
You will immediately be directed to the account signing-up page. On the first signing-up page, please provide FxPro with some basic information, including:
-
Country of residence.
-
Email.
-
Your password (Please note that your password must meet certain security requirements, such as having at least 8 characters, including 1 uppercase letter, 1 number, and 1 special character).
After providing all the required information, select "Register" to continue.
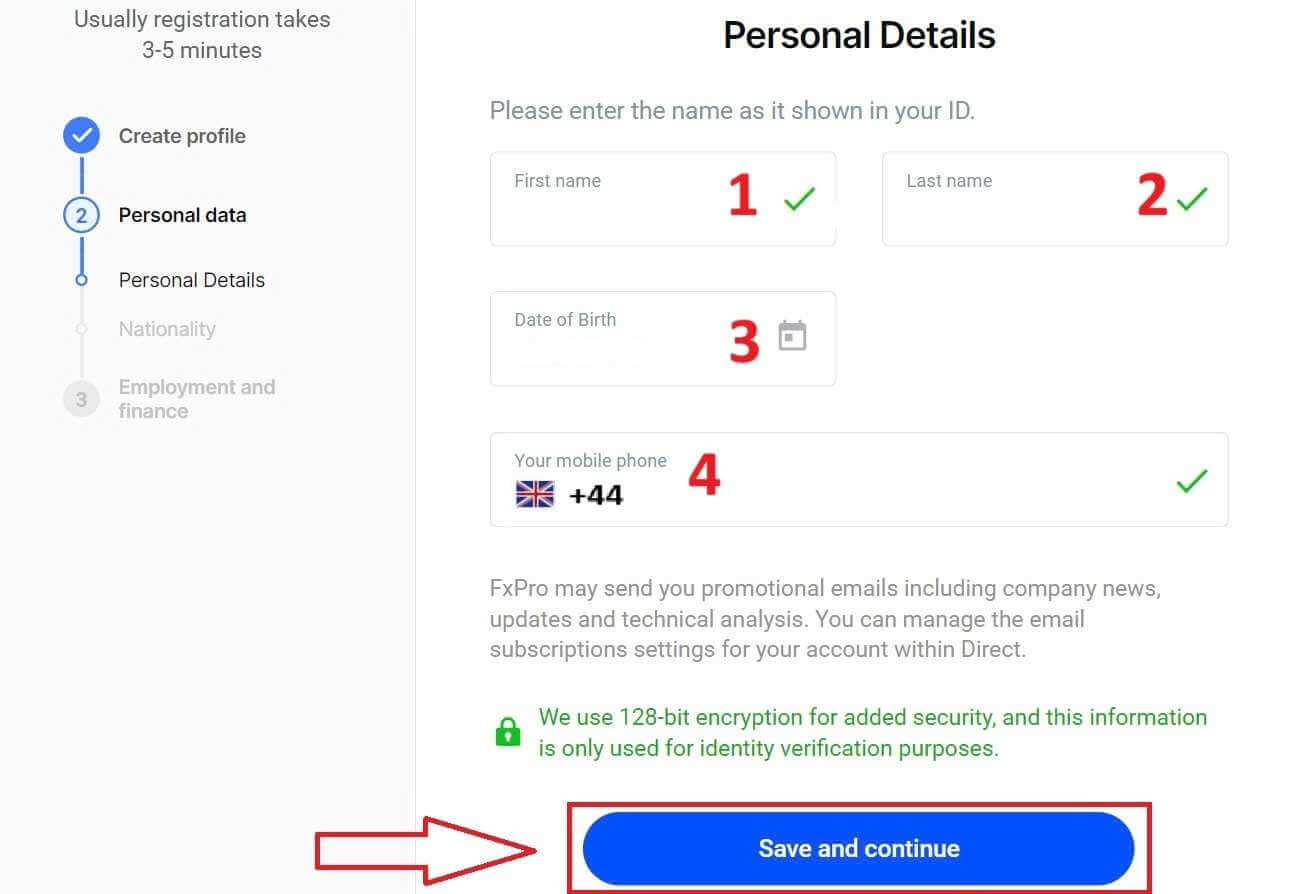
On the next signing-up page, you will provide information under "Personal Details" with fields such as:
-
First name.
-
Last name.
-
Date of Birth.
-
Your mobile number.
After completing the form, select "Save and Continue" to proceed.
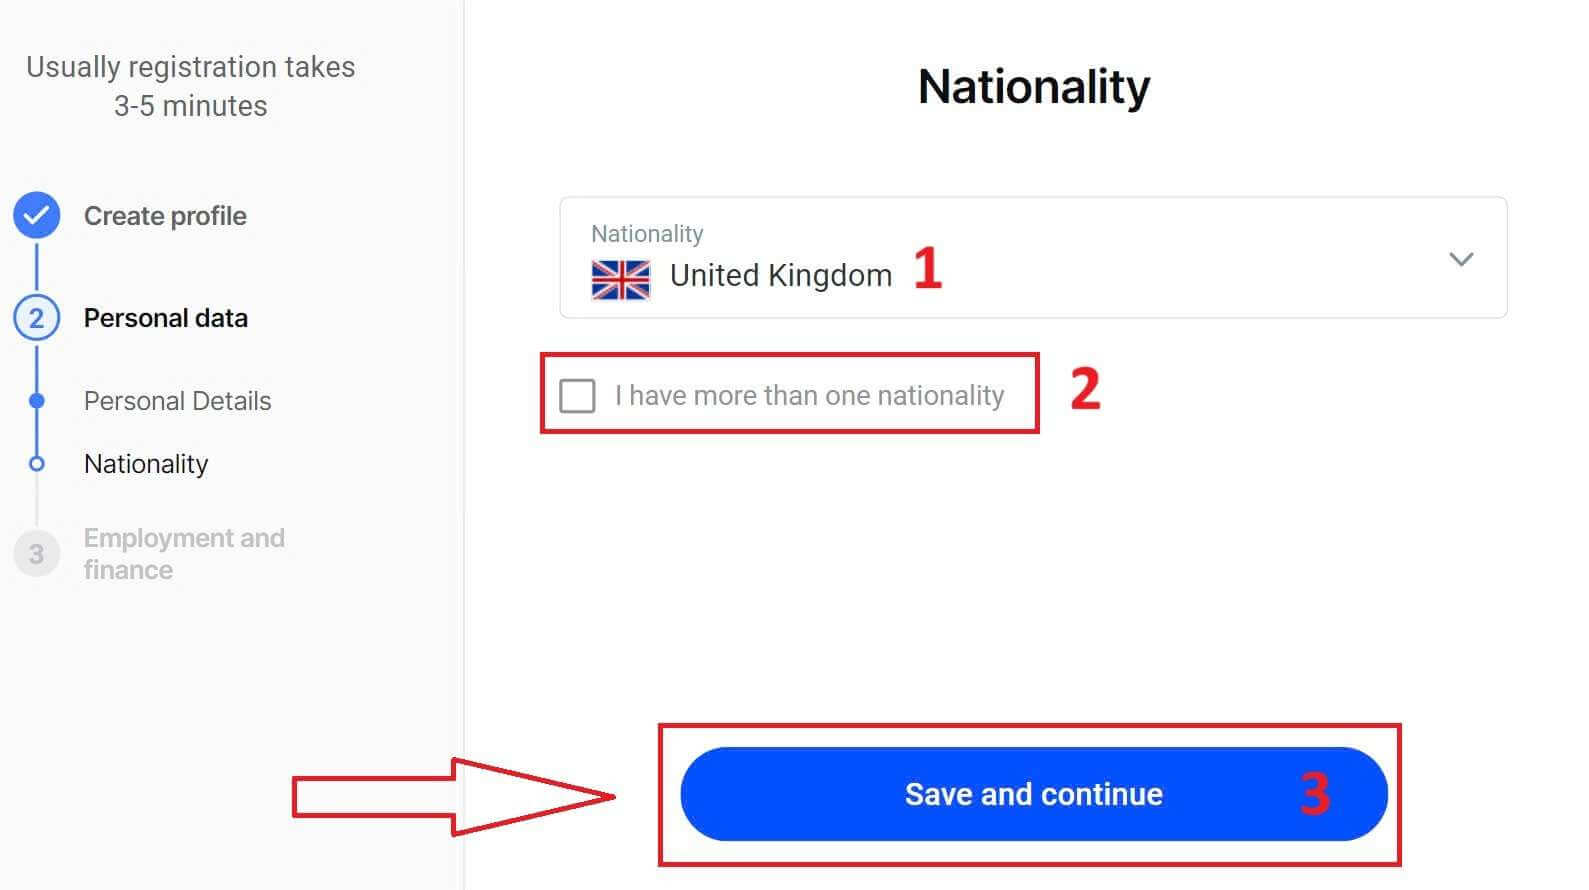
The next step is to specify your nationality under the "Nationality" section. If you have more than one nationality, check the box I have more than one nationality and select the additional nationalities. Then, select "Save and continue" to proceed with the signing-up process.
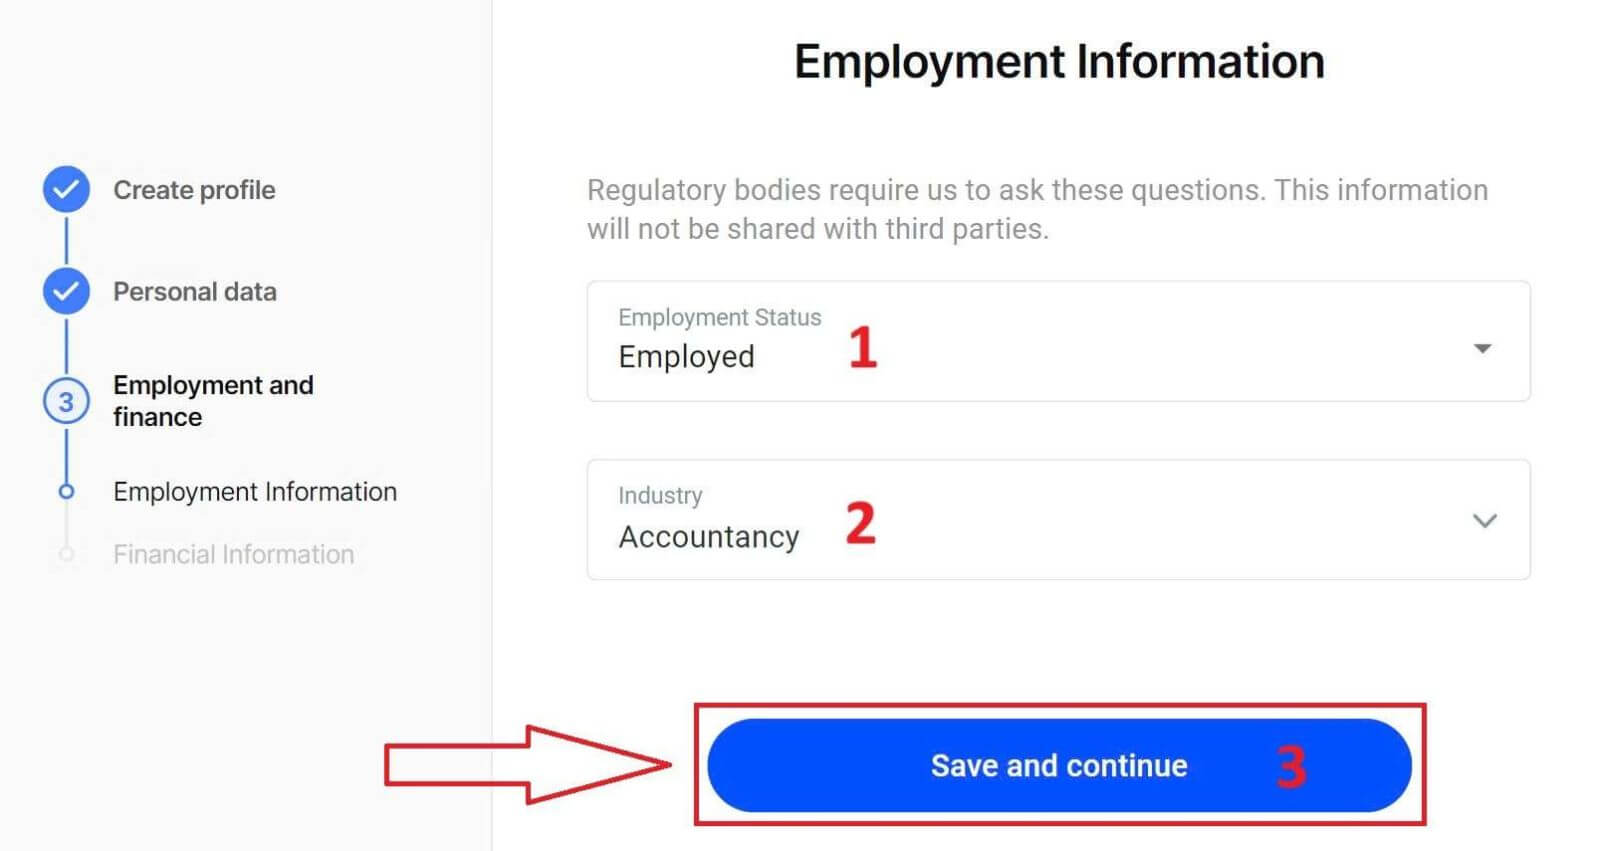
On this page, you must provide FxPro with information about your Employment Status and Industry in the Employment Information Section. Once you finish, click "Save and continue" to move to the next page.
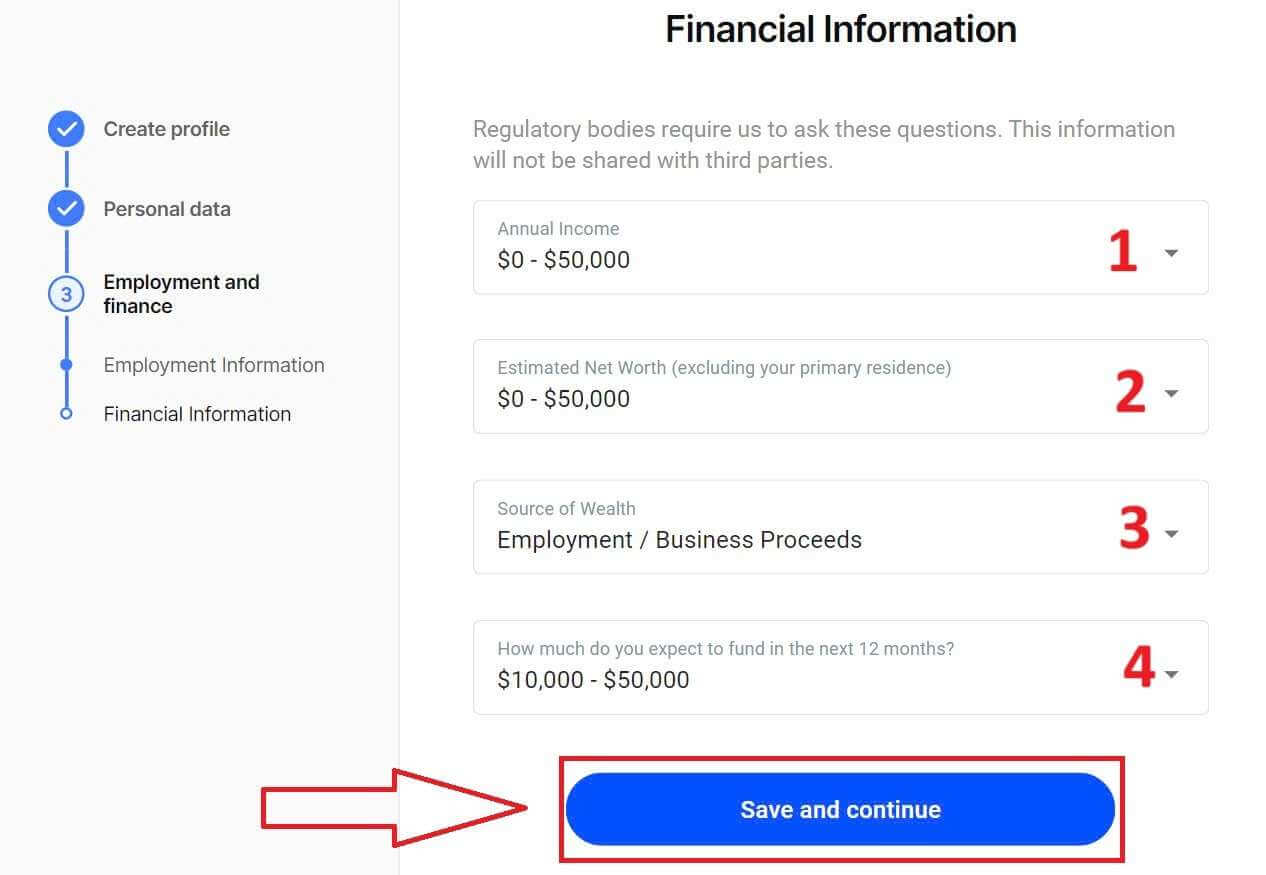
On this page, you will need to provide FxPro with some information about Financial Information such as:
-
Annual Income.
-
Estimated Net Worth (excluding your primary residence).
-
Source of Wealth.
-
How much do you expect to fund in the next 12 months?
After completing the information fields, select "Save and continue" to complete the signing-up process.
Congratulations on successfully signing up for an account with FxPro. Don’t hesitate any longer—start trading now!
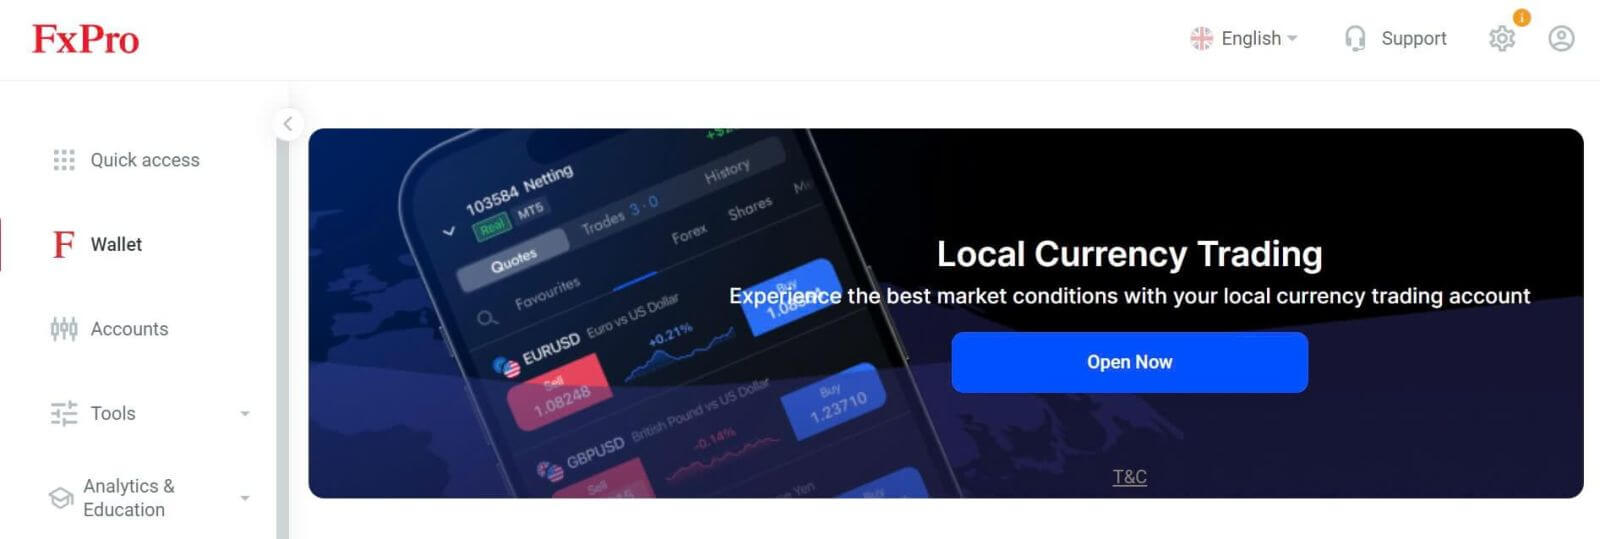
How to create a new trading account
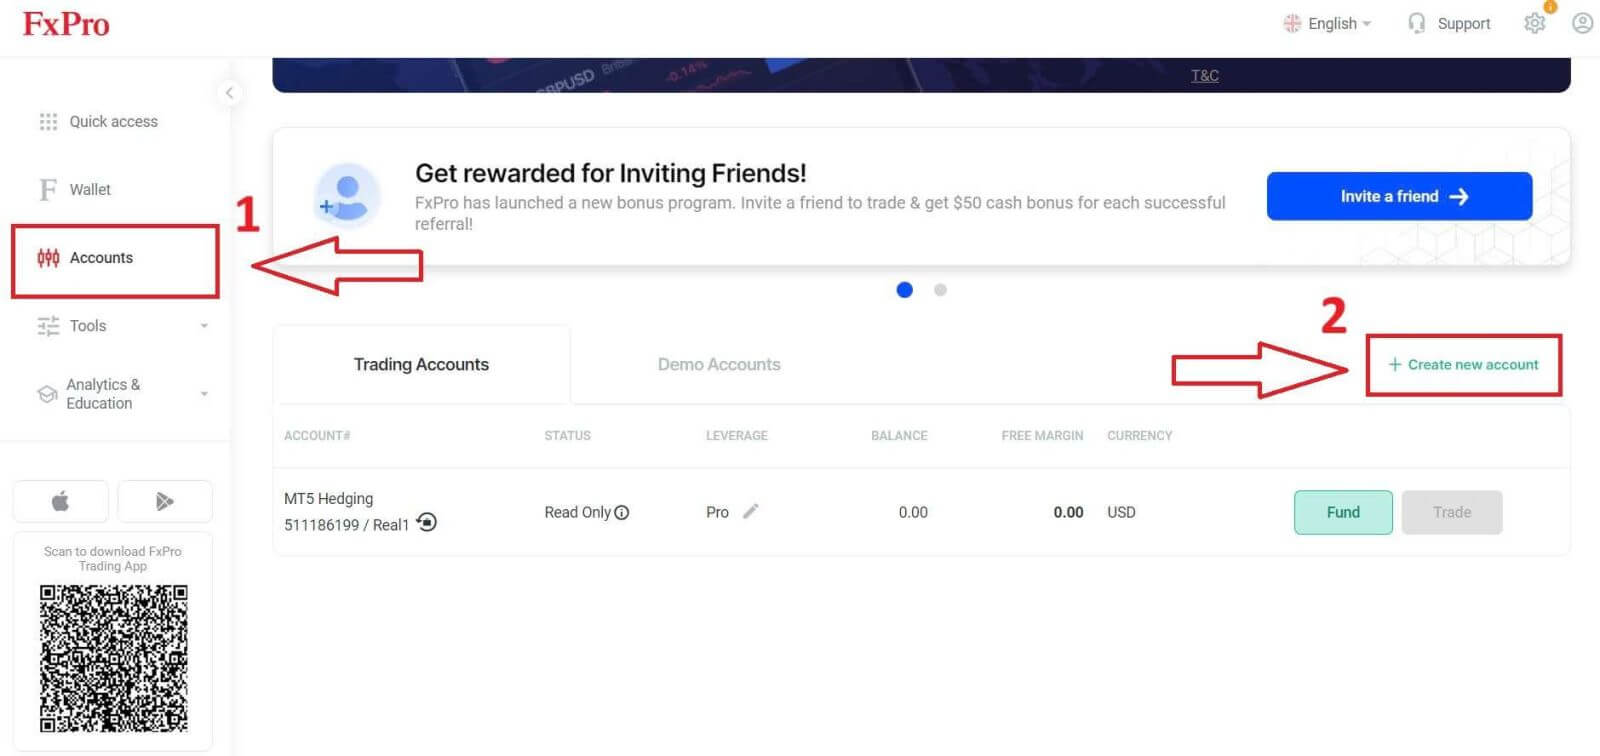
To create additional trading accounts, on the main interface of FxPro, select the Accounts section on the left side of the screen and then click the "Create new account" button to start creating new trading accounts.
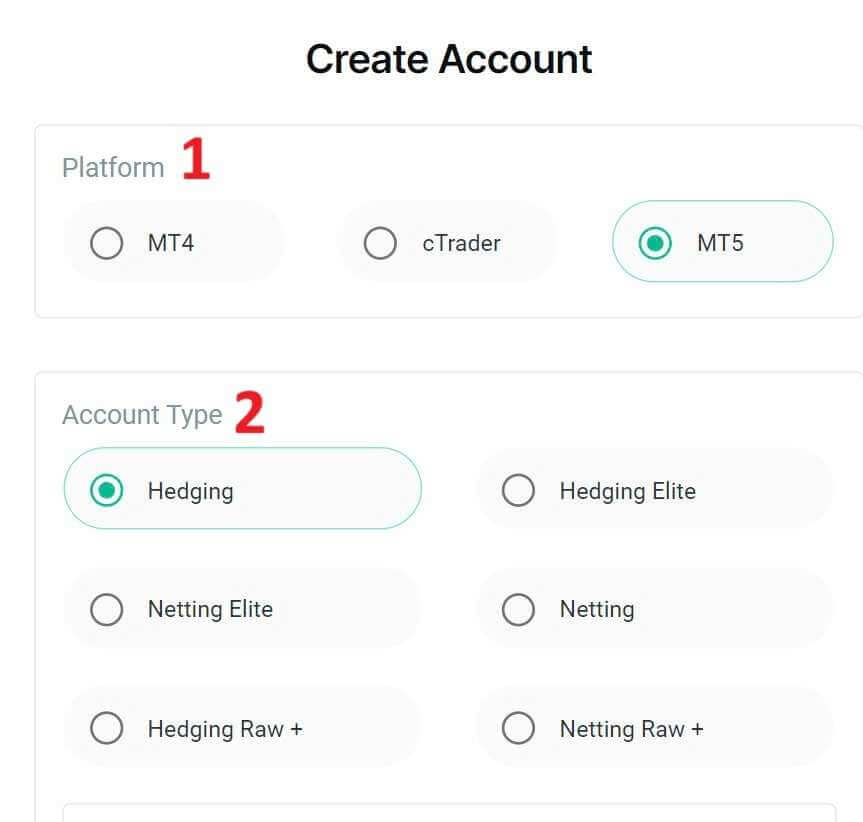
To create new trading accounts, you will need to select the following necessary information:
-
The Platform (MT4/ cTrader/ MT5).
-
The Account Type (this may vary according to the trading platform you choose in the previous field).
-
The Leverage.
-
The Account Base Currency.
After completing the required fields, select the "Create" button to finish the process.
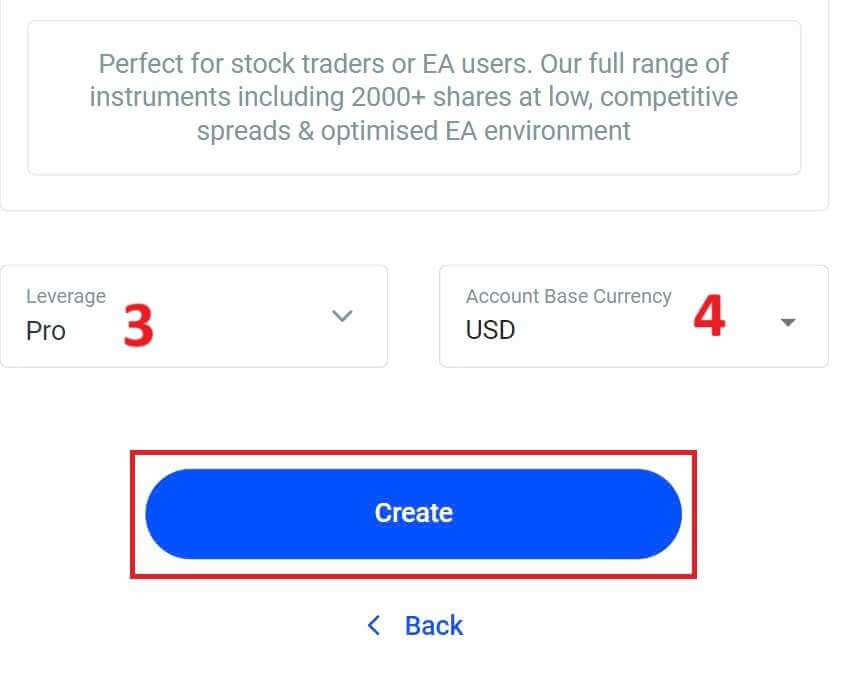
Congratulations! You have created new trading accounts with FxPro with just a few simple steps. Join now and experience the dynamic market.
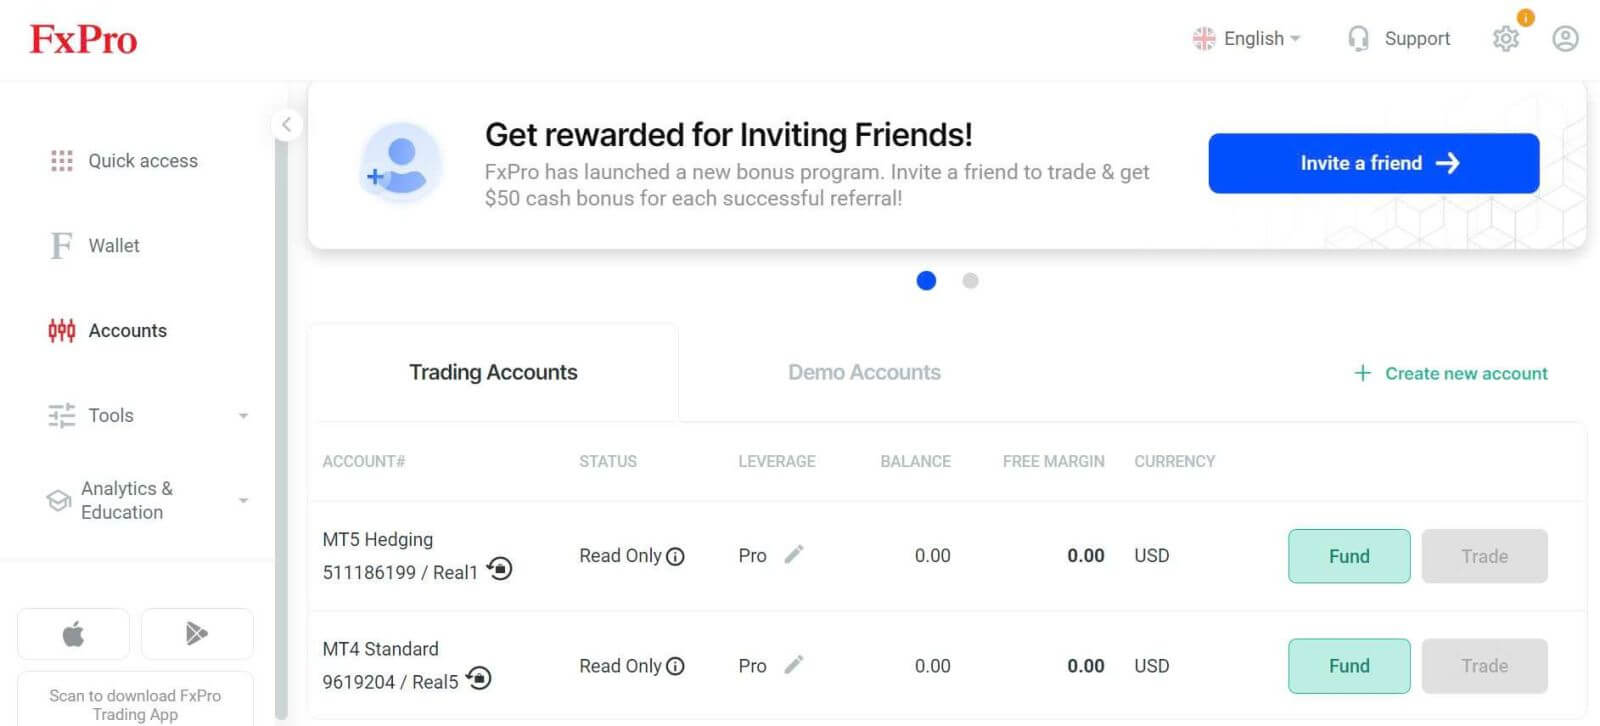
How to Sign up for a FxPro Account [App]
Set up and Sign up
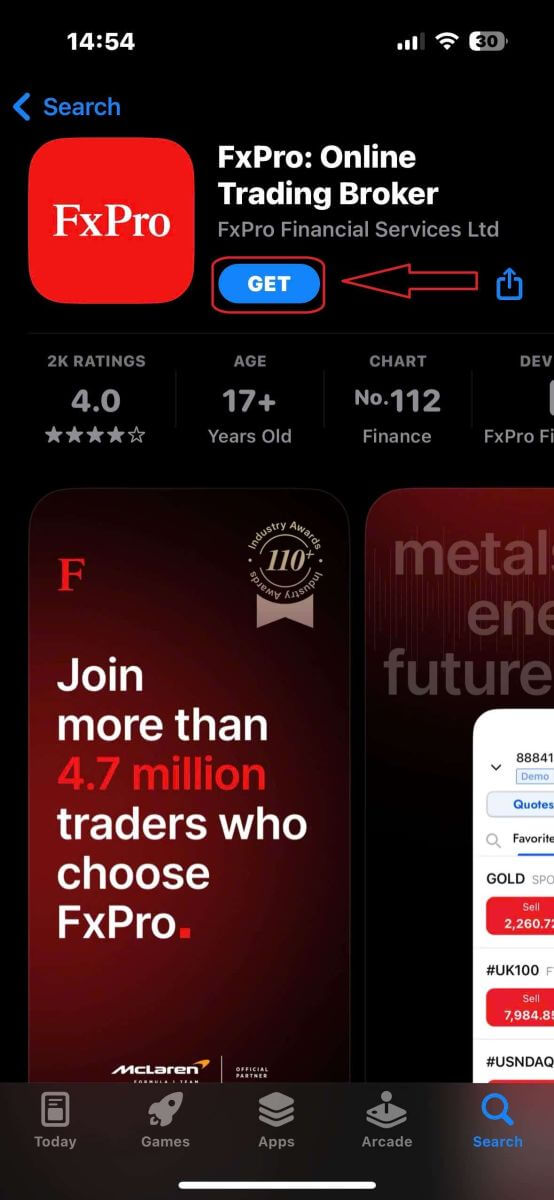
First, open the App Store or Google Play on your mobile device, then search for "FxPro: Online Trading Broker" and download the app.
After installing the app, open it and select "Register with FxPro" to begin the account signing-up process.
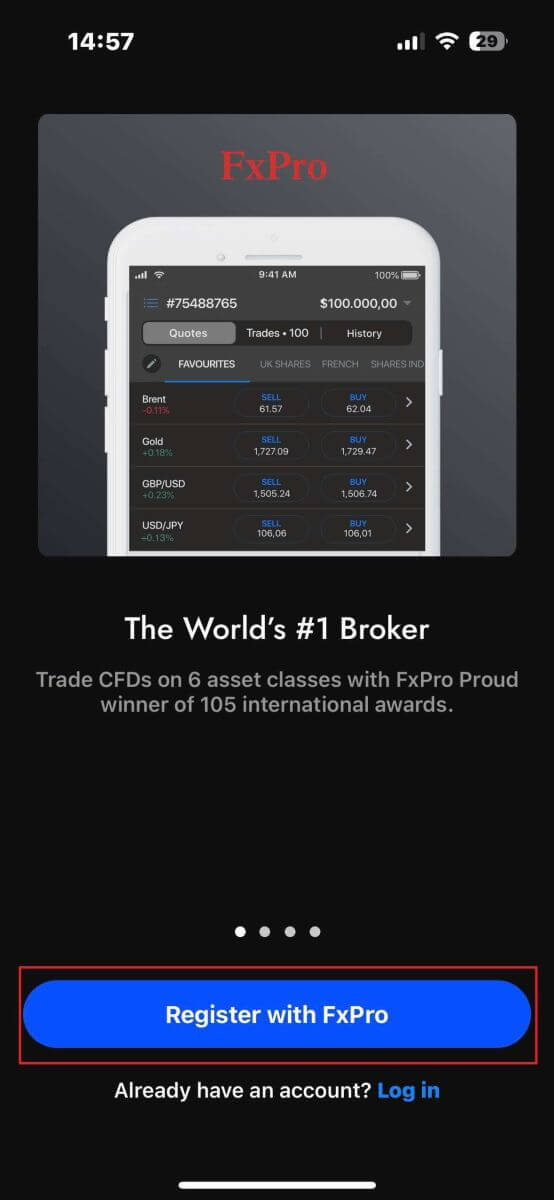
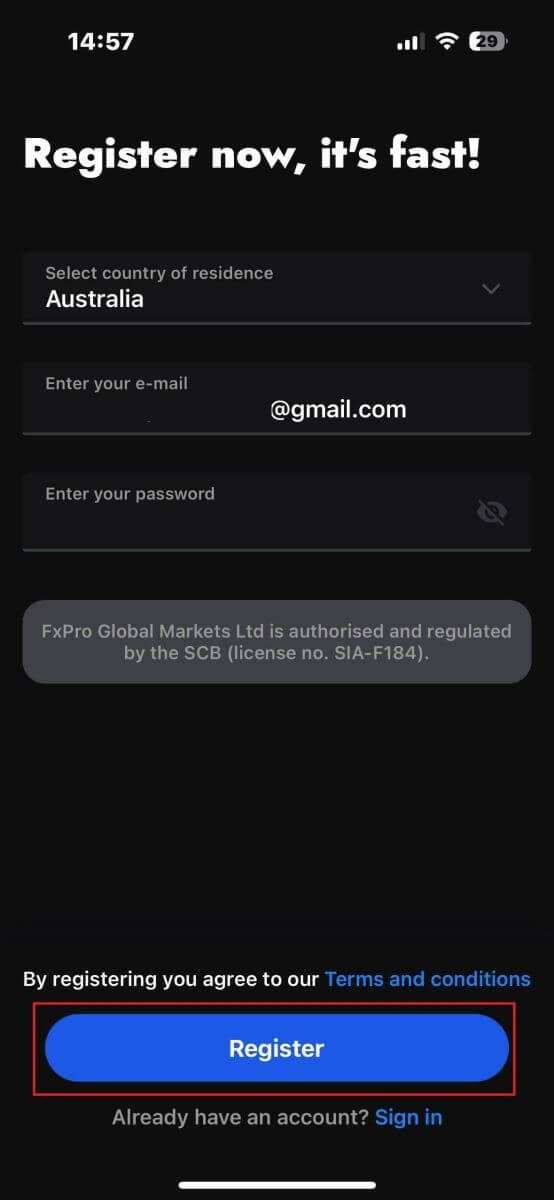
You will be redirected to the account signing-up page right away. On the initial signing-up page, you need to provide FxPro with some essential details, including:
-
Your country of residence.
-
Your email address.
-
A password (Make sure your password meets security criteria, such as being at least 8 characters long and including 1 uppercase letter, 1 number, and 1 special character).
Once you have entered all the necessary information, click "Register" to proceed.
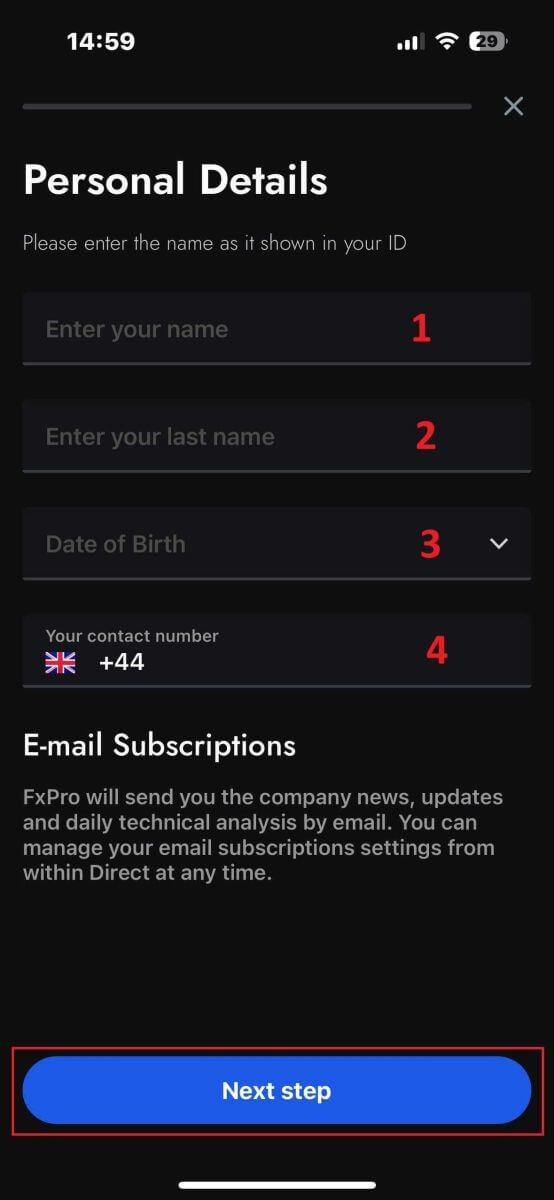
On the subsequent signing-up page, you will need to fill out the "Personal Details" section, which includes fields for:
-
First name.
-
Last name.
-
Date of Birth.
-
Contact number.
After filling out the form, click "Next step" to move forward.
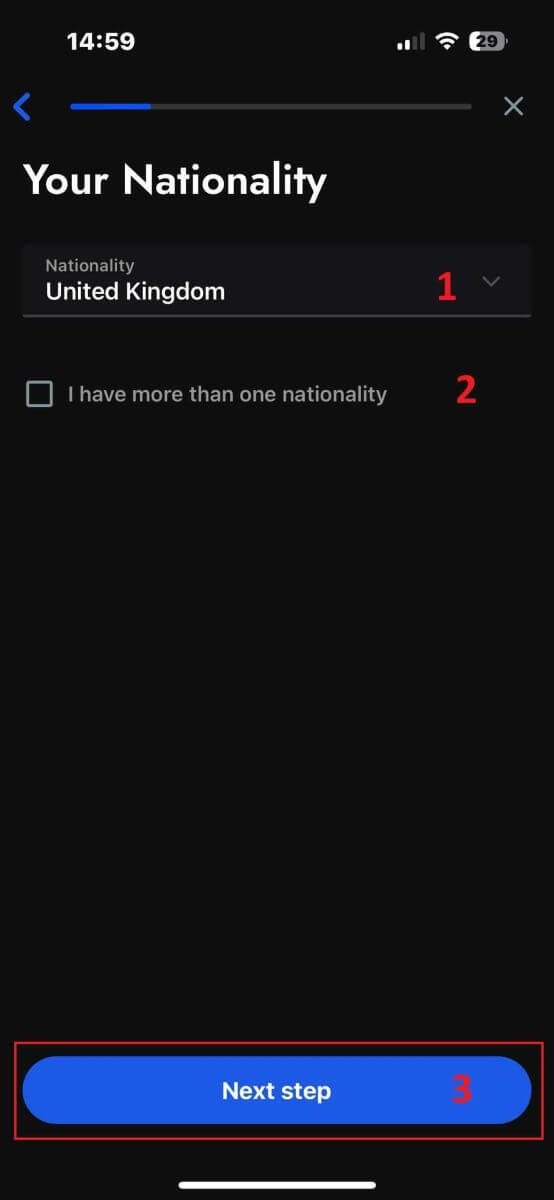
In the following step, indicate your nationality in the "Nationality" section. If you hold multiple nationalities, check the box for "I have more than one nationality" and select the additional nationalities.
Afterward, click "Next step" to advance in the signing-up process.
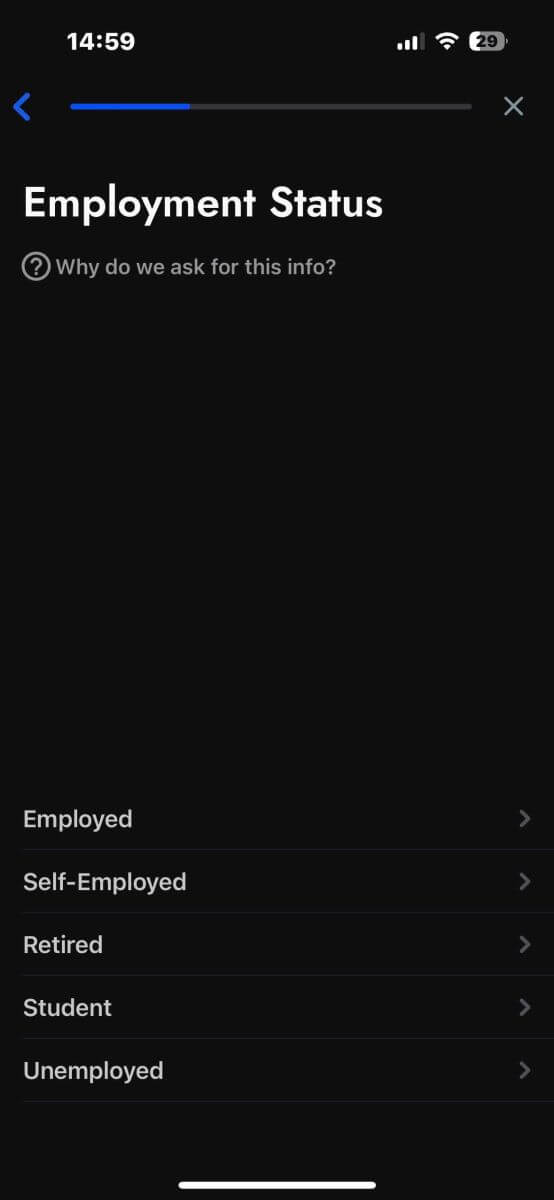
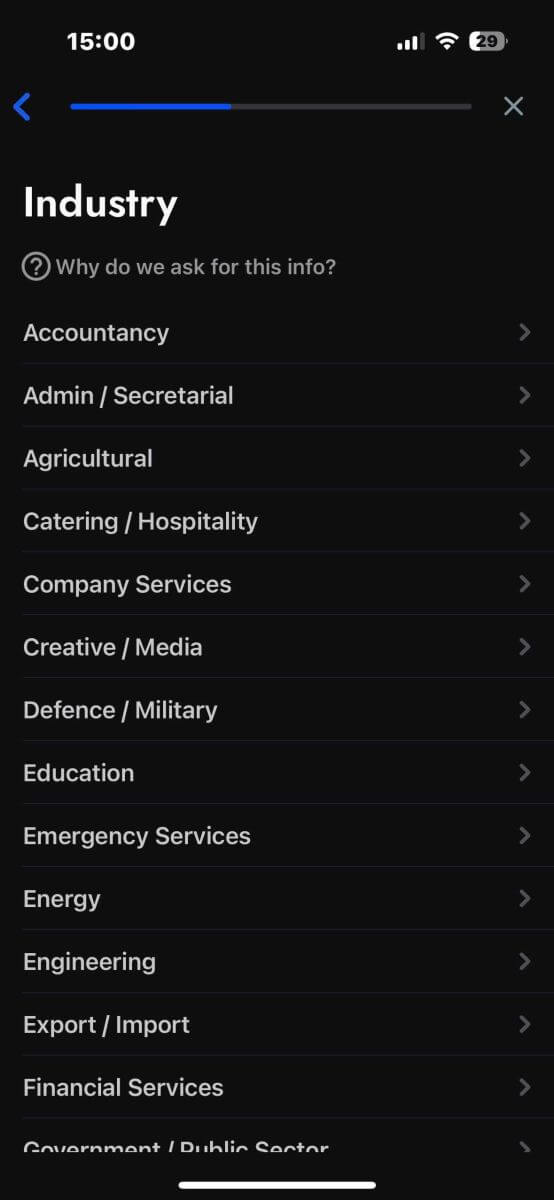
On this page, you need to provide FxPro with details about your Employment Status and Industry.
Once you have completed this, click "Next step" to proceed to the next page.
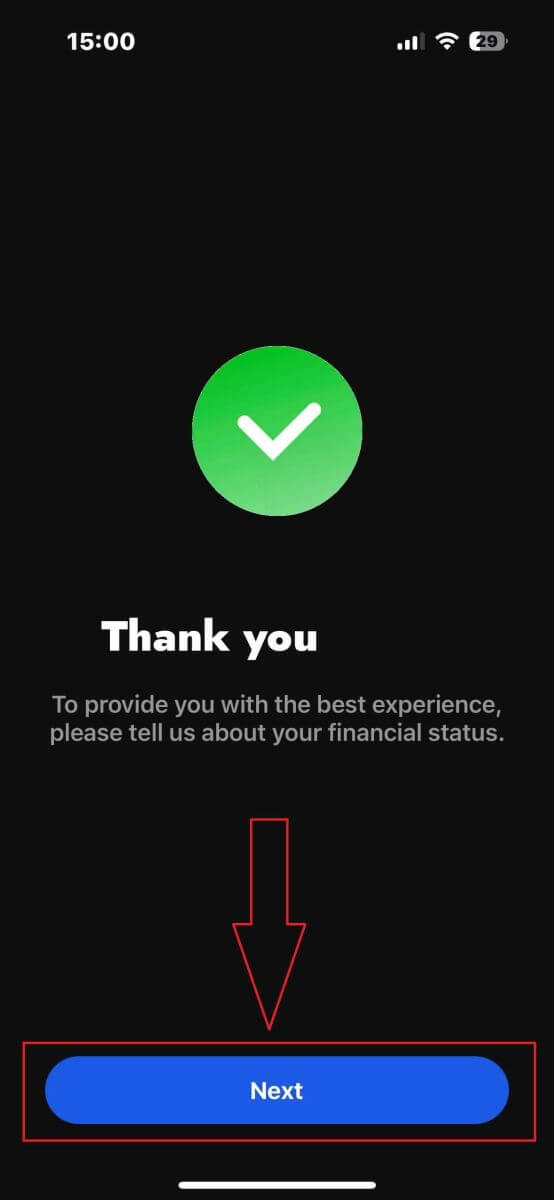
Congratulations on nearly completing the account signing-up process with FxPro on your mobile device!
Next, you will need to provide information about your Financial Status. Please tap "Next" to proceed.
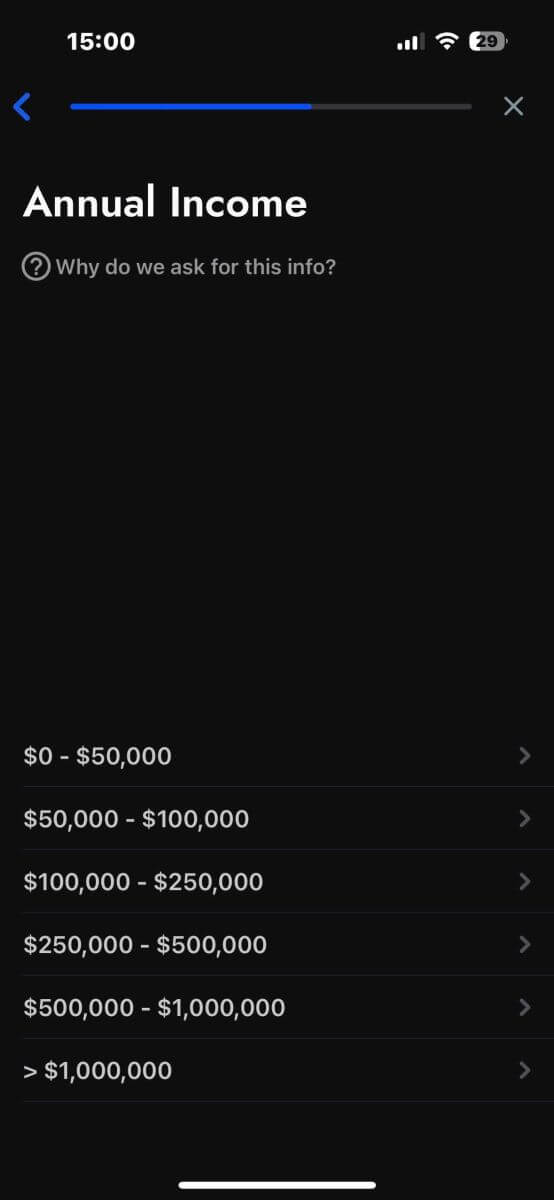
On this page, you’ll need to provide FxPro with details about your Financial Information, including:
-
Annual Income.
-
Estimated Net Worth (excluding your primary residence).
-
Source of Wealth.
-
Expected funding amount for the next 12 months.
Once you’ve filled out the information, click "Next step" to finalize the signing-up process.
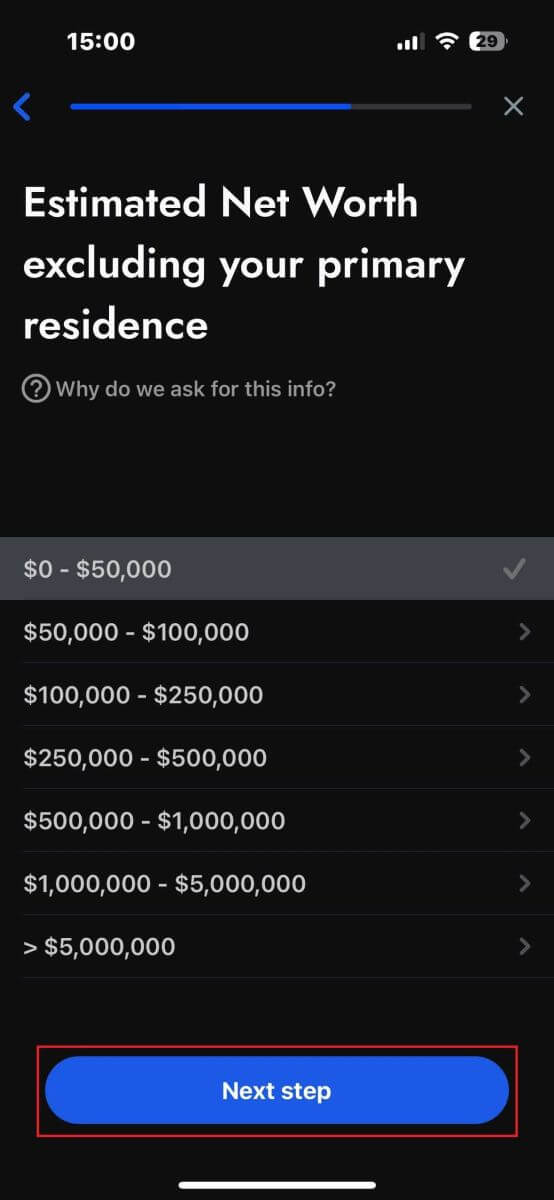
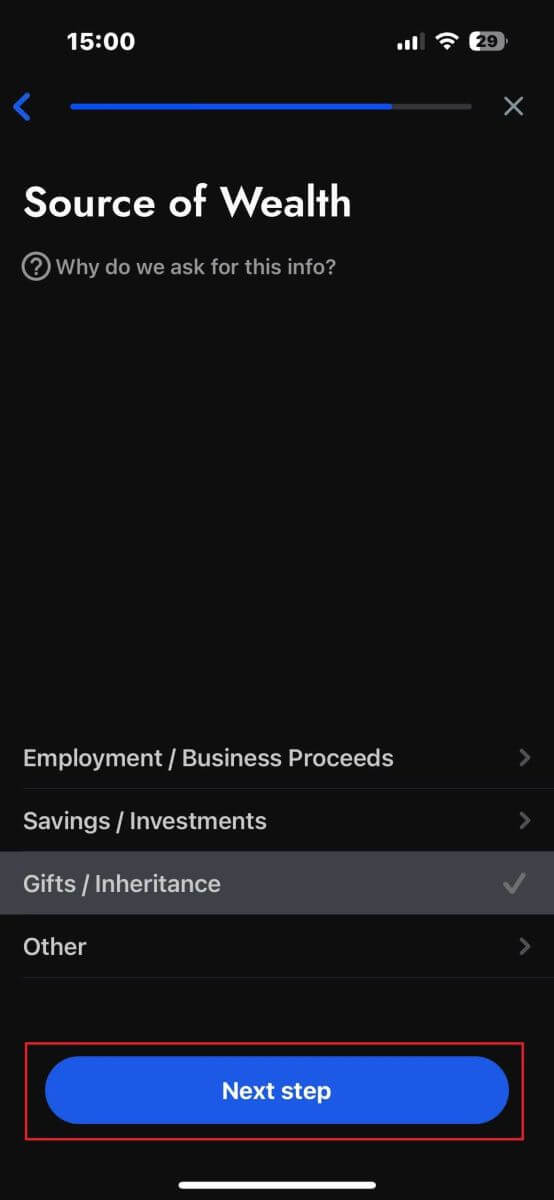
After completing the survey questions in this section, select "Next step" to finish the account signing-up process.
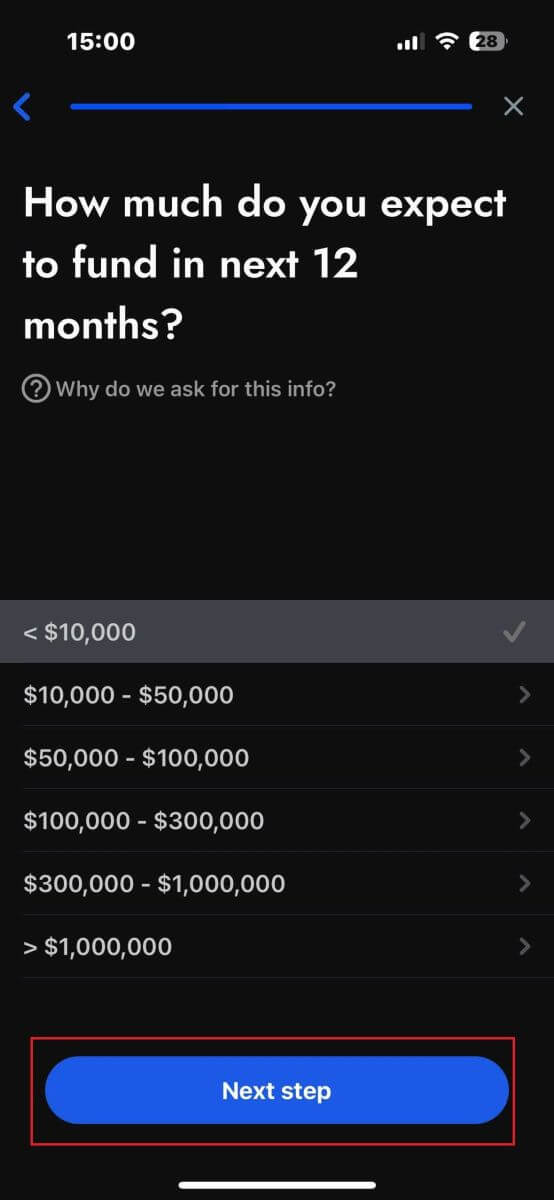
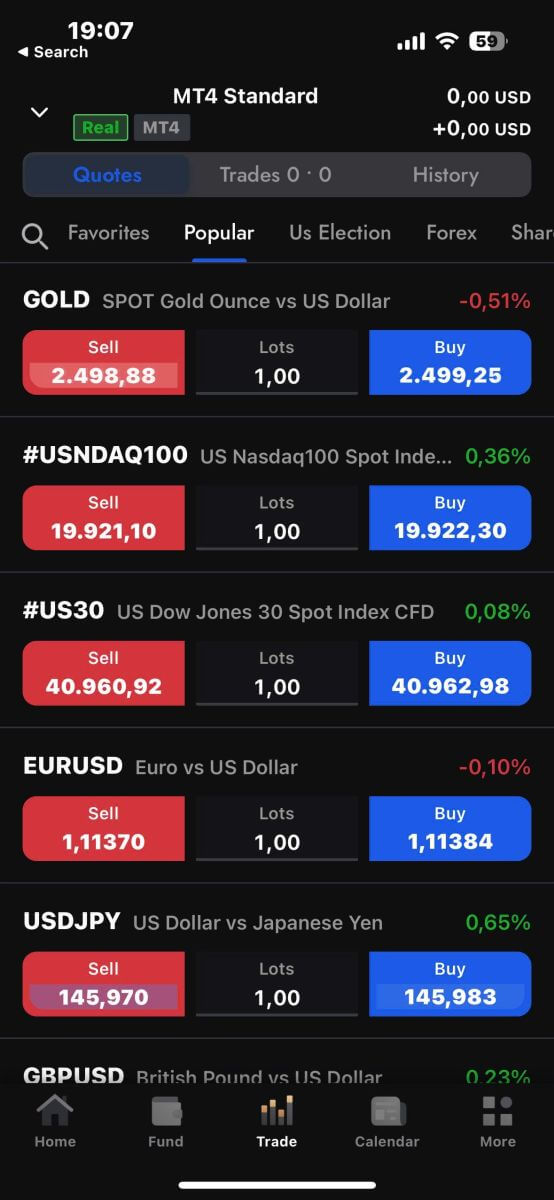
Congratulations on successfully signing up for your account! Trading is now easy with FxPro, allowing you to trade anytime, anywhere with your mobile device. Join us now!
How to create a new trading account
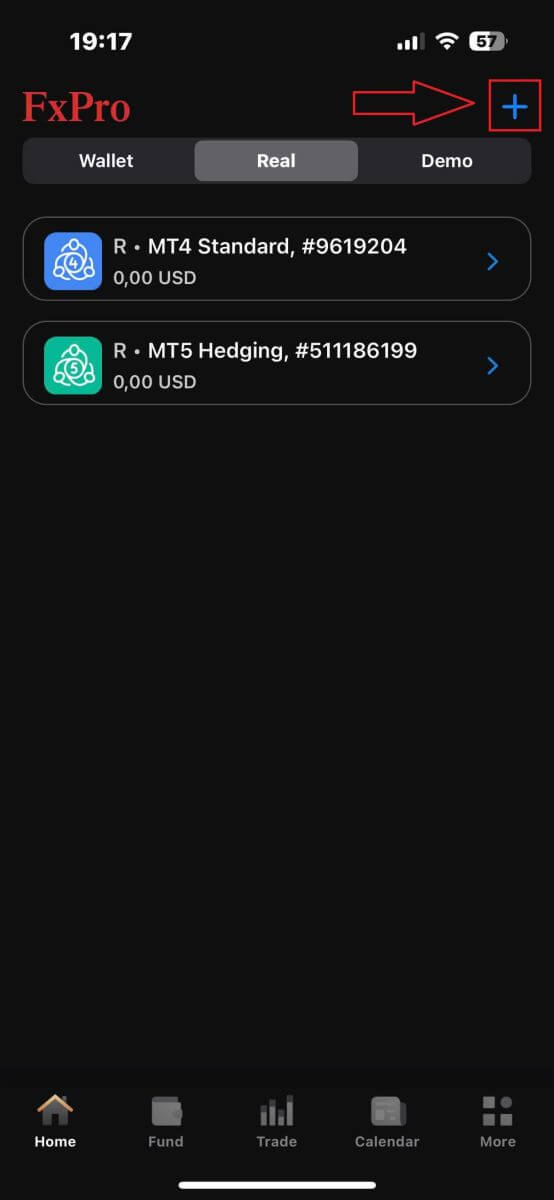
First, to create new trading accounts in the FxPro mobile app, select the "REAL" tab (as shown in the descriptive image) to access your trading account list.
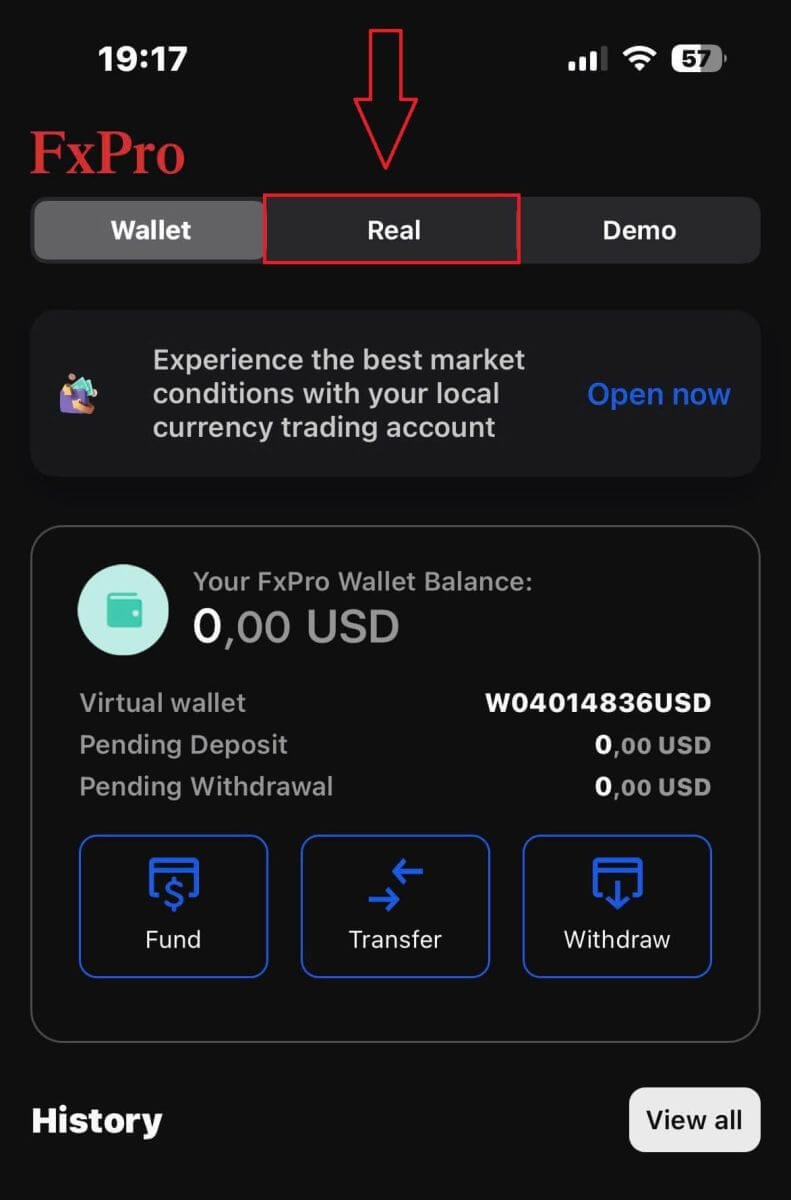
Then, tap the + icon at the top right corner of the screen to create new trading accounts.
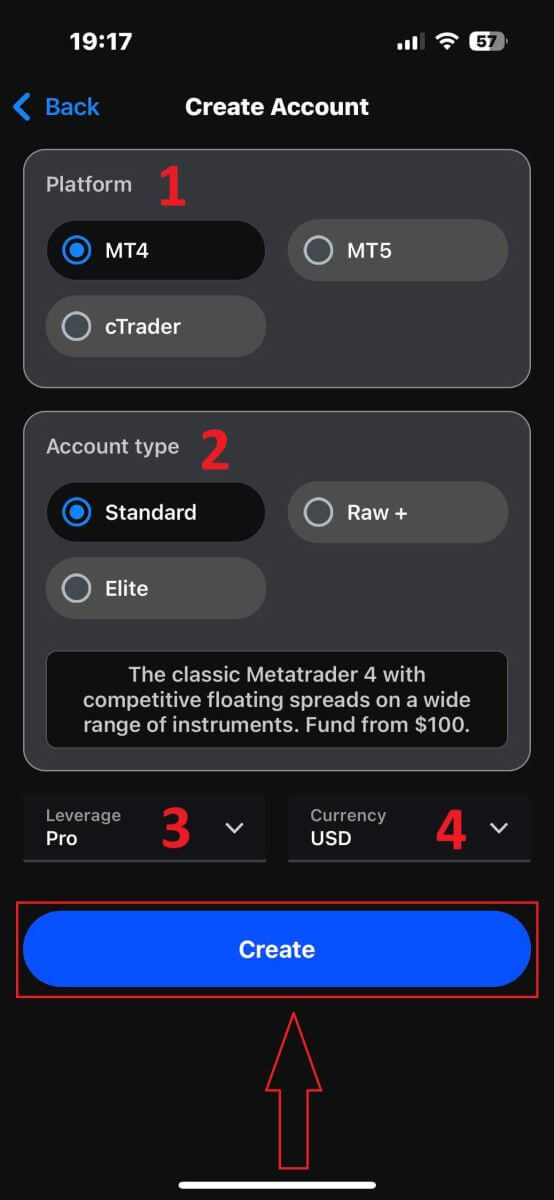
To set up new trading accounts, you’ll need to choose the following details:
-
The Platform (MT4, cTrader, or MT5).
-
The Account Type (which may vary based on the chosen platform).
-
The Leverage.
-
The Account Base Currency.
After filling in the required information, click the "Create" button to complete the process.
Congratulations on completing the process! Creating new trading accounts on the FxPro mobile app is easy, so don’t hesitate—start experiencing it now.
How to Verify Account on FxPro
How to Verify Account on FxPro [Web]
First, log in to the FxPro Dashboard, select the icon at the top right corner of the screen, and then choose "Upload Document" to be directed to the verification page.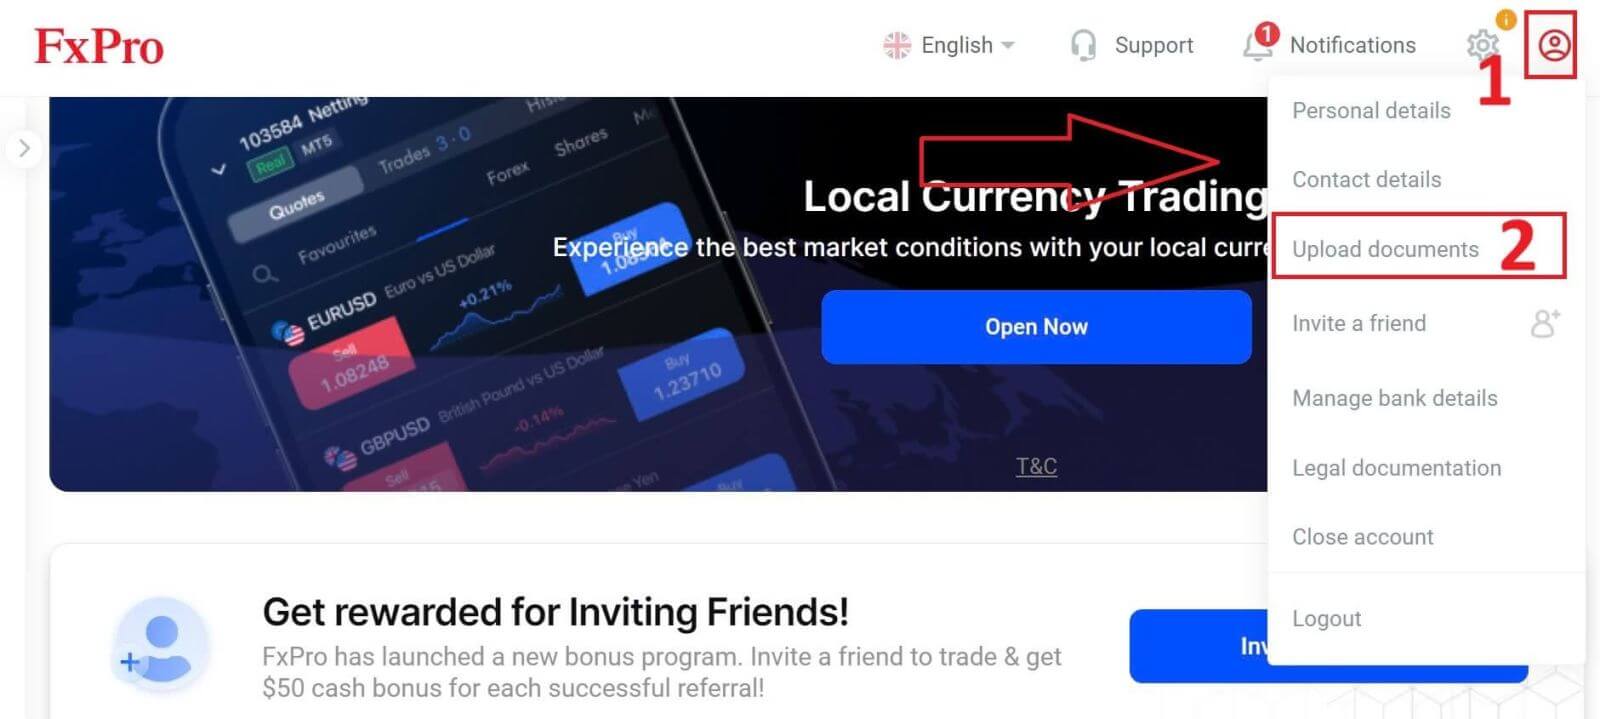
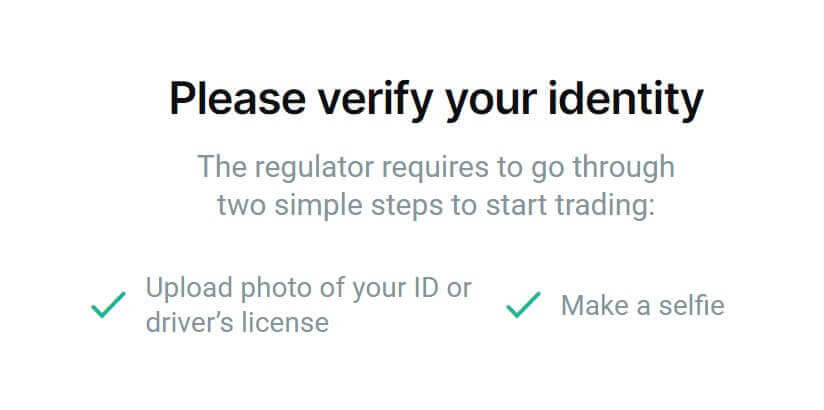
The verification process consists of two steps as follows:
-
Upload the photo of your ID or driver’s license.
-
Make a selfie.
We support two methods for you to complete the verification process (but we recommend using the mobile app due to its convenience and optimization for verification):
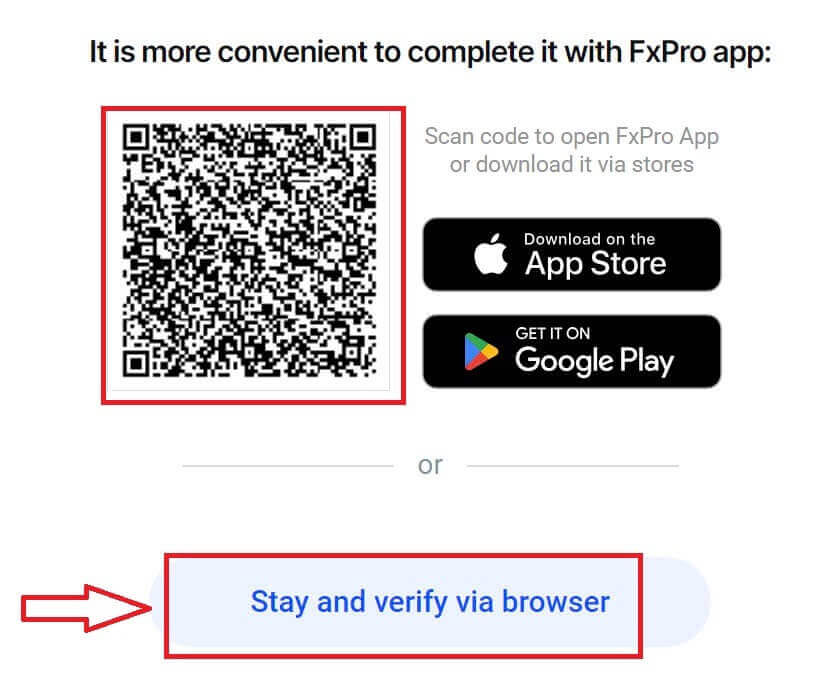
- If you choose to upload documents using a mobile device, open the camera and scan the QR code displayed on the screen to be directed to the verification page, where you can complete the entire process on your mobile device.
-
Alternatively, you can complete the process on your web browser by selecting the "Stay and verify via browser" button.
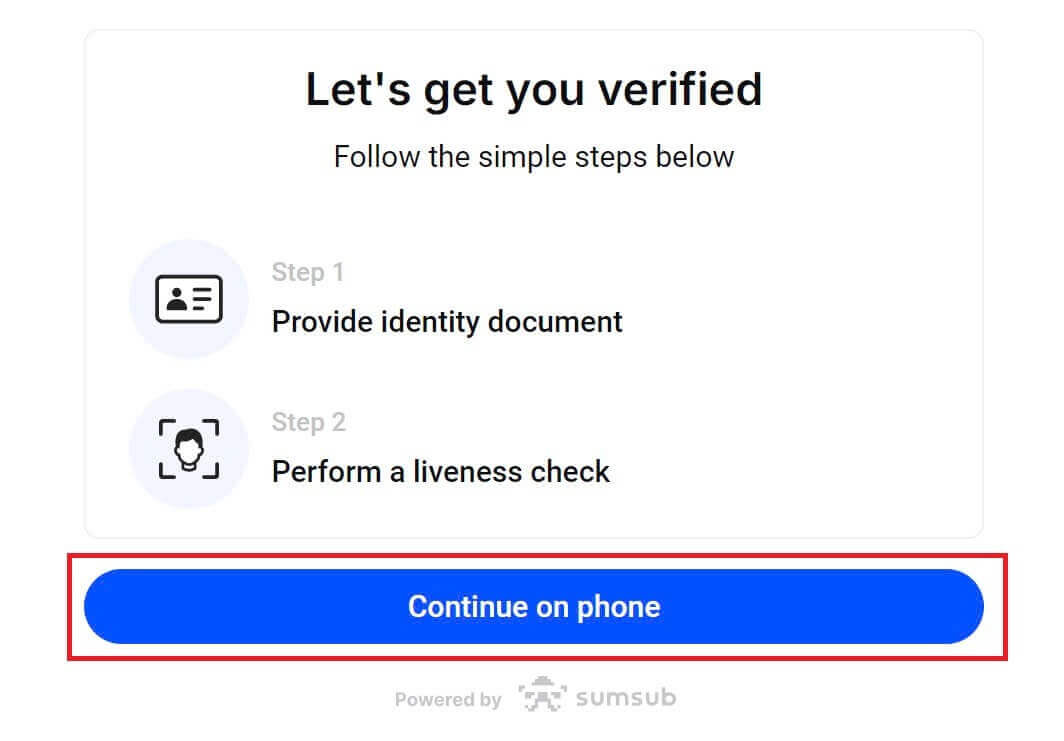
Select the "Continue on phone" button on the next page to proceed with the verification process.
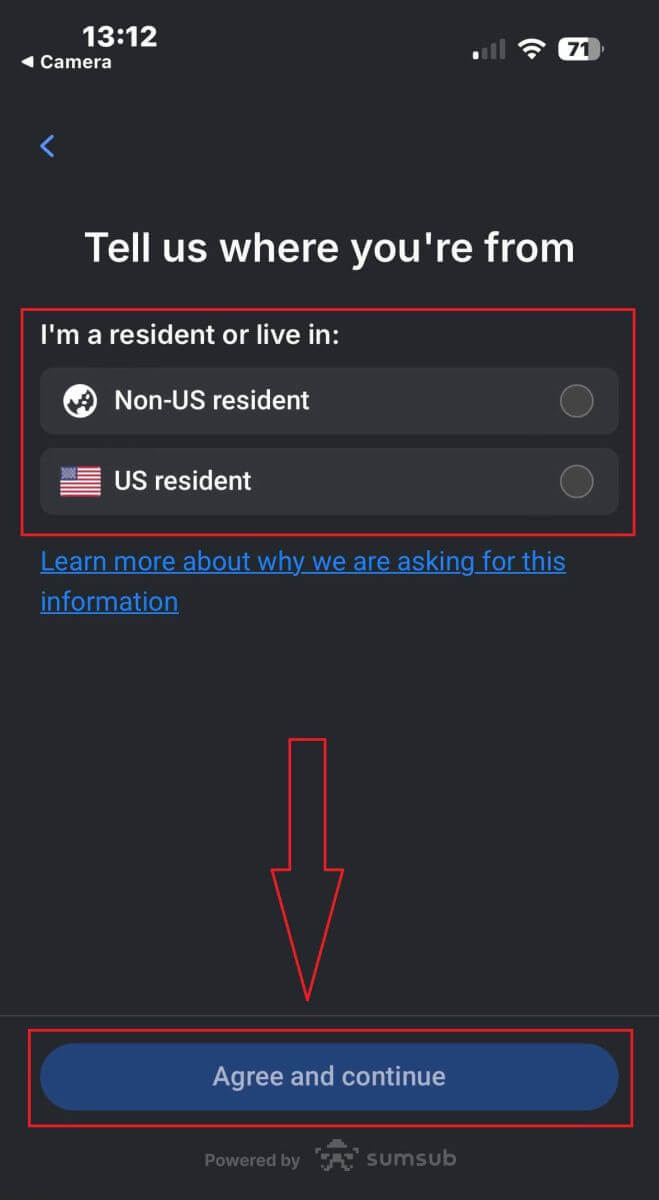
First, let FxPro know whether you are a US resident, as there are special policies for the verification process for US residents. After making your selection, tap "Agree and continue" to move to the next page.
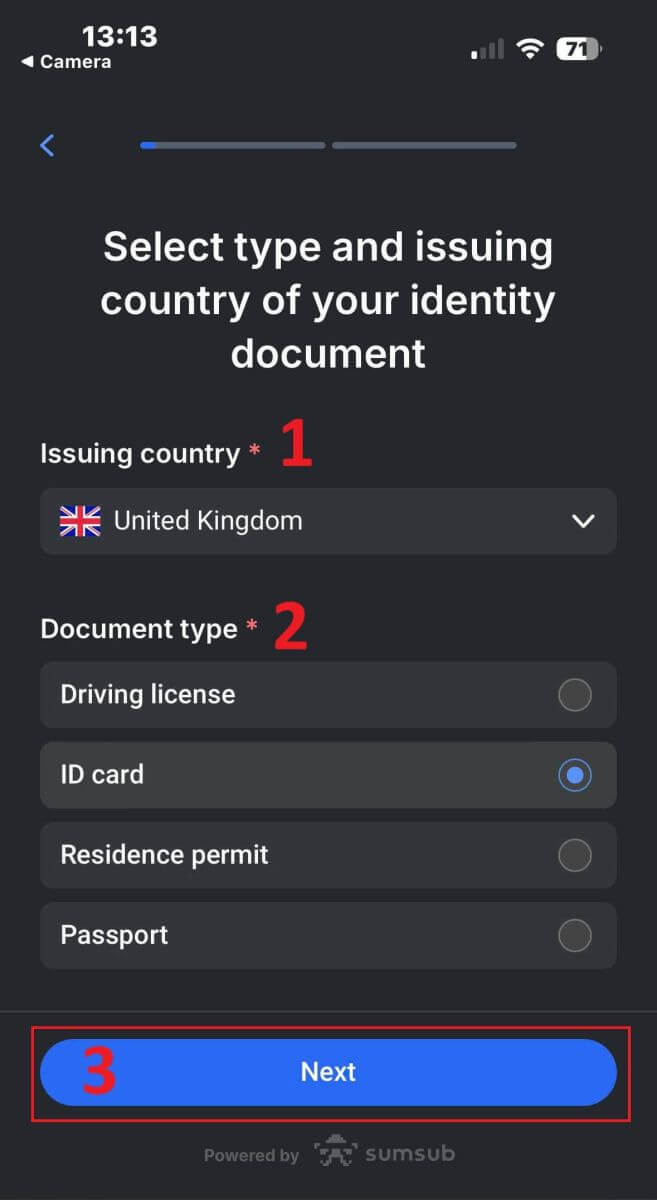
On this page, you will select:
-
The Issuing country.
-
The document type (Driving license/ ID Card/ Residence permit/ Passport).
Once you finish, tap "Next" to proceed.
Now you’ll reach the step where you upload documents using images. You will have two options:
-
Upload a colored photo or file.
-
Take a photo in a well-lit room.
-
Please don’t edit images of your documents.
Please take note carefully, then tap "Continue" to begin uploading.
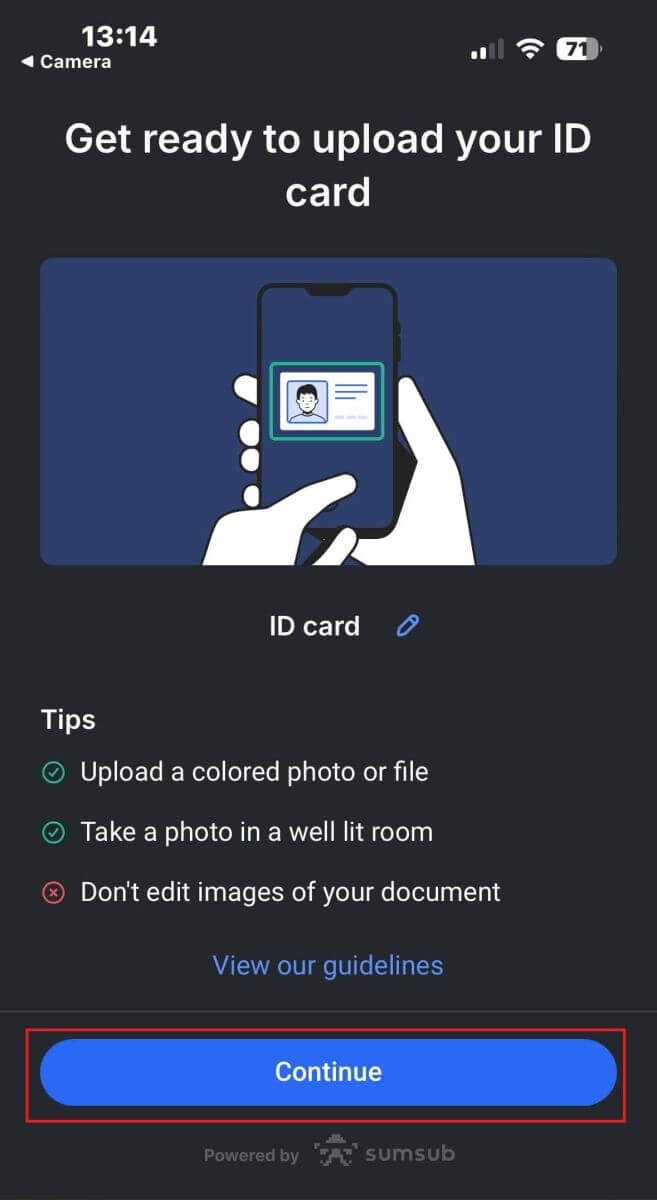
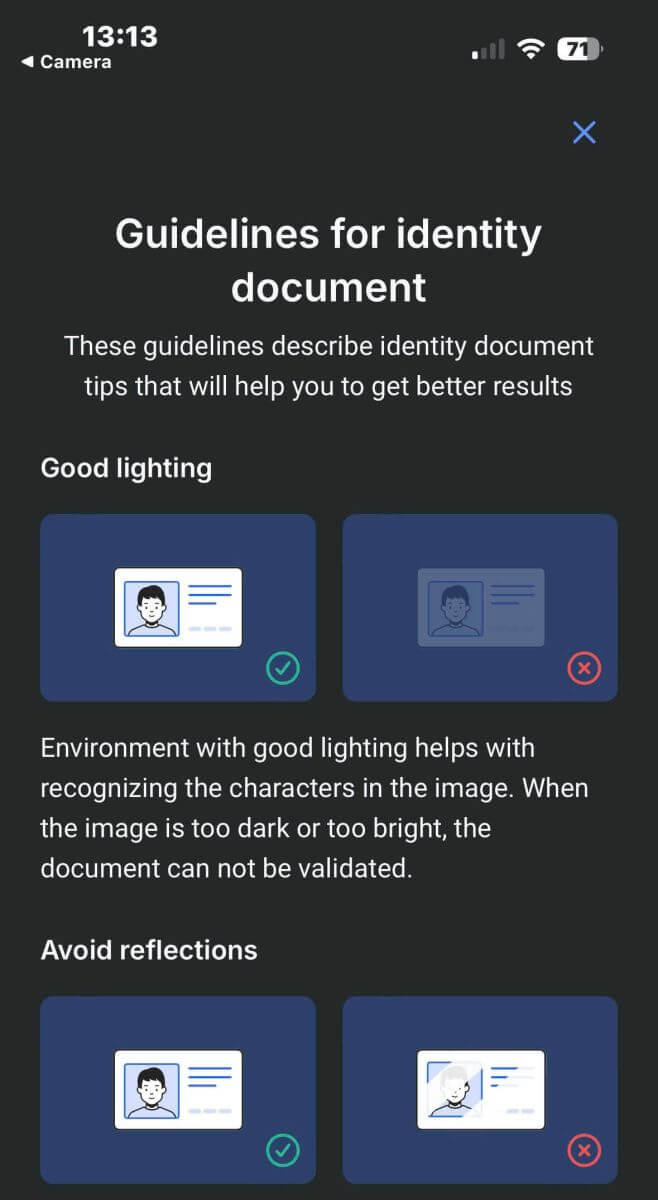
Below are some tips for you to get better results:
Good Lightning
The environment with good lighting helps with recognizing the characters in the image. When the image is too dark or too bright, the document can be not validated.
Avoid Reflections
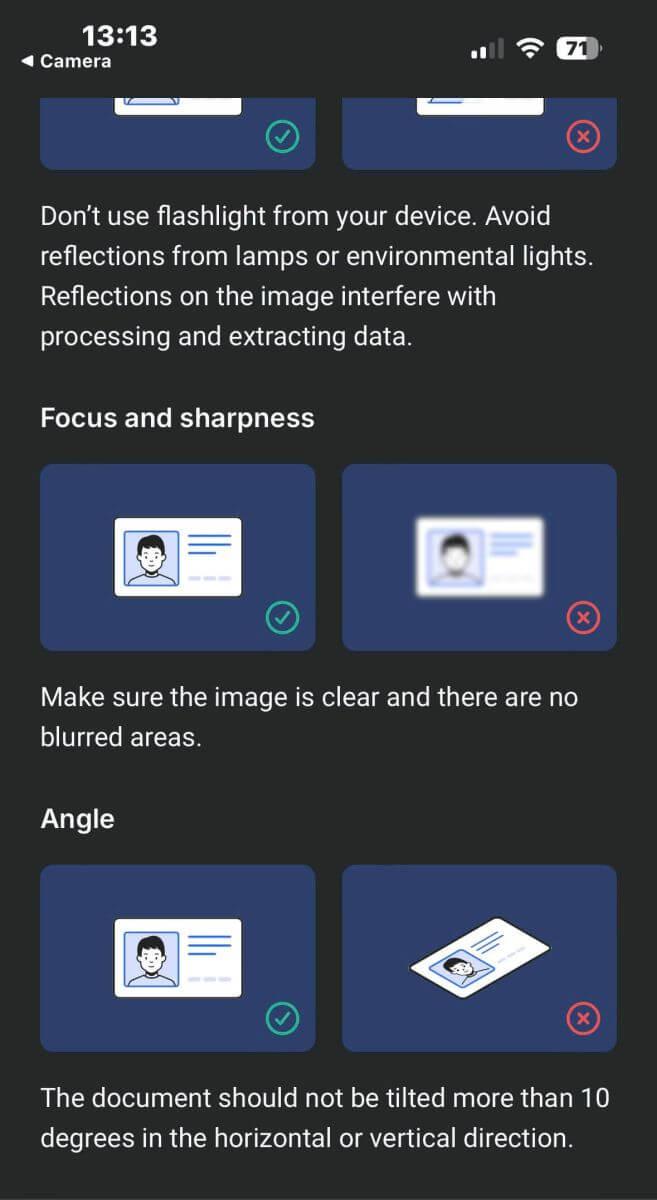
Don’t use the flashlight from your device. Avoid reflections from lamps or environmental lights. Reflections on the image interfere with processing and extracting data.
Focus and Sharpness
Make sure the images are clear and there are no blurred areas.
Angle
The document should not be titled more than 10 degrees in the horizontal or vertical direction.
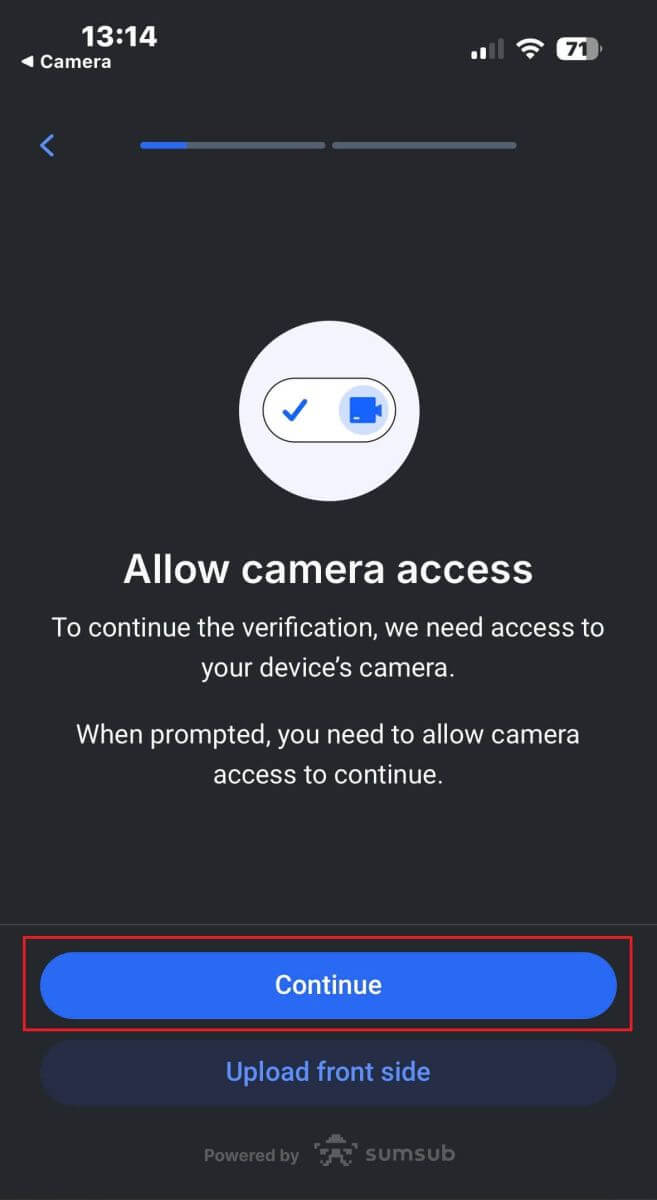
Additionally, please remember to allow the device’s camera access (this is a mandatory requirement).
Then tap "Continue" to begin uploading
You will be offered two ways to upload your document images:
-
Align the document within the frame on the screen, then tap the white circular button at the bottom (labeled as number 1 in the image) to capture and save the image.
-
Select the button with the icon shown in the image (labeled as number 2) to upload a photo from your device’s existing photo library.
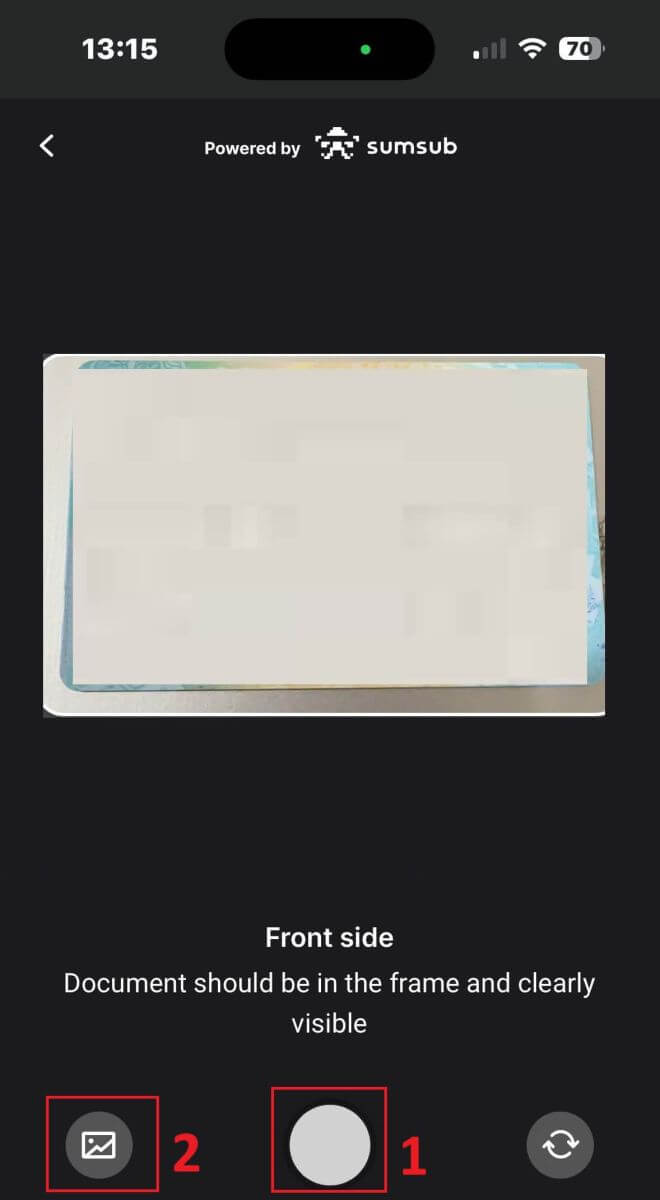
Then, verify that the image is clearly visible and readable. Then, proceed with the same process for the remaining sides of the document (the number of sides required will depend on the type of verification document you initially selected).
If it meets the standards, select "Continue" to proceed to the next step.
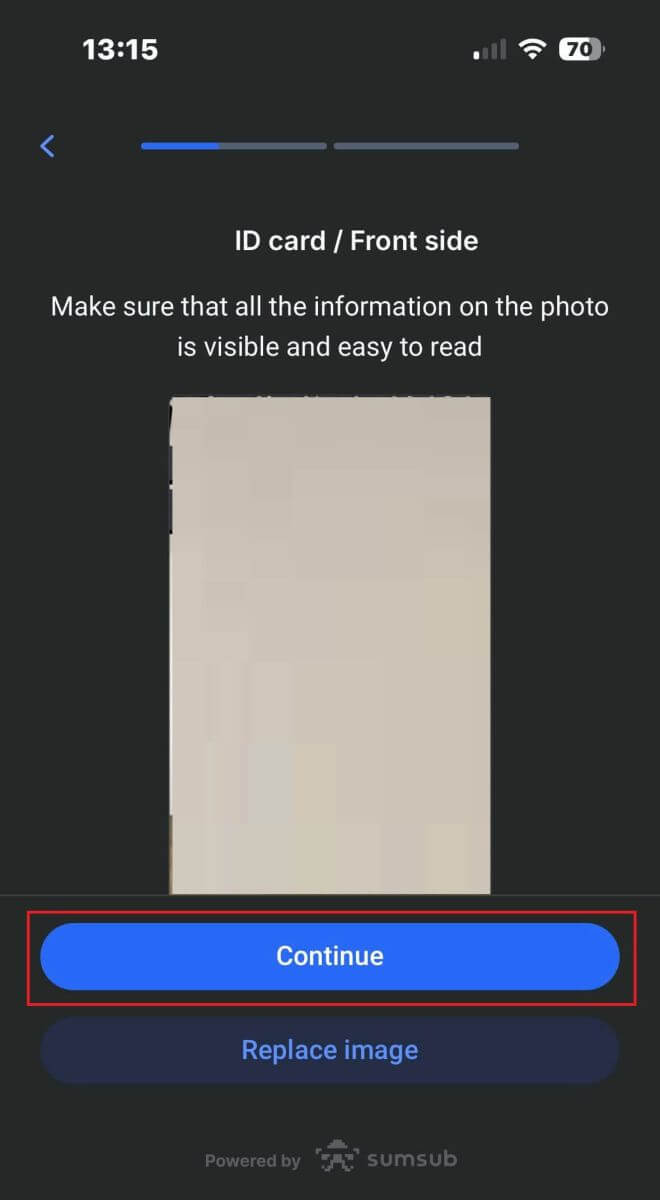
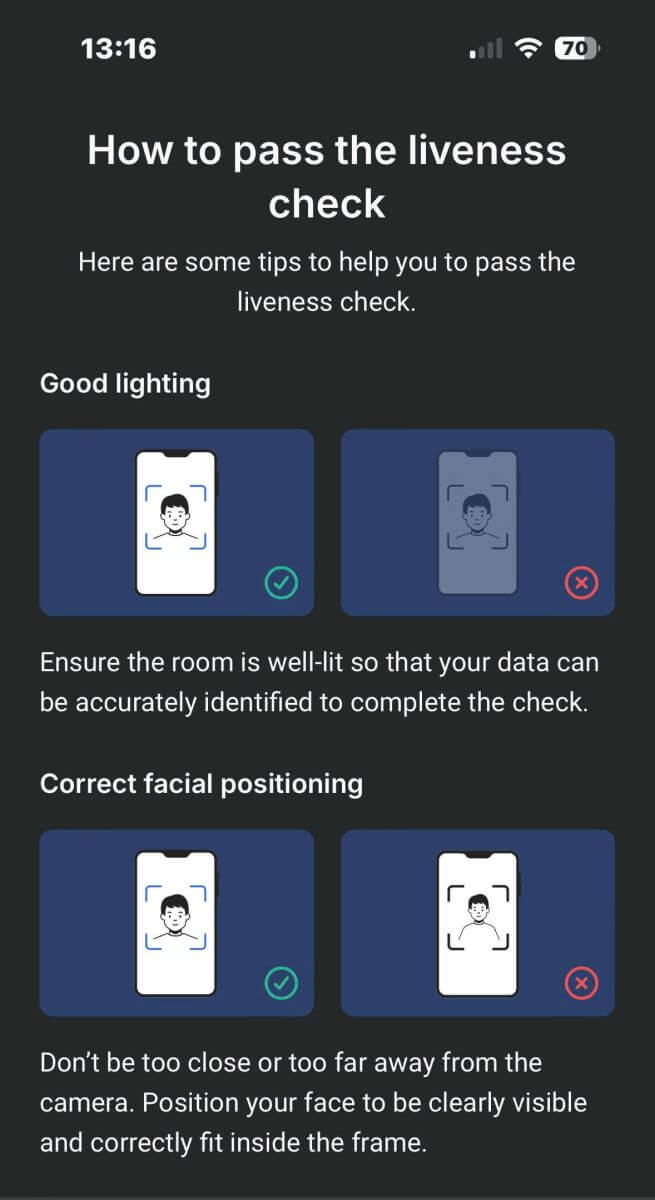
The next step will be the Liveness Check. Below are some tips to help you complete this step smoothly:
Good Lighting
Ensure the room is well-lit so that your data can be accurately identified to complete the check.
Correct facial positioning
Please don’t be too close or too far away from the camera. Position your face to be clearly visible and correctly fit inside the frame.
Natural Look
Don’t change your appearance. Don’t wear masks, glasses, and hats when passing the liveness check.
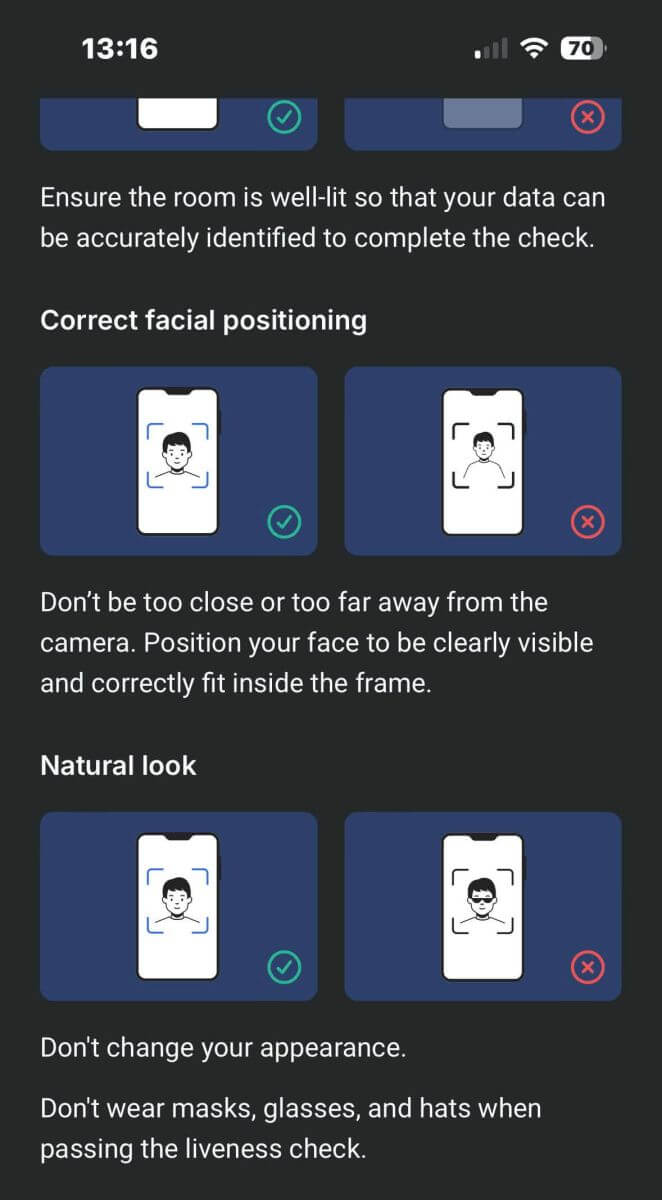
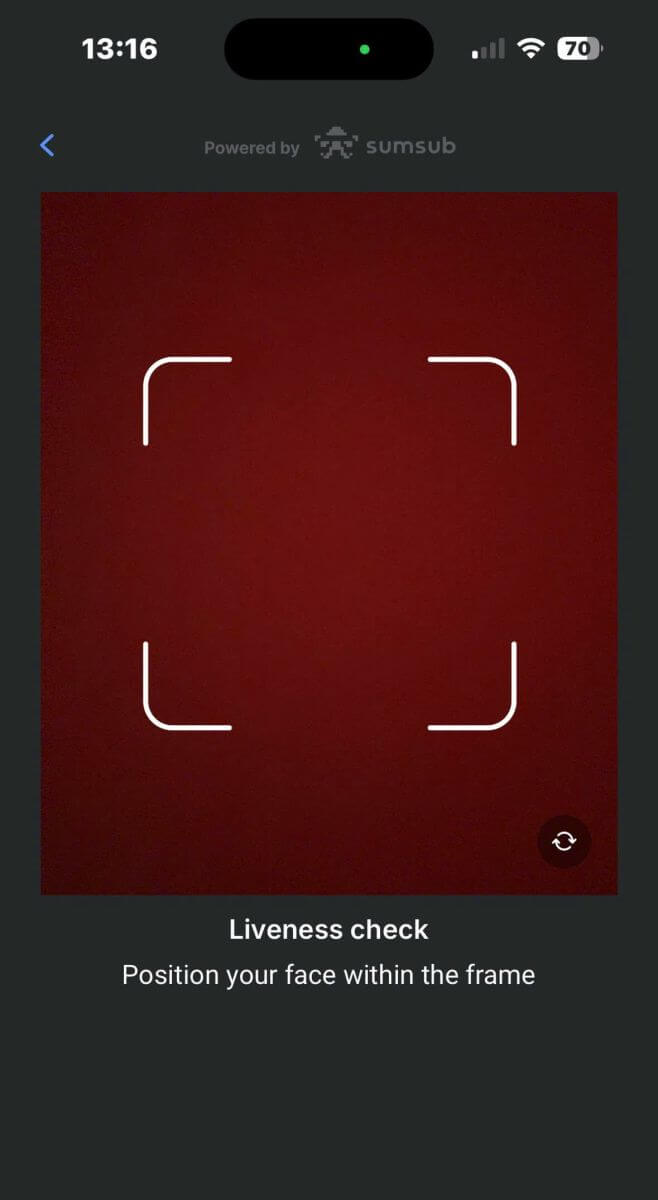
Please position your face within the frame then stay still for 2 - 5 seconds for the system to identify you. If you succeed, you will be automatically directed to the next screen.
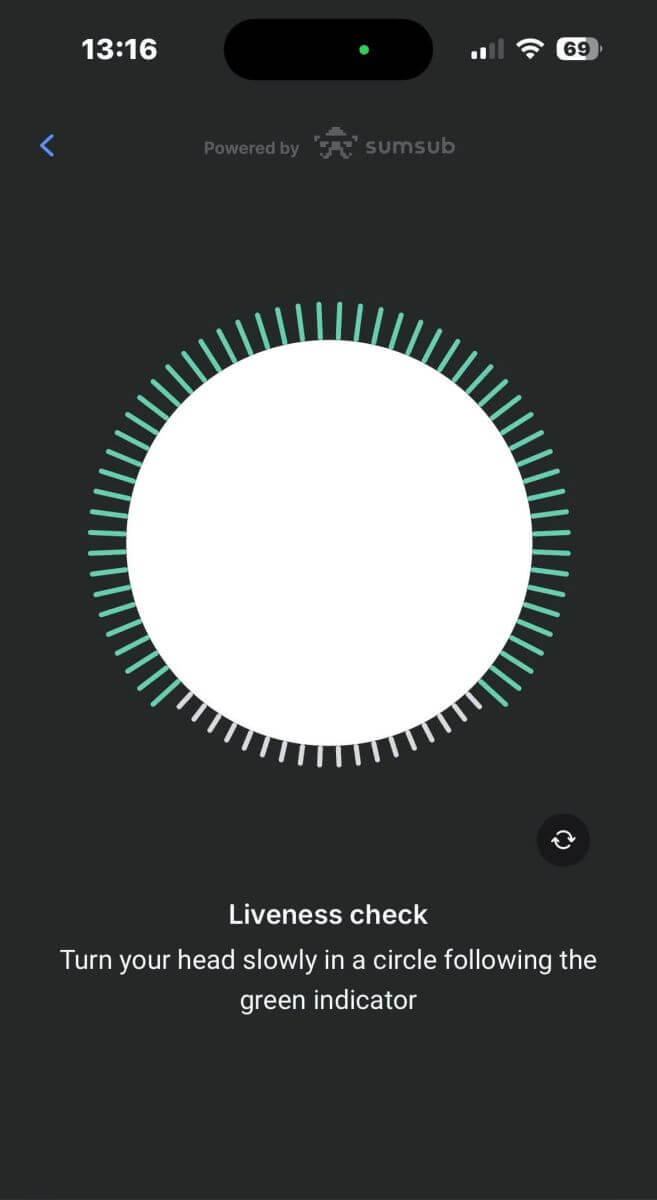
On this page, keep your face within the frame and turn your head slowly in a circle following the green indicator.
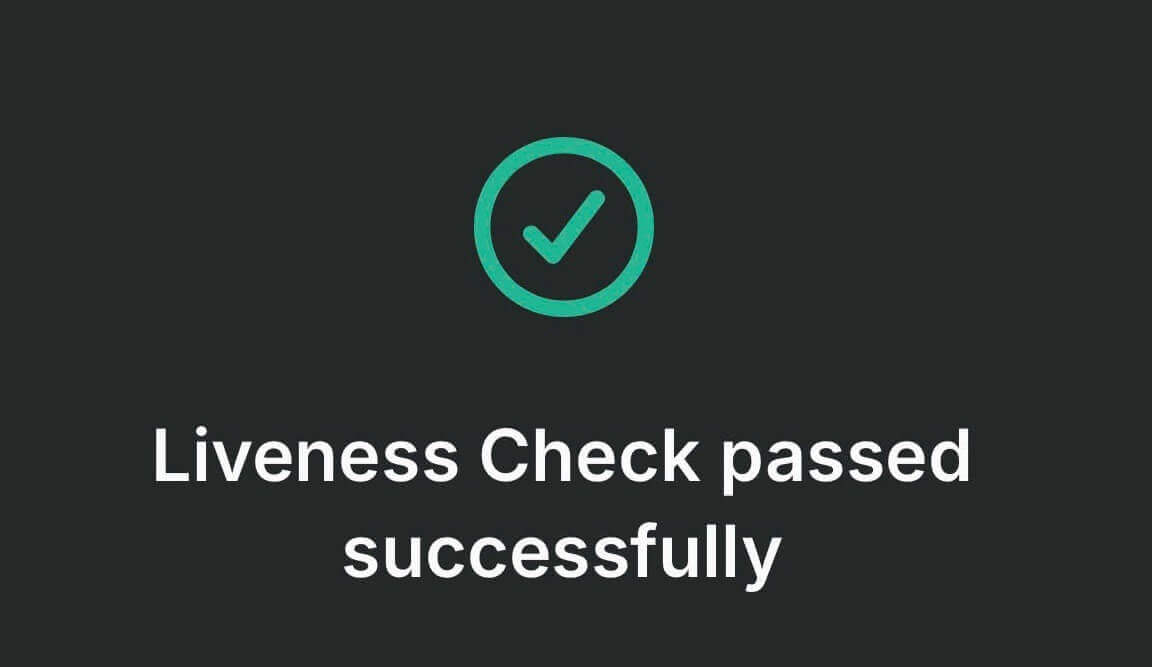
Congratulations on successfully passing the Liveness Check.
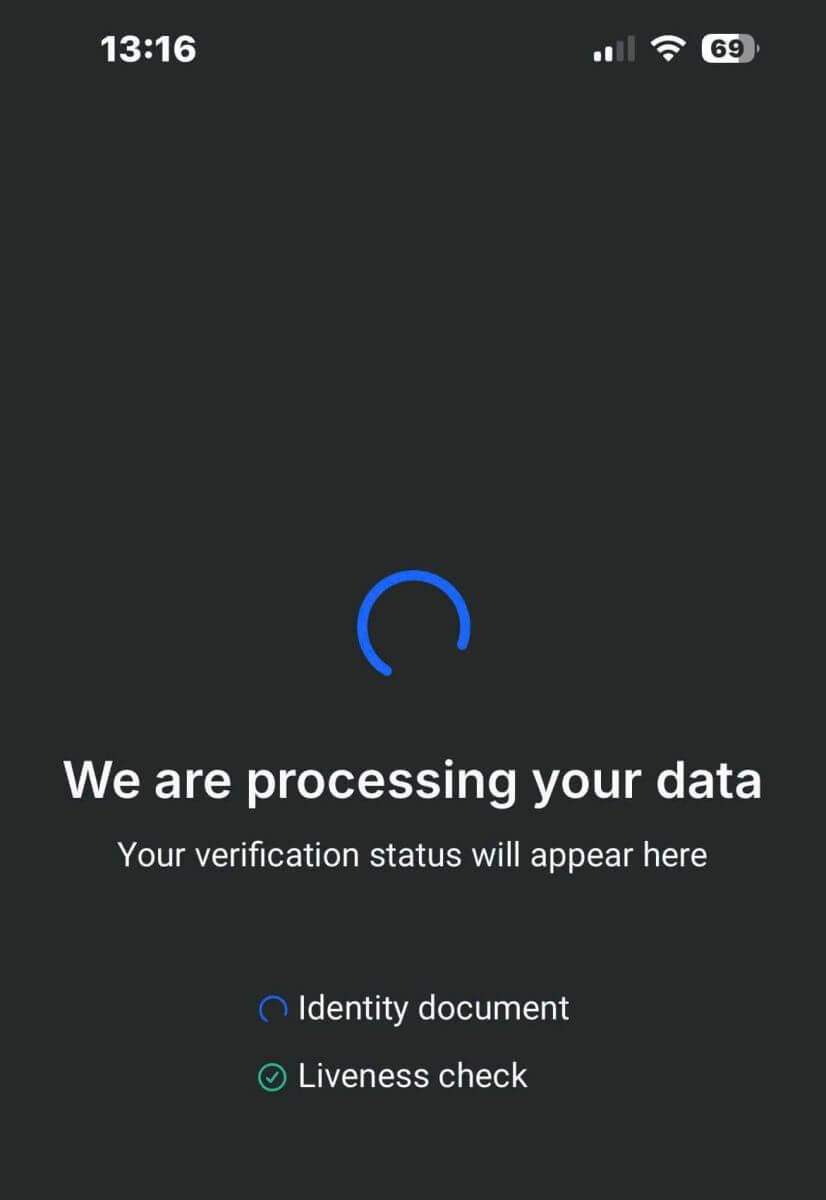
Now please wait from 5 to 10 seconds for the system to process your data and display the results on the screen.
Congratulations on successfully verifying your profile with FxPro. It was simple and quick.

How to Verify Account on FxPro [App]
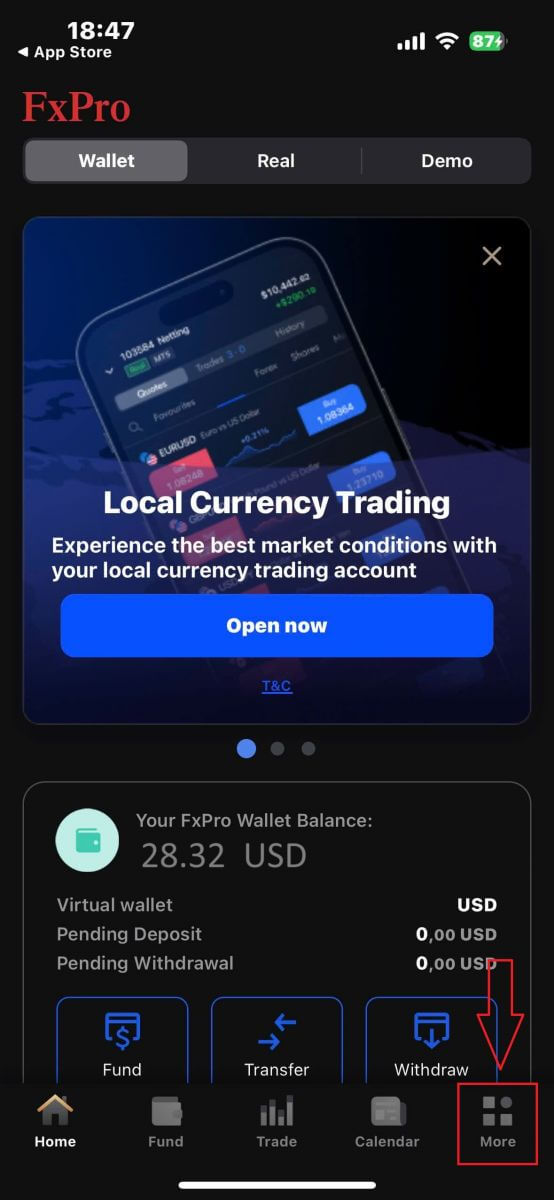
First, open the FxPro Mobile App on your mobile device, then select "More" at the bottom right corner of the screen.
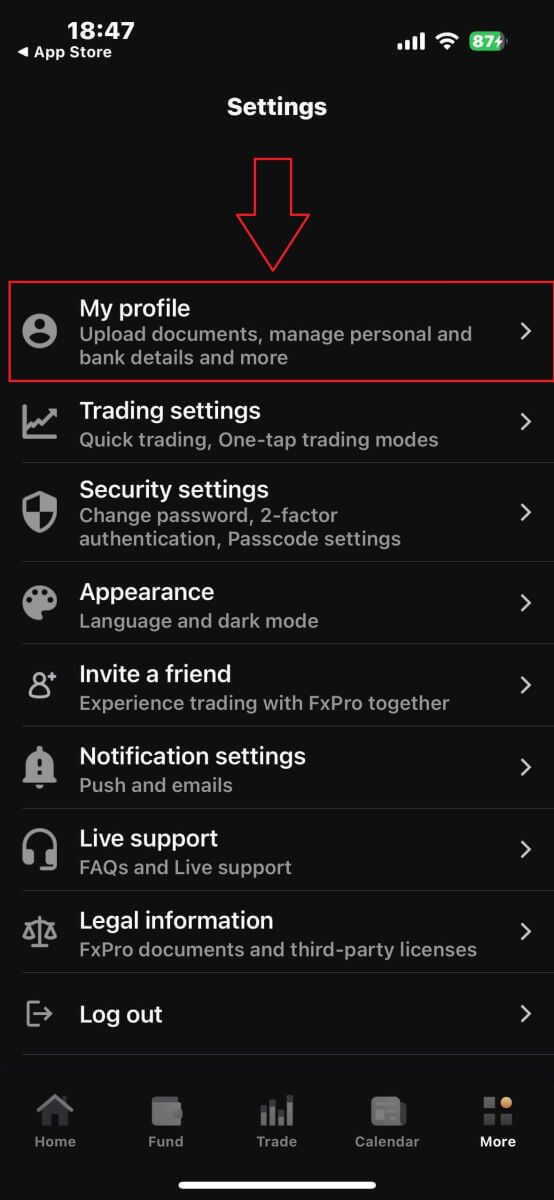
There, continue by selecting "My profile".
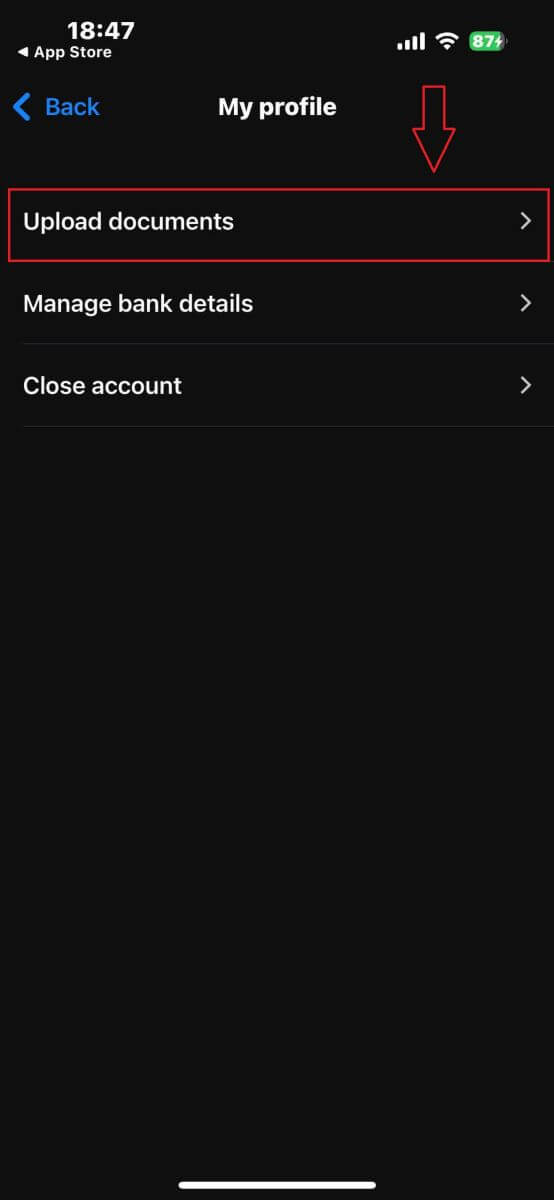
Then, please choose the "Upload documents" section to begin the verification process.
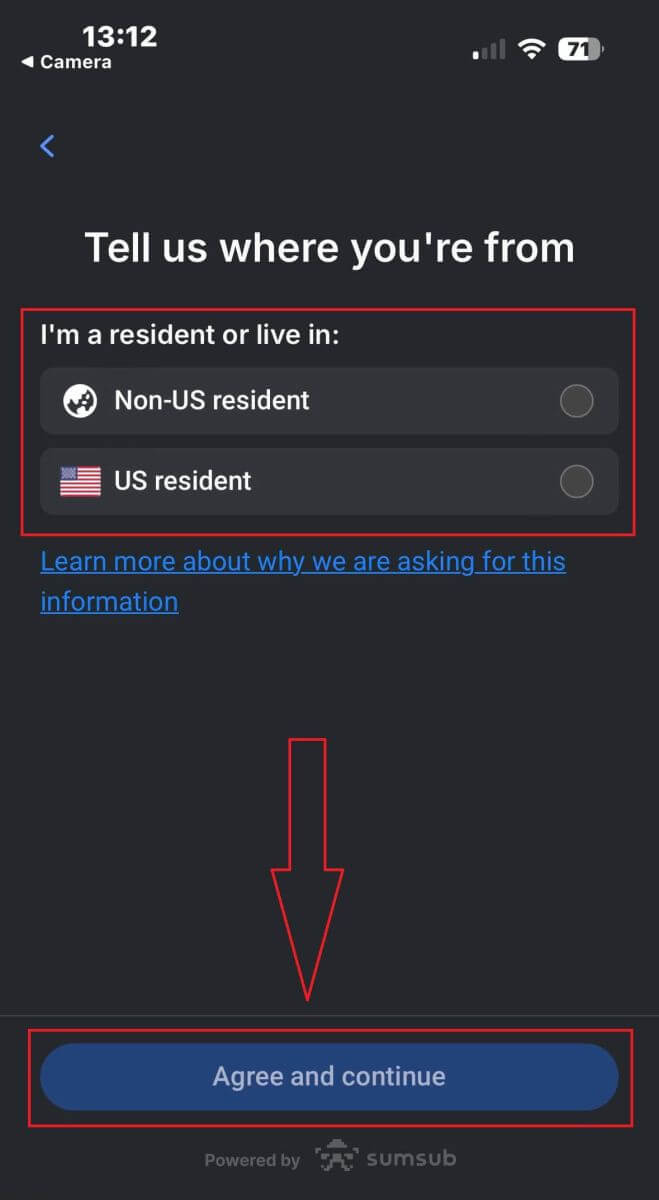
First, inform FxPro whether you are a US resident, as there are specific verification policies for US residents.
Once you make your selection, tap "Agree and continue" to proceed to the next page.
On this page, you will need to select:
-
The issuing country.
-
The document type (Driving license, ID Card, Residence permit, or Passport).
After completing these selections, tap "Next" to continue.
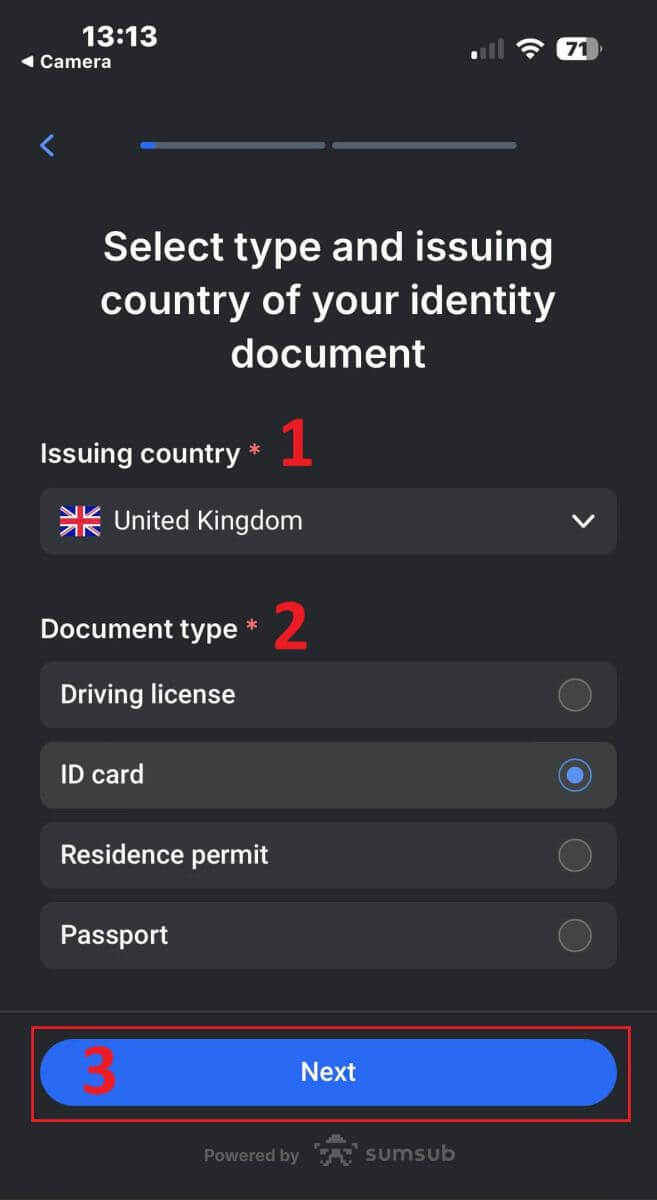
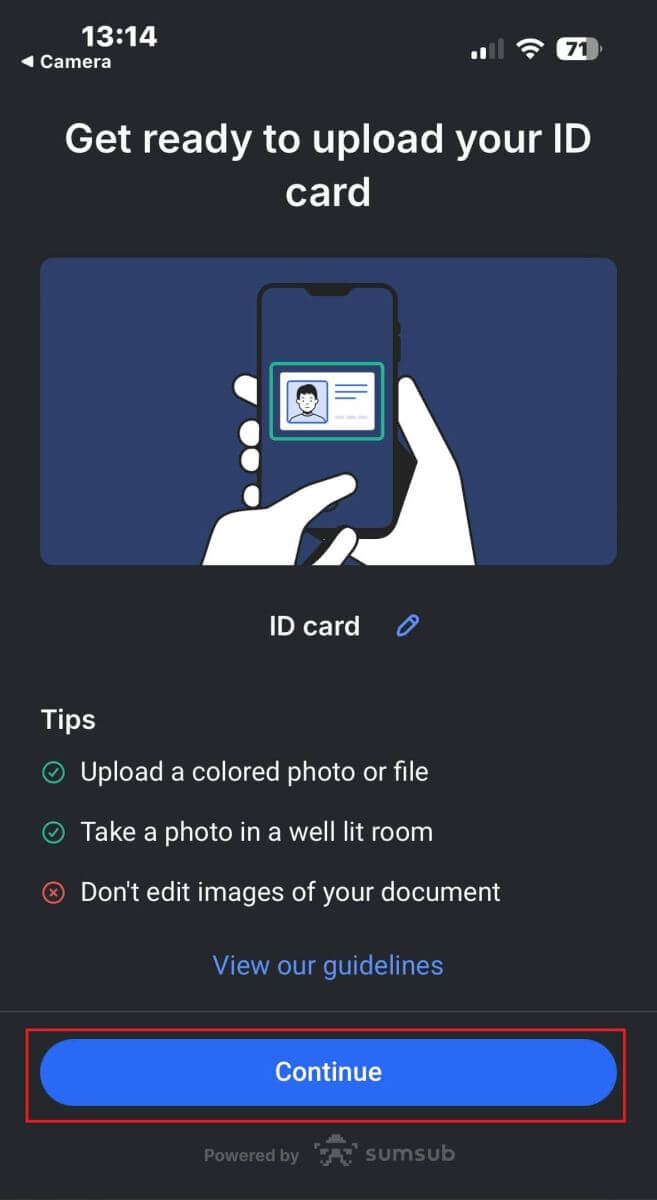
At this step, you will need to upload documents using images. You have two options:
-
Upload a colored photo or file.
-
Take a photo in a well-lit area.
-
Do not edit the images of your documents.
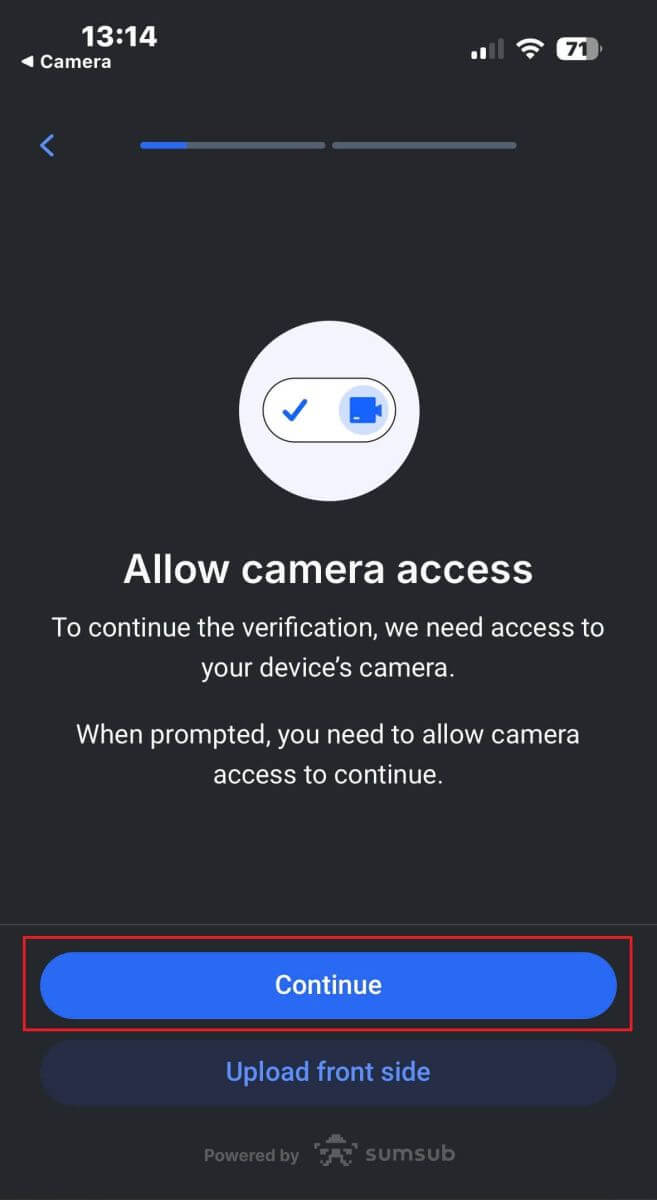
Review these instructions carefully, then tap "Continue" to start the upload process.
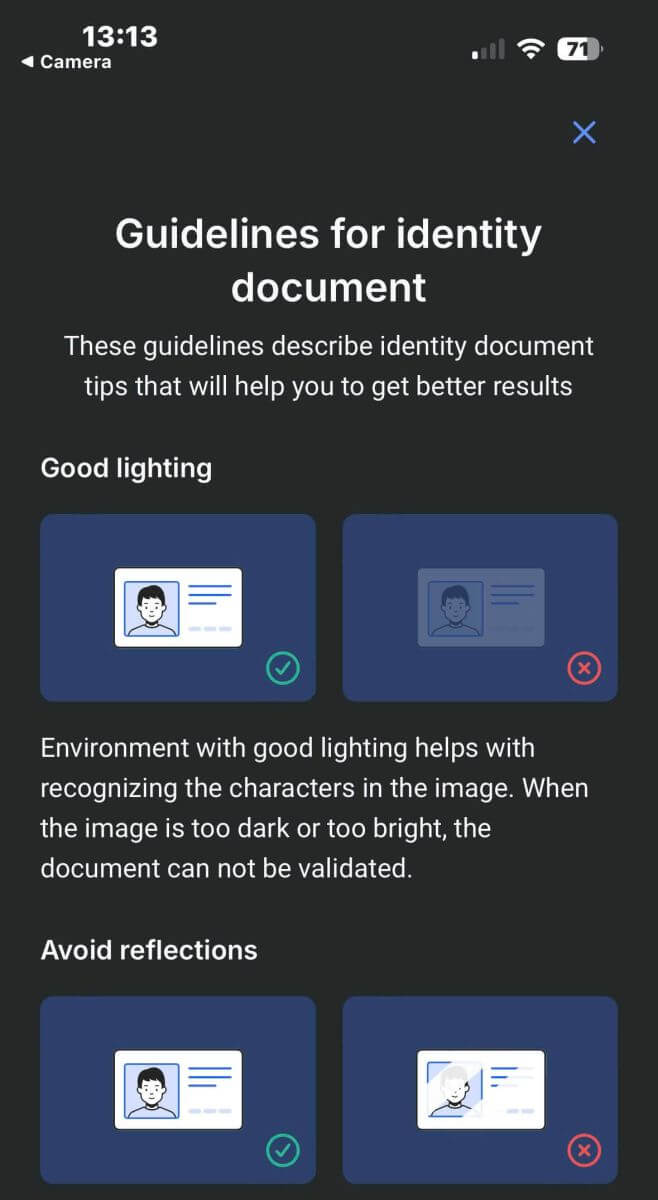
Here are some tips to help you achieve better results:
Good Lightning
The environment with good lighting helps with recognizing the characters in the image. When the image is too dark or too bright, the document can be not validated.
Avoid Reflections
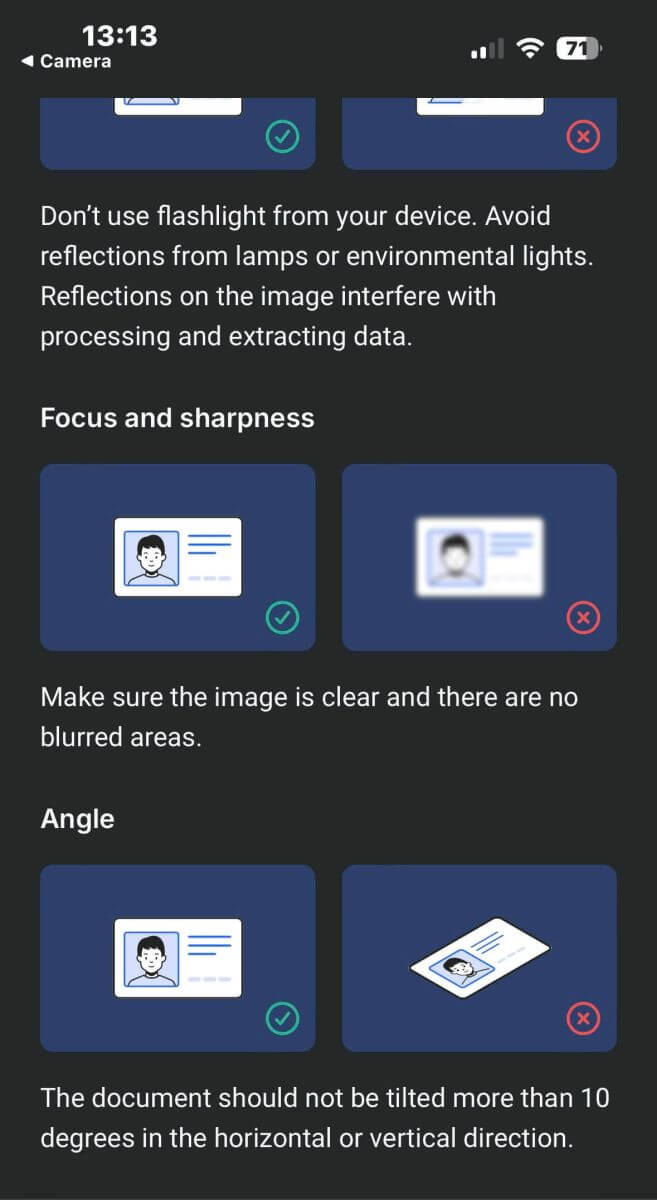
Don’t use the flashlight from your device. Avoid reflections from lamps or environmental lights. Reflections on the image interfere with processing and extracting data.
Focus and Sharpness
Make sure the images are clear and there are no blurred areas.
Angle
The document should not be titled more than 10 degrees in the horizontal or vertical direction.
Also, ensure that you allow the device’s camera access, as this is a mandatory requirement.
Afterward, click "Continue" to start the upload process.
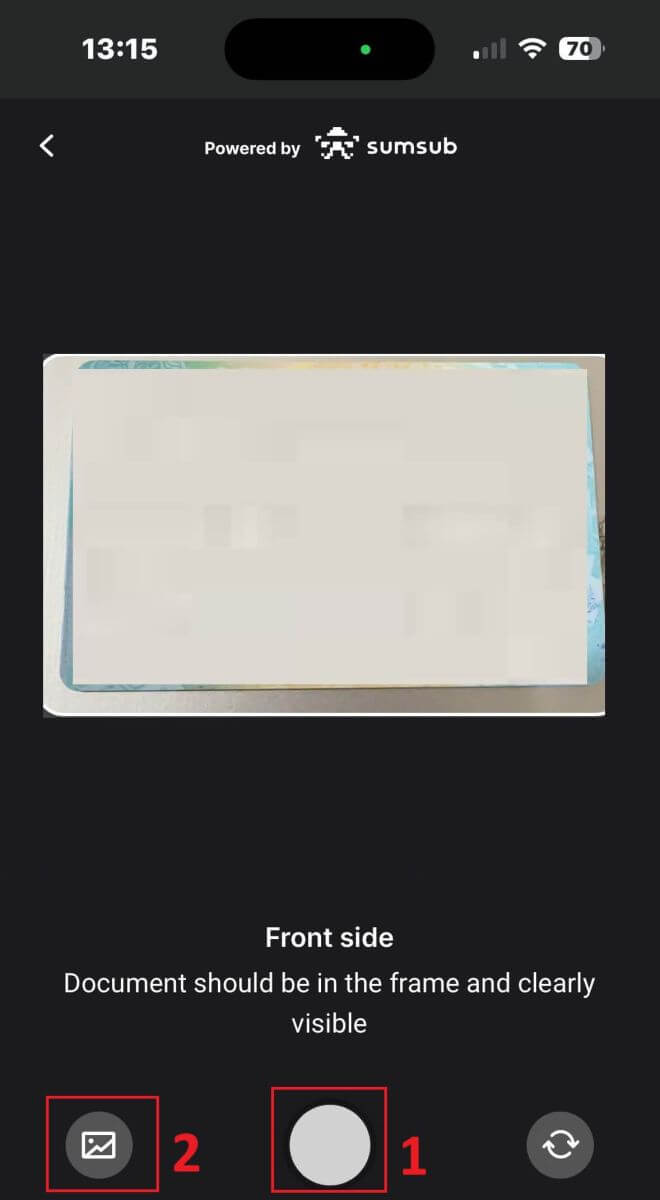
You will have two options for uploading your document images:
-
Align the document within the frame on the screen and then tap the white circular button at the bottom (labeled as number 1 in the image) to capture and save the image.
-
Choose the button with the icon shown in the image (labeled as number 2) to upload a photo from your device’s existing photo library.
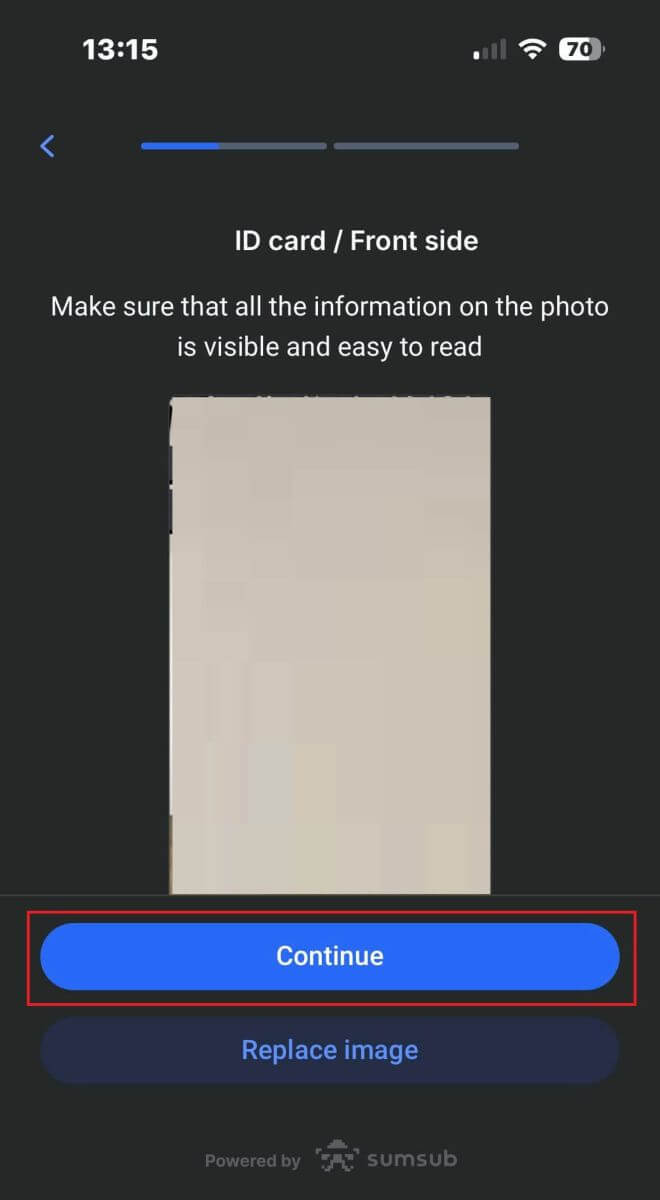
Next, ensure that the image is clear and readable. Repeat the process for any remaining sides of the document, depending on the type of verification document you selected.
If the images meet the standards, tap "Continue" to proceed to the next step.
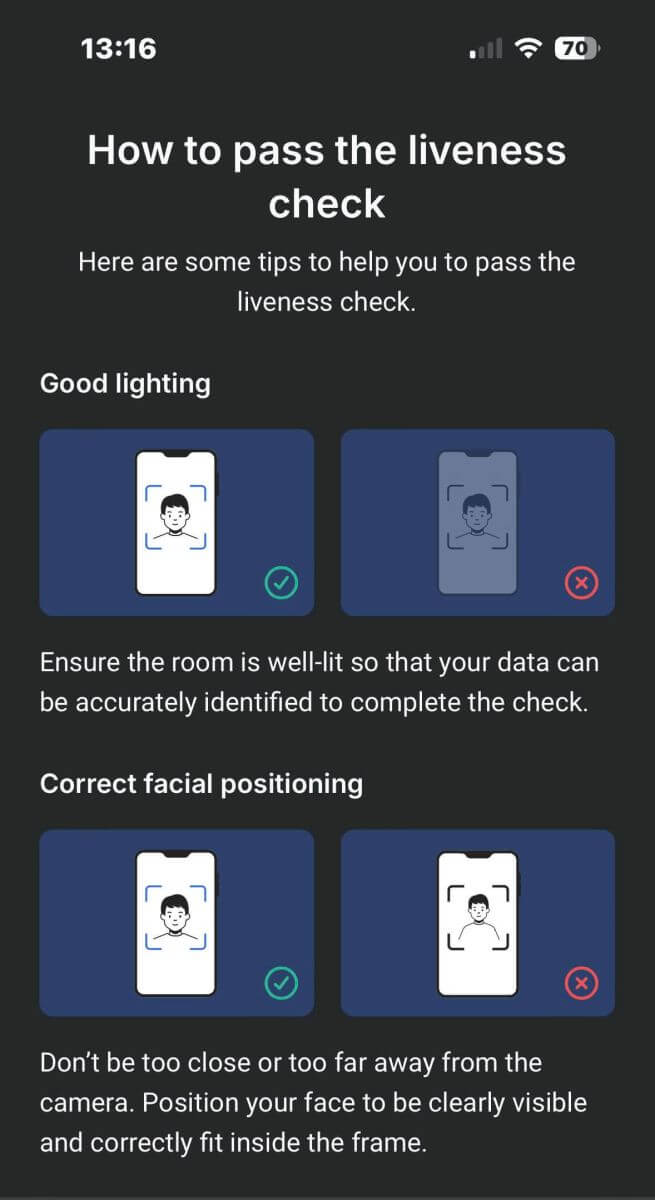
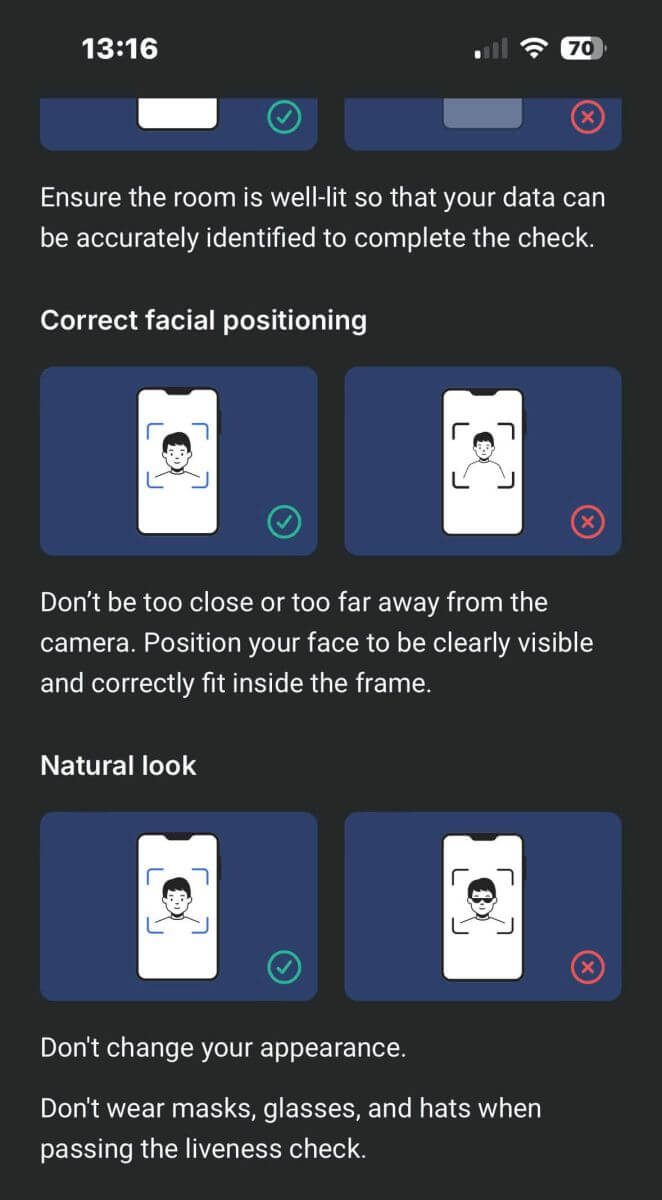
The next step will be the Liveness Check. Below are some tips to help you complete this step smoothly:
Good Lighting
Ensure the room is well-lit so that your data can be accurately identified to complete the check.
Correct facial positioning
Please don’t be too close or too far away from the camera. Position your face to be clearly visible and correctly fit inside the frame.
Natural Look
Don’t change your appearance. Don’t wear masks, glasses, and hats when passing the liveness check.
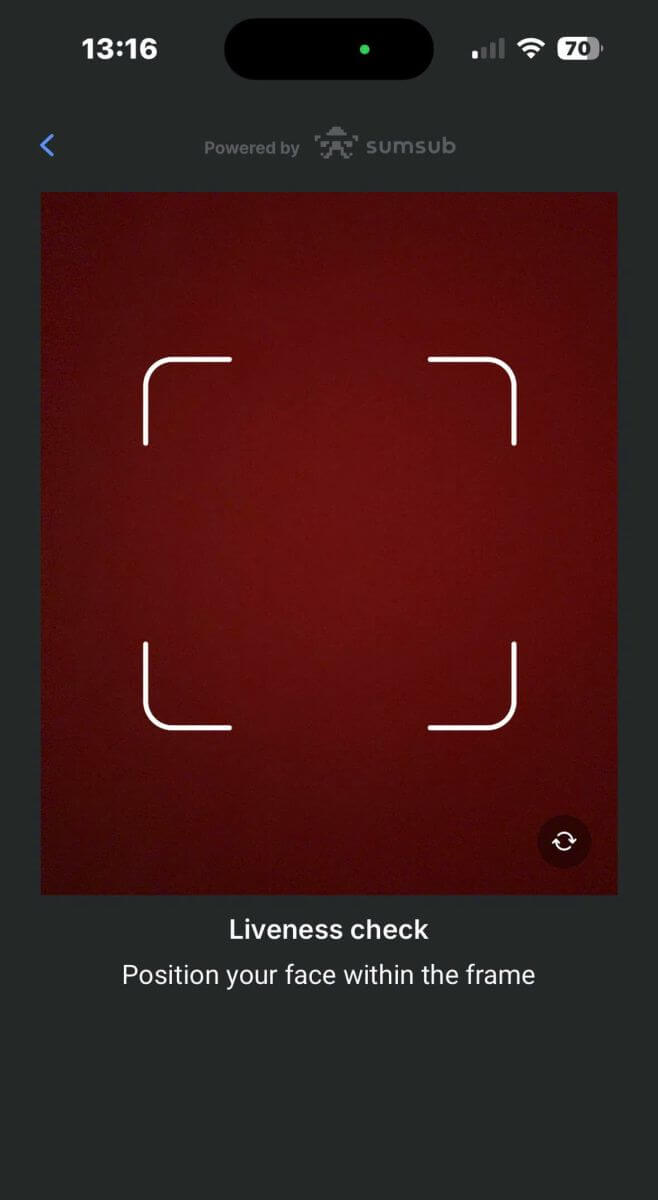
Position your face within the frame and remain still for 2 to 5 seconds for the system to identify you. If successful, you will be automatically redirected to the next screen.
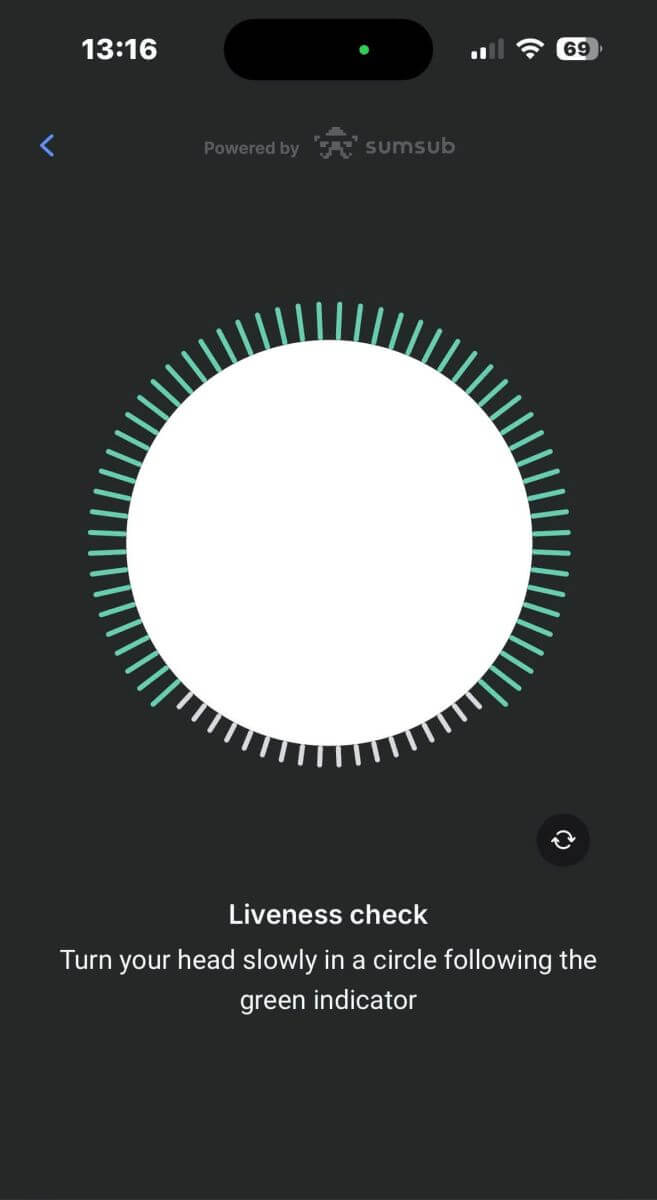
On this page, keep your face within the frame and slowly turn your head in a circular motion following the green indicator.
Congratulations on successfully completing the Liveness Check!
Please wait for 5 to 10 seconds while the system processes your data and displays the results on the screen.
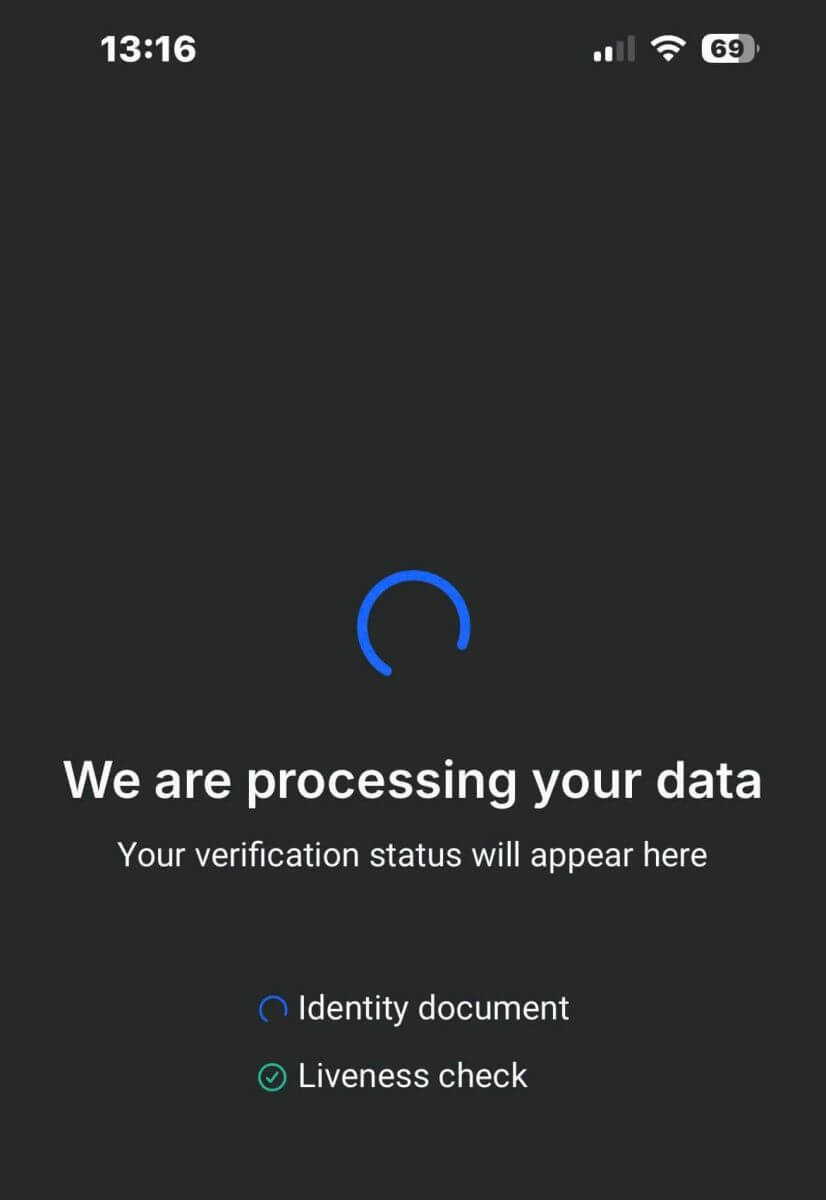
Congratulations on successfully verifying your profile with FxPro! Such a straightforward and quick process.

How to Deposit Money on FxPro
What is the FxPro Wallet?
The FxPro Wallet is a personal risk management tool that works as a central account from which you can transfer money to all your other trading accounts with a few simple clicks. The main advantage of making deposits into your FxPro Wallet as opposed to funding your accounts directly is that your deposited funds are completely protected from any open positions that you may have in your trading account.
Deposit Tips
Funding your FxPro account is quick and straightforward. Here are some tips to ensure hassle-free deposits:
-
The FxPro Wallet only shows payment methods after completing the mandatory verification process.
-
Minimum deposit requirements start from USD 100 or equivalent currencies.
-
Verify the minimum deposit requirements for your chosen payment system.
-
Your payment services must be in your name and match the FxPro account holder’s name.
-
Double-check that all details, including your account number and any important personal information, are correctly entered.
-
All the deposits and withdrawals are processed with no commissions from the FxPro side.
Visit the FxPro Wallet section of your FxPro Dashboard to add funds to your FxPro account anytime, 24/7.
How to Deposit on FxPro [Web]
Bank Card
First, log in to your FxPro account and click on the FxPro Wallet on the left side of the screen, then select the "FUND" button to get started.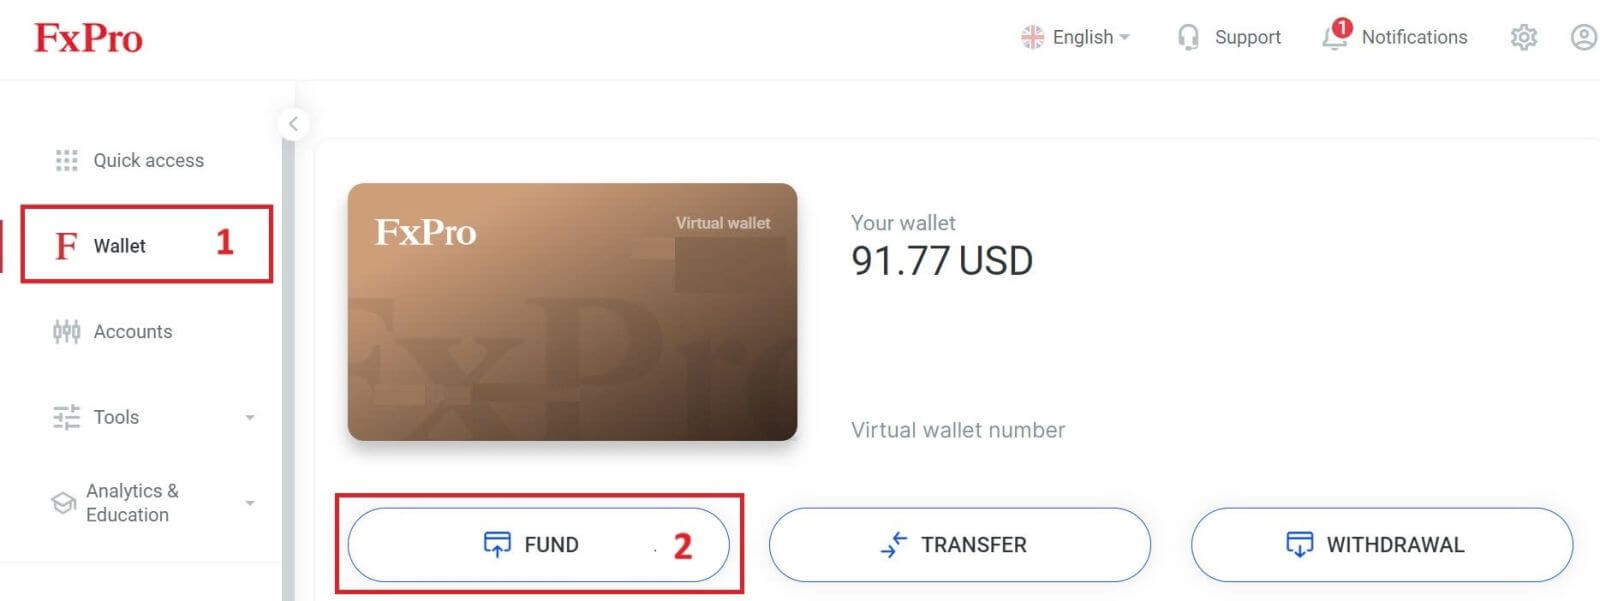
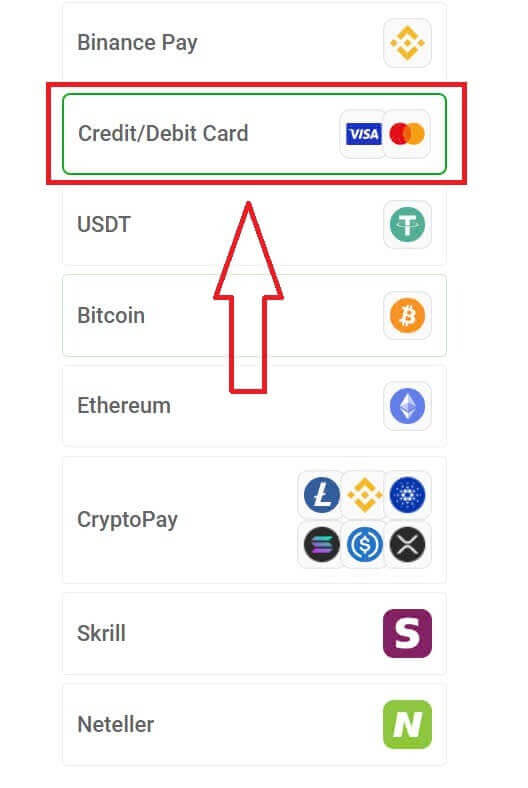
On the next page, when selecting a payment method, click on "Credit/Debit Card" to use your bank card to deposit into your FxPro Wallet
We accept Credit/Debit cards including Visa, Visa Electron, Visa Delta, MasterCard, Maestro International, and Maestro UK.
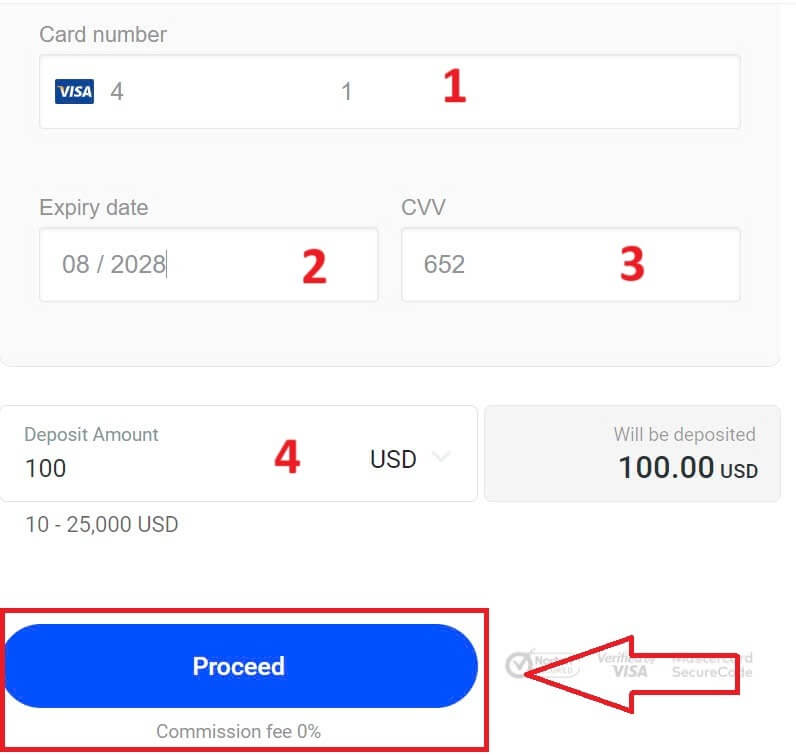
A small form will then appear for you to fill in the following information:
-
Card number.
-
Expiry date.
-
CVV.
-
The amount of balance you wish to deposit and its equivalent currency.
After completing the form and ensuring all information is valid, select "Proceed" to continue.
A message will confirm once the deposit transaction is complete.
Sometimes, you may need to enter an OTP sent by your bank as an additional step before the deposit is finalized. Once a bank card has been used for a deposit, it is automatically added to your FxPro Wallet and can be selected for future deposits.
Electronic Payment Systems (EPS)
Electronic payments are becoming increasingly popular due to their speed and convenience. Cashless payments save time and are easy to complete.
First, log in to your FxPro account and navigate to the FxPro Wallet section on the left-hand side of the screen. Click on the "FUND" button to begin.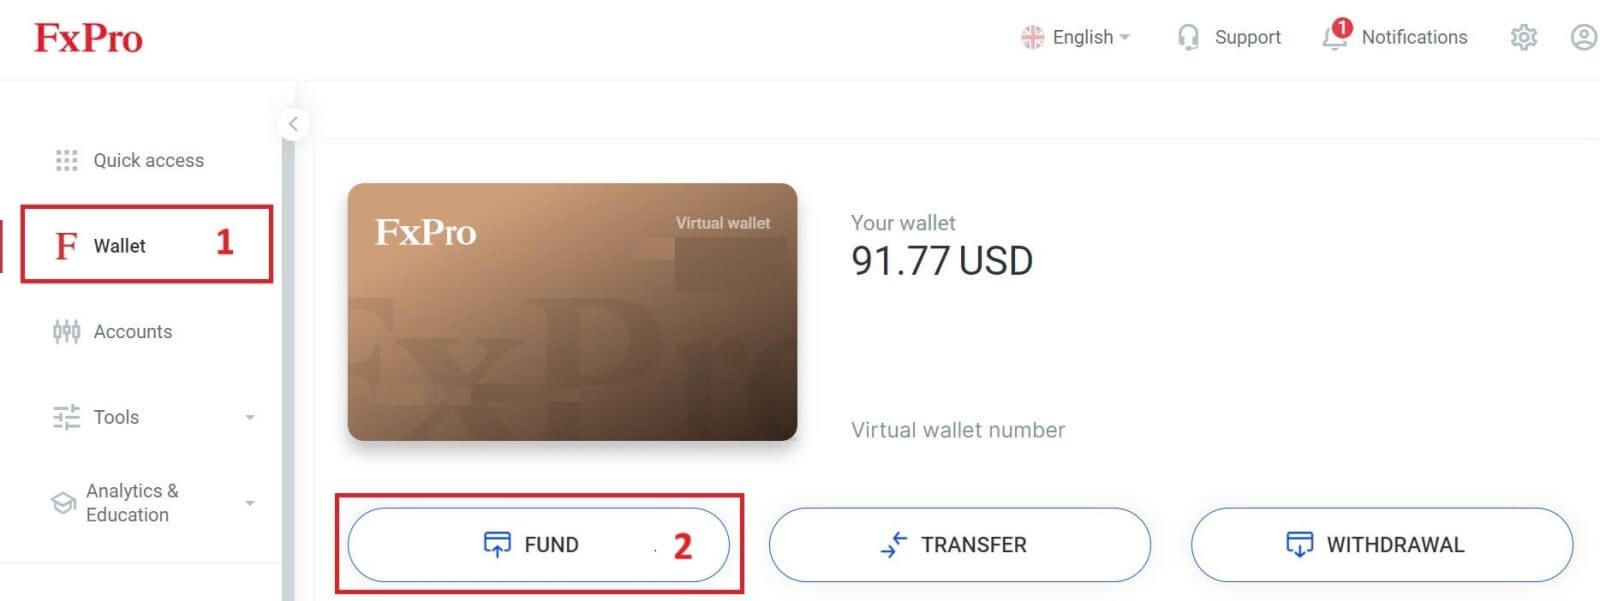
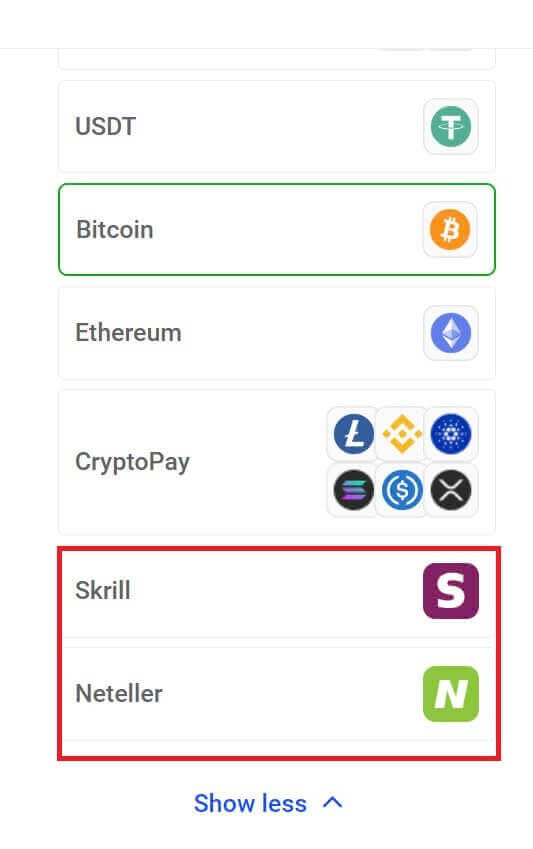
Currently, we accept deposits through:
-
Skrill.
-
Nettler.
On the FxPro Wallet, when choosing a payment method, select one of the available EPS that is most convenient for us to use for depositing into your FxPro Wallet.
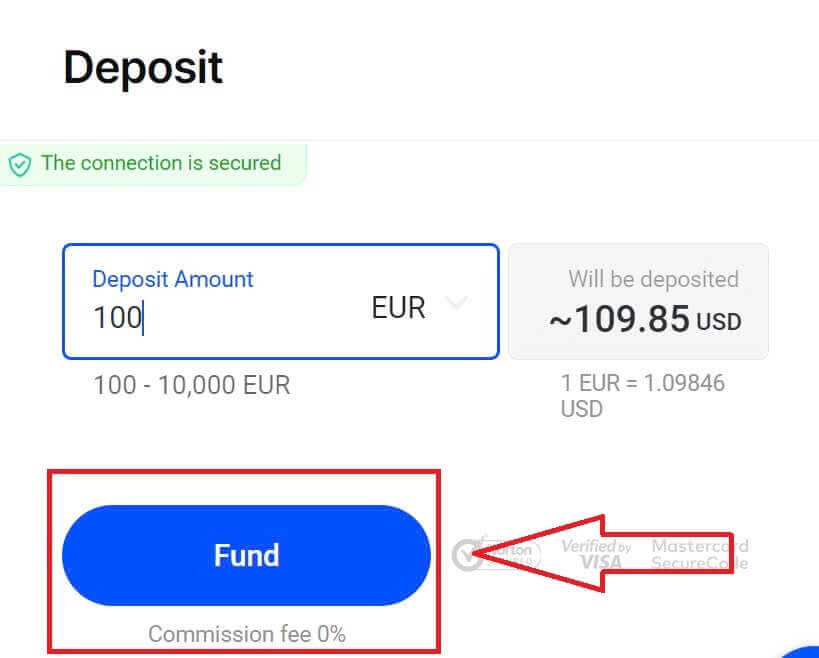
Next, enter the amount you wish to deposit in the Deposit Amount field (please note that the amount must be between 100 and 10.000 EUR or the equivalent in other currencies).
Then, select the "FUND" button to continue.
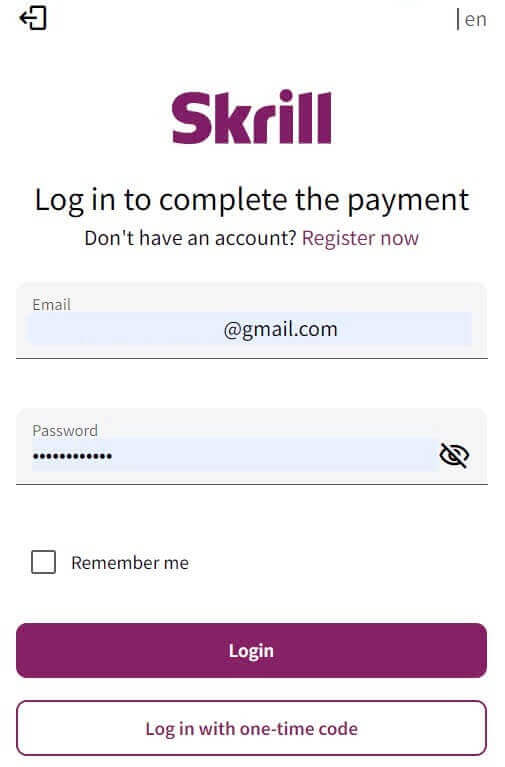
You will be redirected to the website of your chosen payment system, where you can complete your transfer.
Cryptocurrencies
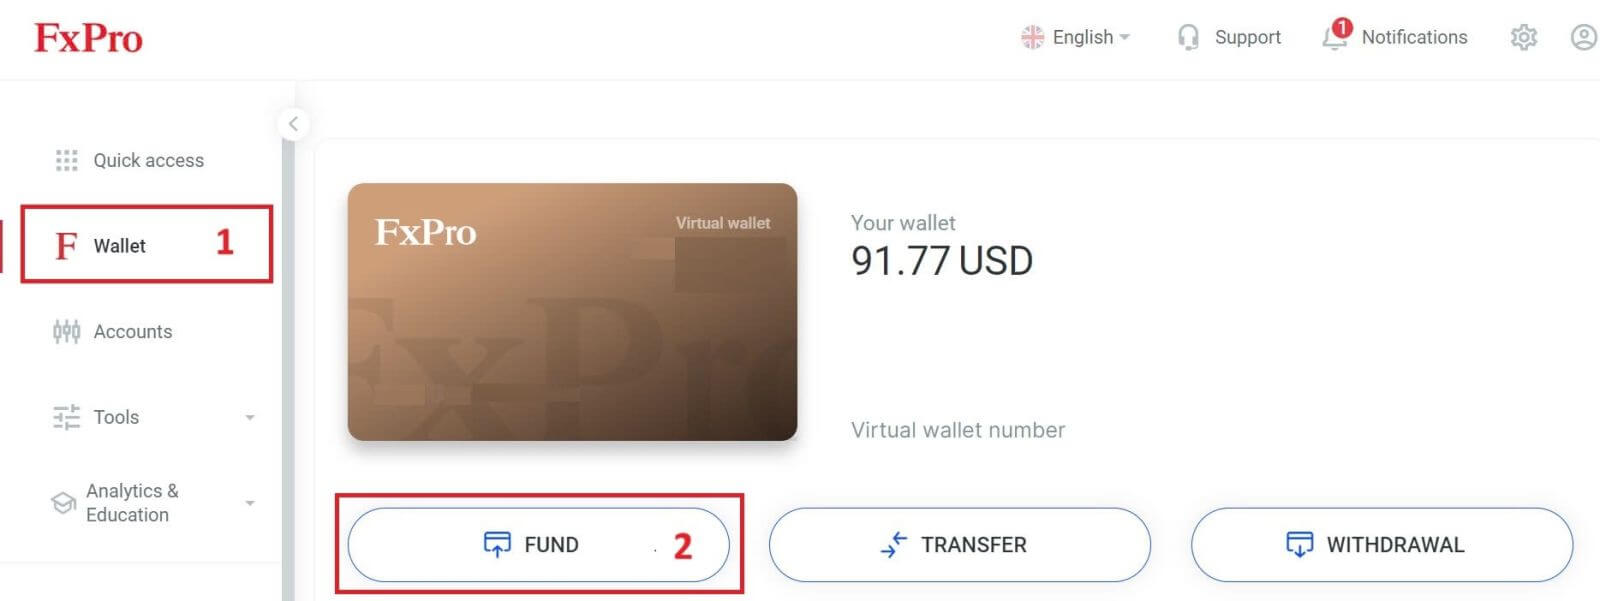
To begin, access your FxPro account and head over to the FxPro Wallet tab located on the left panel. From there, press the "FUND" button to initiate the process.
On the FxPro Wallet, when choosing one of the available cryptocurrencies, select the one you wish to deposit.
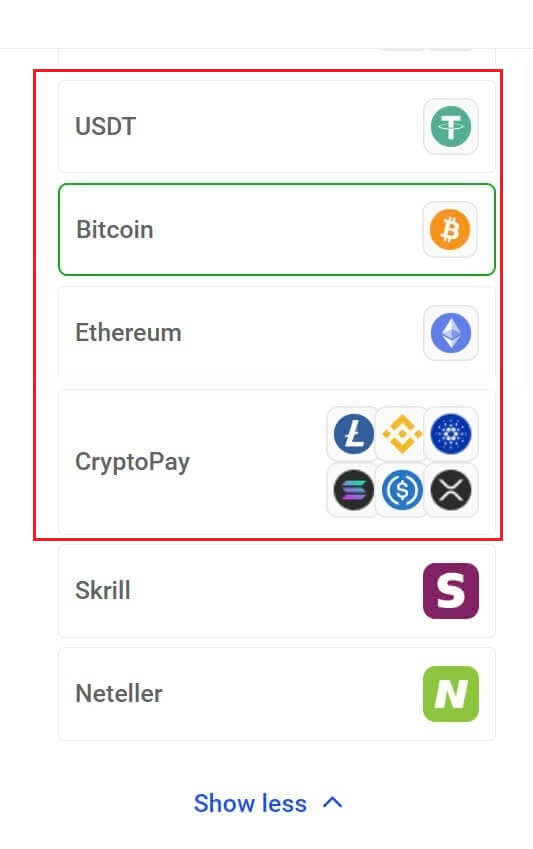
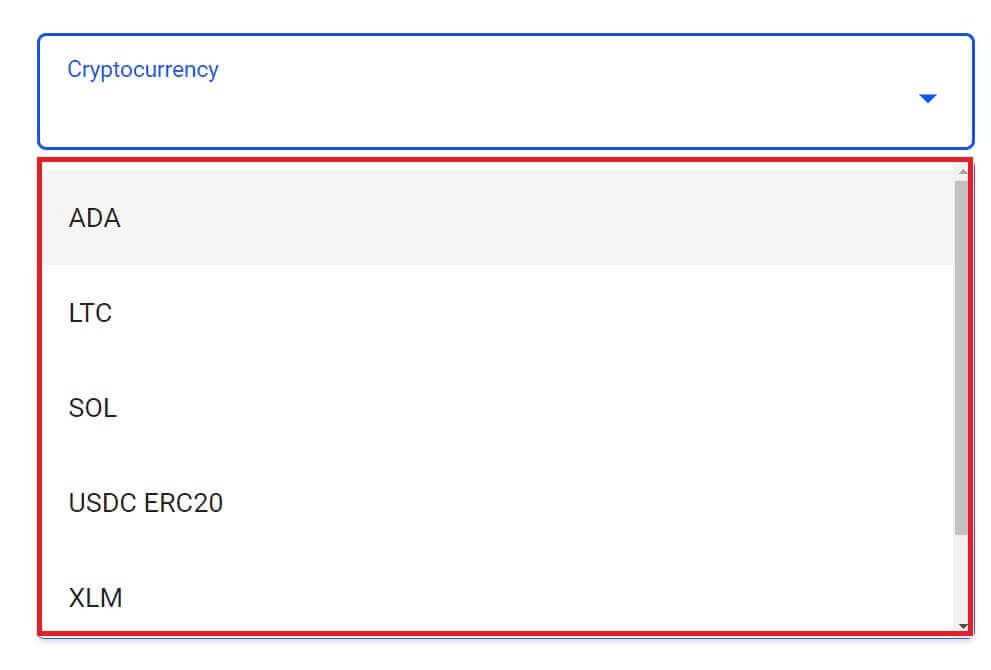
There are a few more cryptocurrencies in the "CryptoPay" section besides Bitcoin, USDT, and Ethereum.
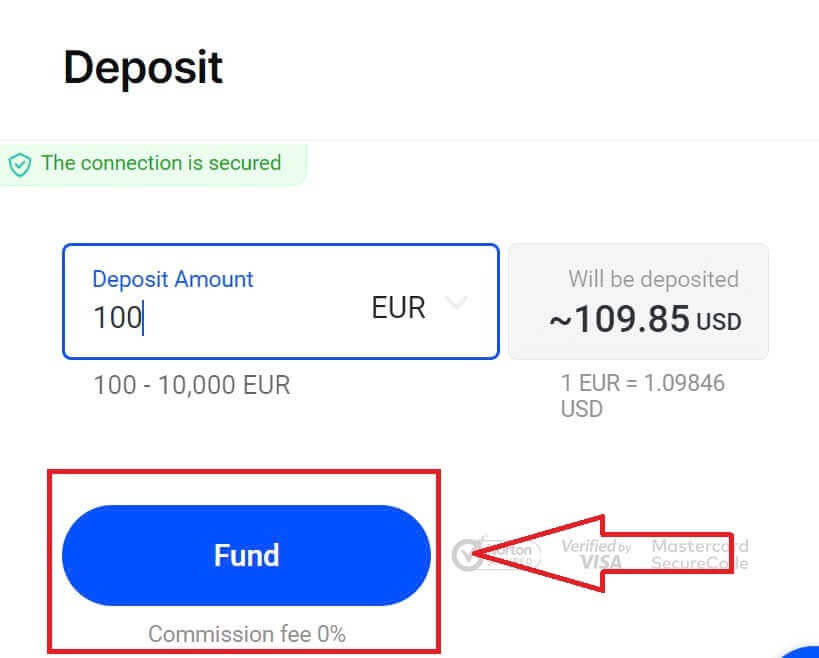
Next, enter the amount you wish to deposit in the Deposit Amount field (please note that the amount must be between 100 and 10.000 EUR or the equivalent in other currencies).
After that, select the "FUND" button to continue.
The assigned payment address will be presented, and you will need to withdraw your crypto from your private wallet to the FxPro address.
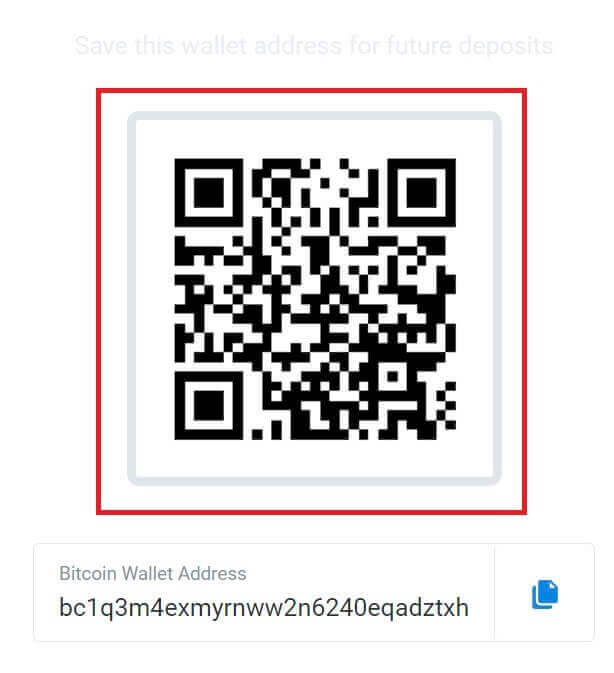
Once the payment is successful, the amount will be reflected in your chosen trading account in USD. Your deposit action is now complete.
Local Payment - Bank Transfers
Start by logging into your FxPro account. Once you’re in, go to the FxPro Wallet option found in the left-hand menu. Click on the "FUND" button to start the funding process.
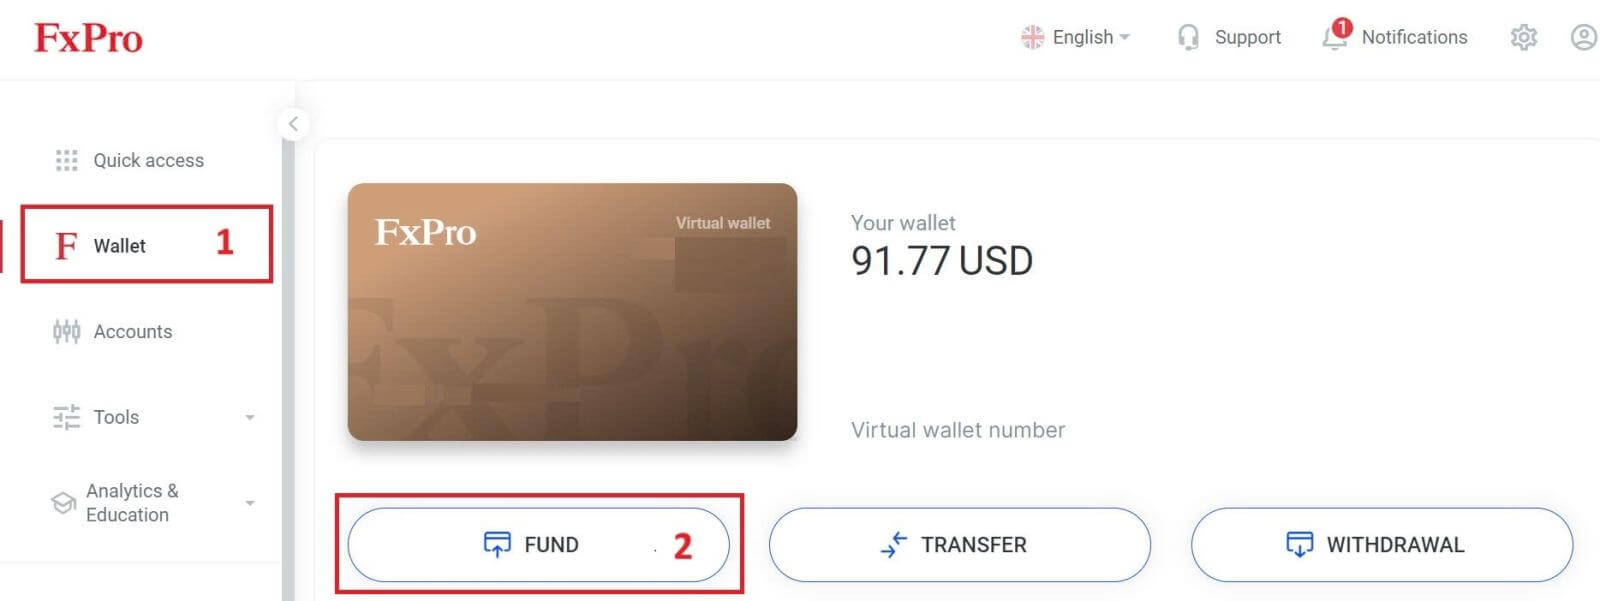
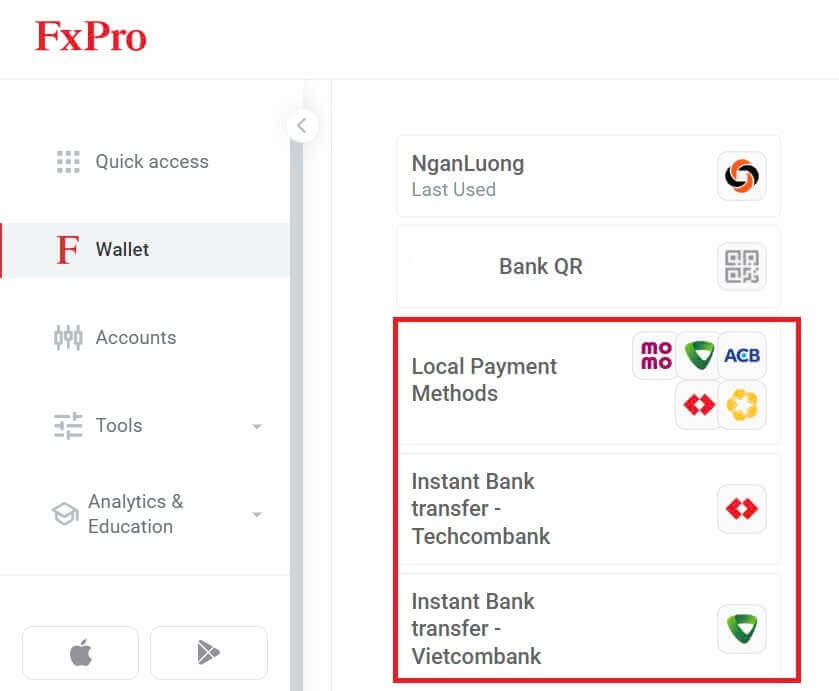
On the FxPro Wallet, when choosing a payment method, select "Local Payment Methods" or "Instant Bank Transfer" to begin the deposit process.
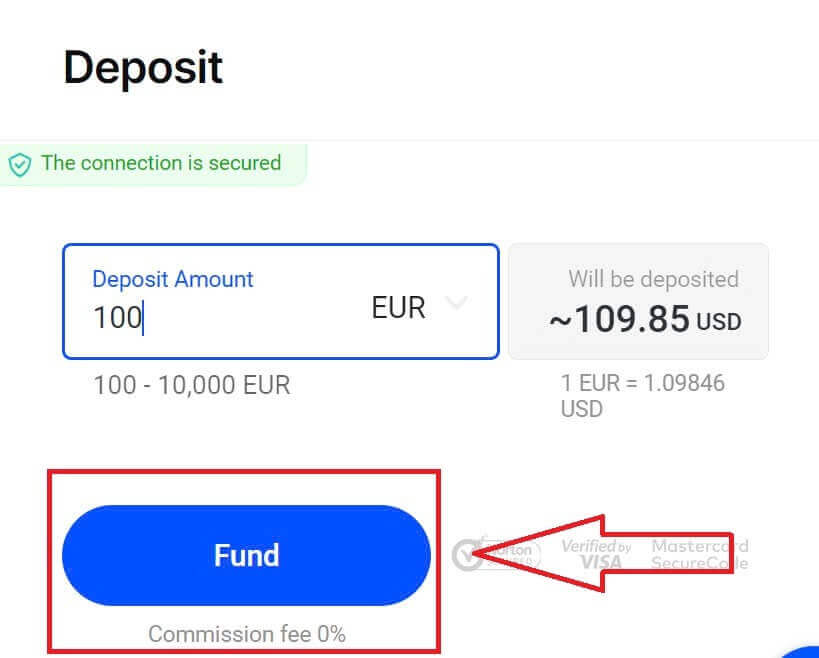
Secondly, enter the amount you wish to deposit in the Deposit Amount field (please note that the amount must be between 100 and 10.000 EUR or the equivalent in other currencies).
Then, select the "FUND" button to continue.
You will be presented with further instructions; follow these steps to complete the deposit action.
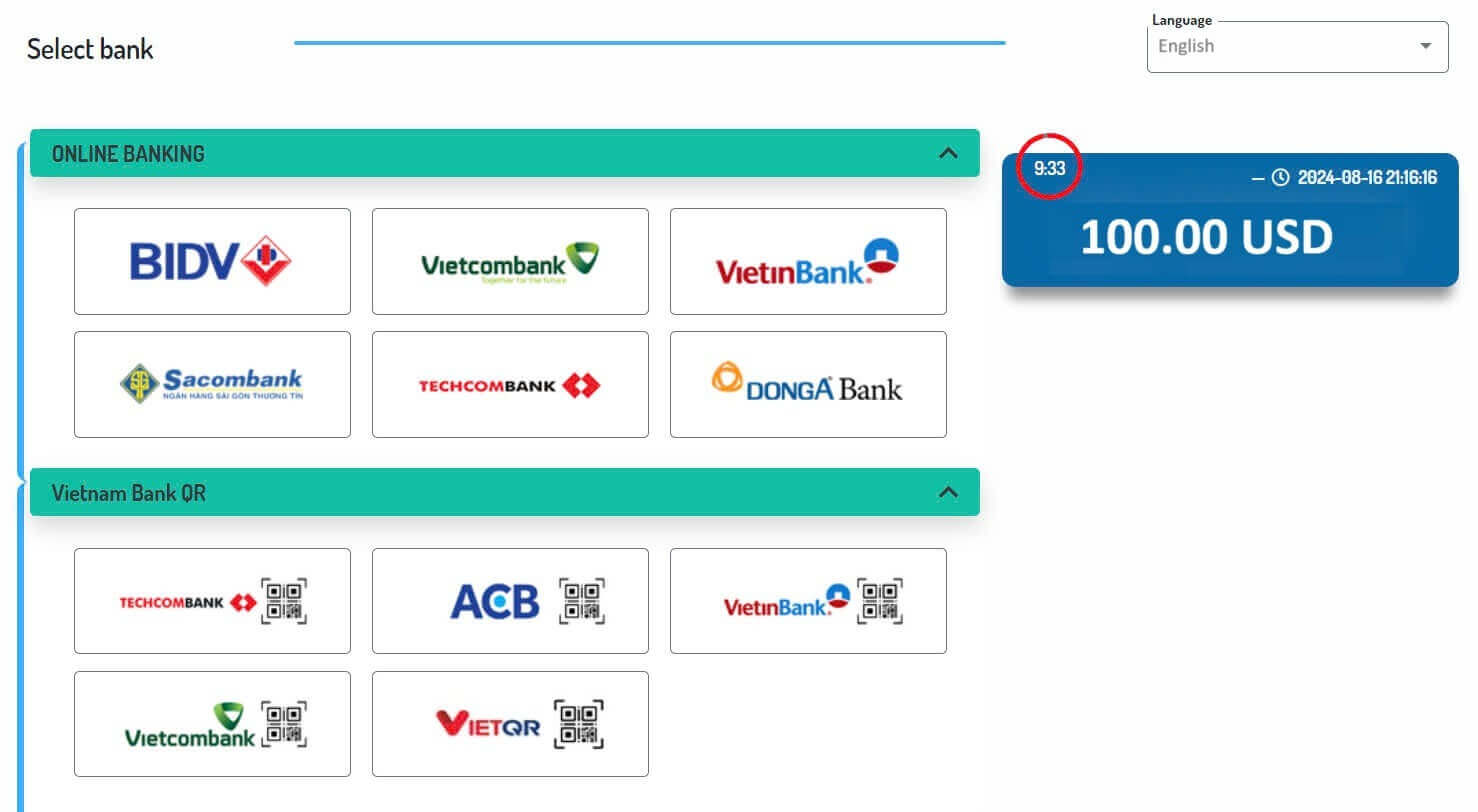
How to Deposit on FxPro [App]
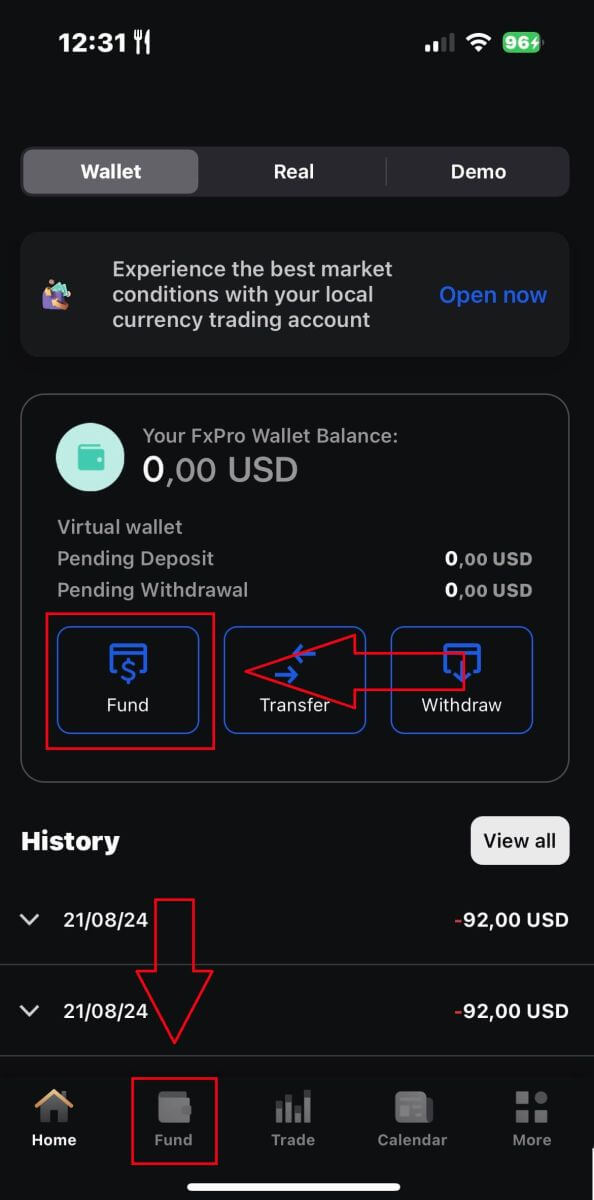
First, open the FxPro app on your mobile device. You can tap the "FUND" button in the FxPro Wallet section or the "FUND" button in the toolbar at the bottom of the screen to get started.
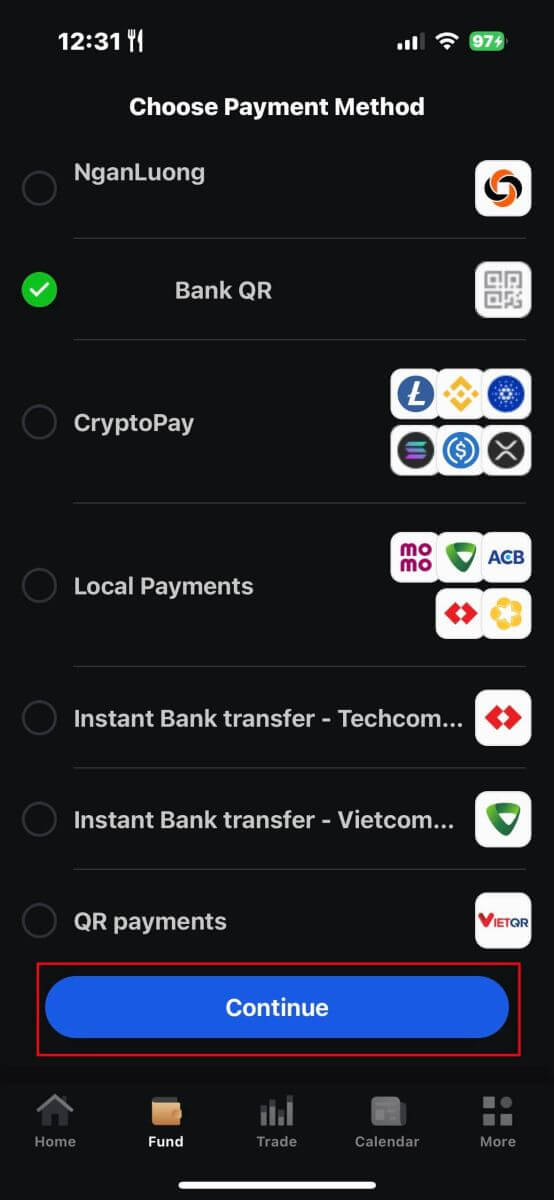
Then, choose a deposit method that you find suitable and convenient, as FxPro offers a wide range of options for users even on the mobile app.
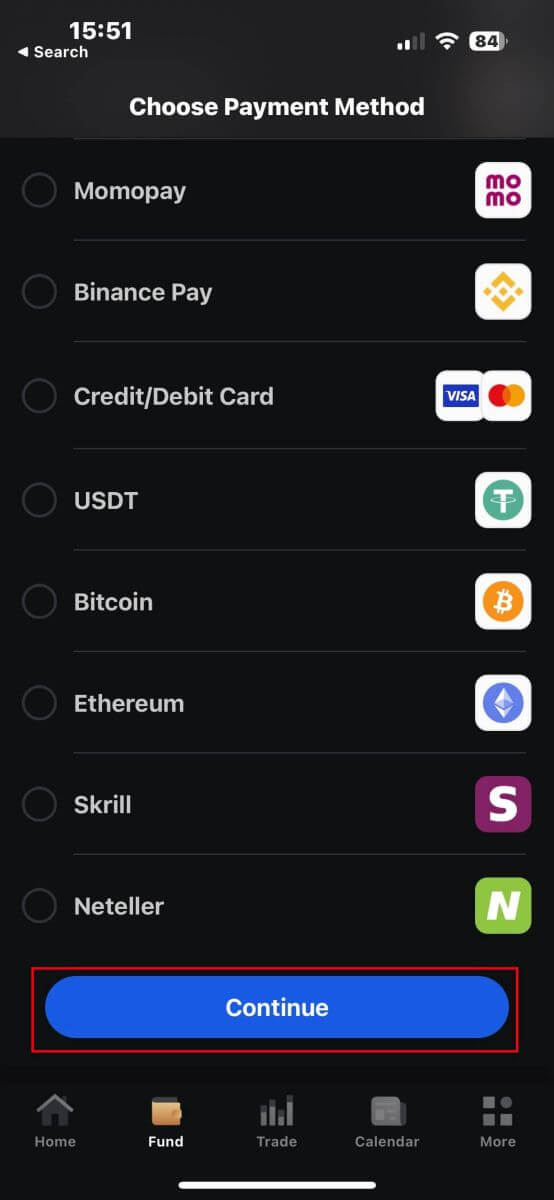
Various methods are available, such as Bank Cards, Electronic Payment Systems (EPS), Cryptocurrencies, Local Payment, or Bank Transfer.
Once you choose the payment method, please tap "Continue" to proceed.
On the next page, enter the required information (this may vary depending on your chosen deposit method) in the corresponding fields
Please note that the amount must be between 100 USD and 15,999 USD or the equivalent in other currencies to be valid. You can also check the converted amount in USD in the field below.
After checking carefully all the information, please continue by tapping the "Deposit" button.
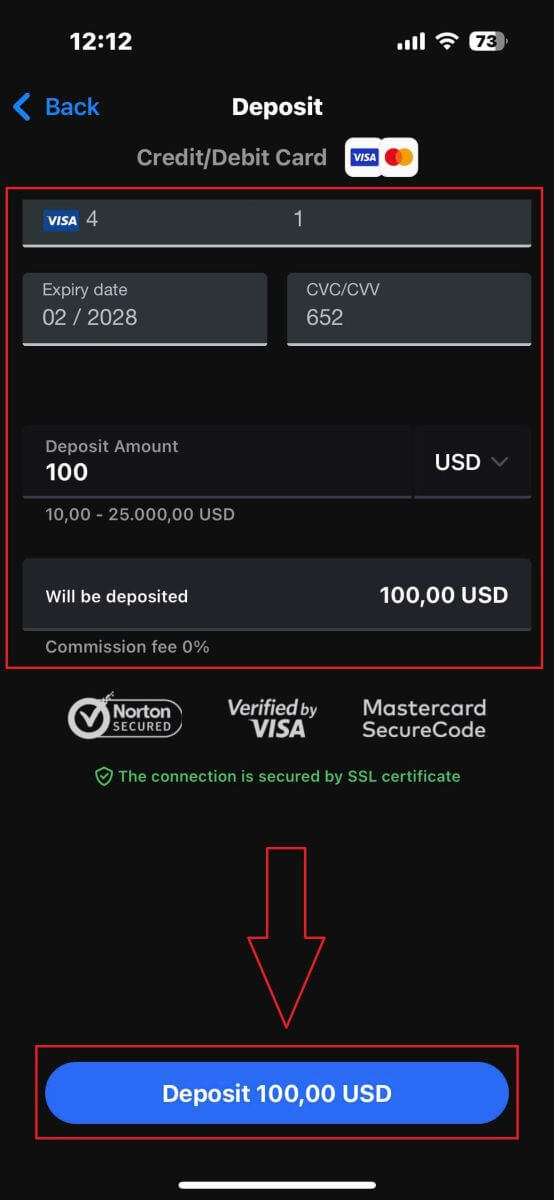
After that, you will be directed to the next instruction page, depending on your chosen deposit method. Follow the on-screen instructions step-by-step to complete the process. Good luck!
How to Trade Forex on FxPro
How to place a New Order on FxPro MT4
Initially, please download and log in to your FxPro MT4. If you don’t know how to do so, please refer to this article with detailed and simple instructions: How to Login to FxPro
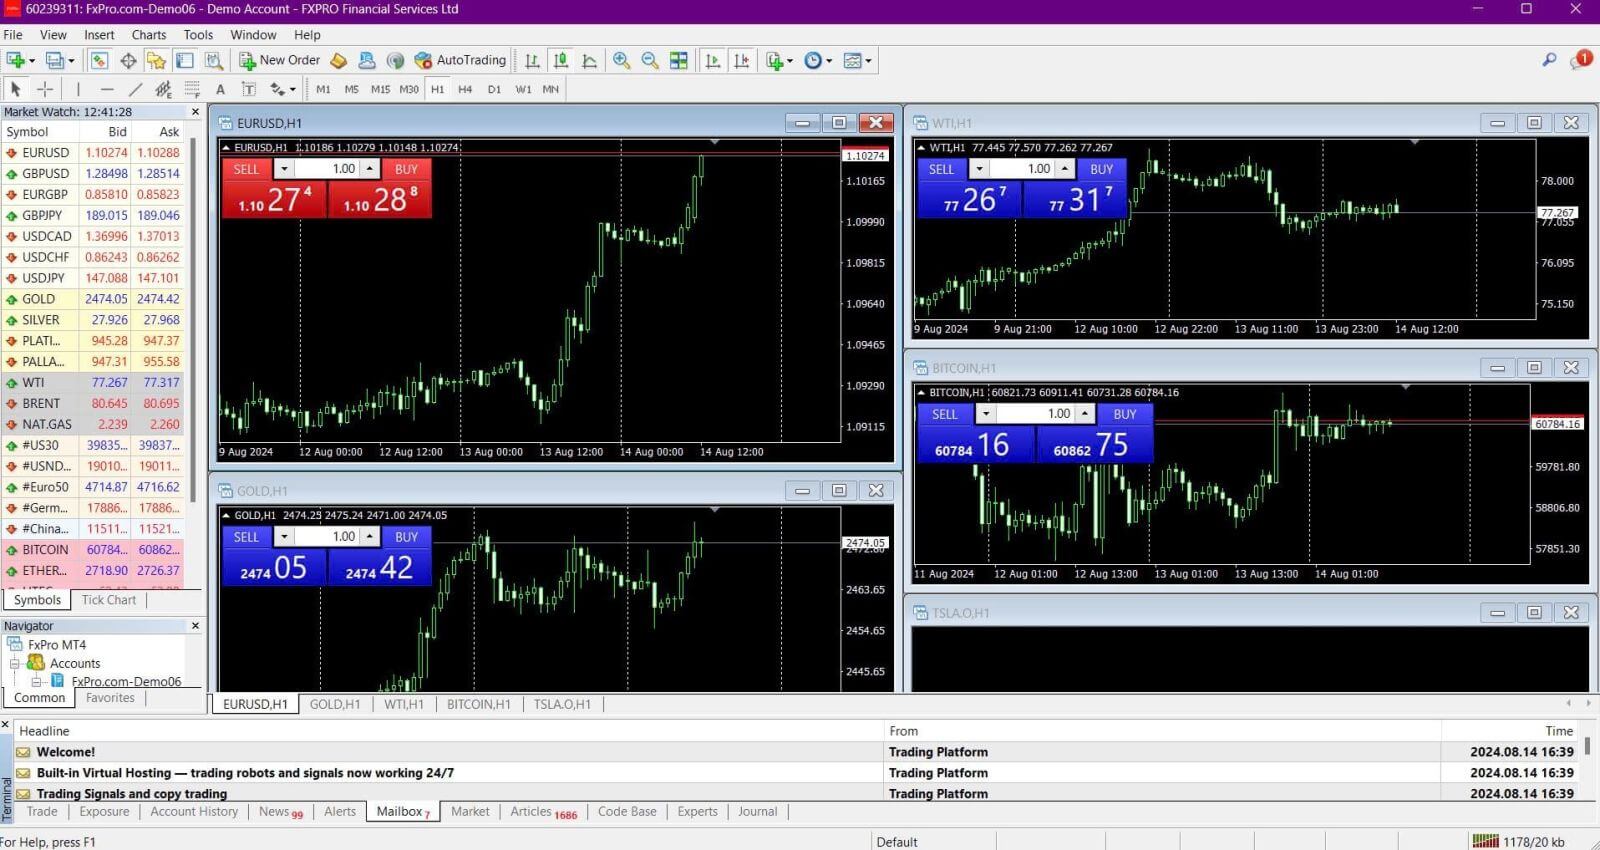
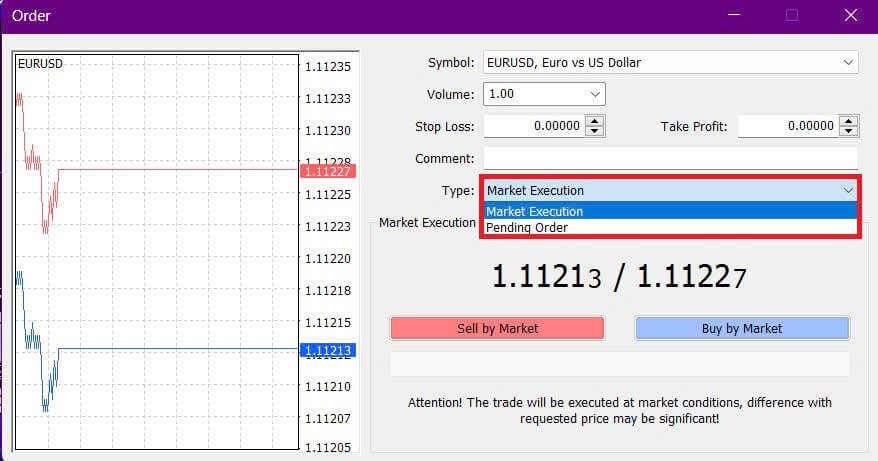
Please right-click on the chart, then click “Trading” and select “New Order” or double-click on the currency you want to place an order on in MT4, then the Order window will appear.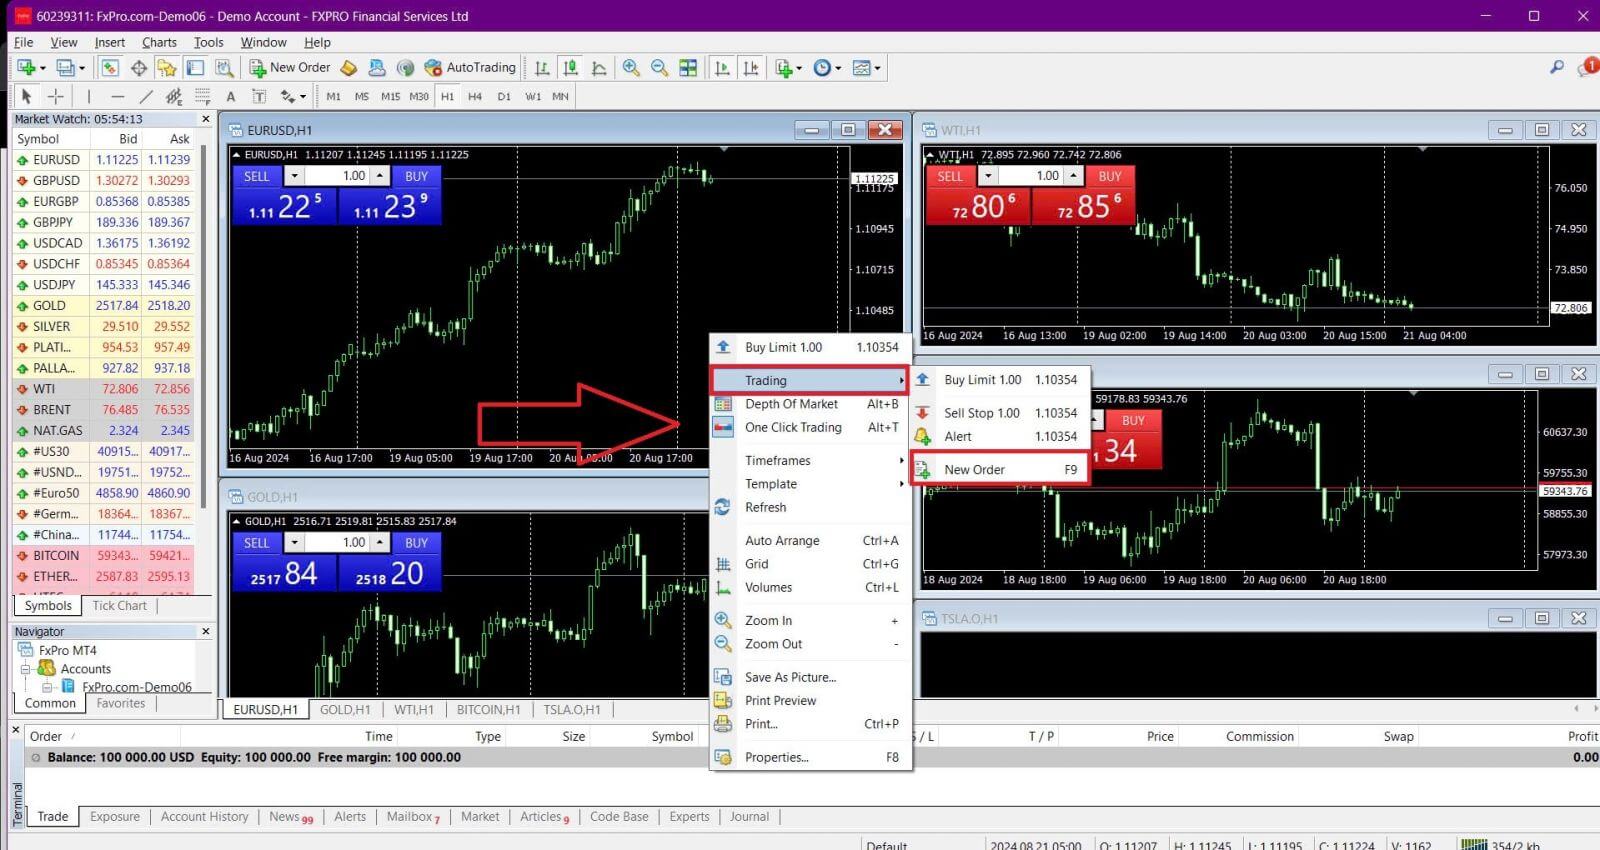
Symbol: Ensure that the currency symbol you wish to trade is displayed in the symbol box.
Volume: Decide the size of your contract. You can either click the arrow to choose the volume from the drop-down options or left-click in the volume box and type in the desired value. Remember that your contract size directly impacts your potential profit or loss.
Comment: This section is optional, but you can use it to add comments to identify your trades.
Type: The type is set to Market Execution by default:
-
Market Execution: Executes orders at the current market price.
-
Pending Order: Allows you to set a future price at which you intend to open your trade.
Finally, choose the order type to open — either a sell or a buy order:
-
Sell by Market: Opens at the bid price and closes at the ask price. This order type may bring profit if the price goes down.
-
Buy by Market: Opens at the asking price and closes at the bid price. This order type may bring profit if the price goes up.
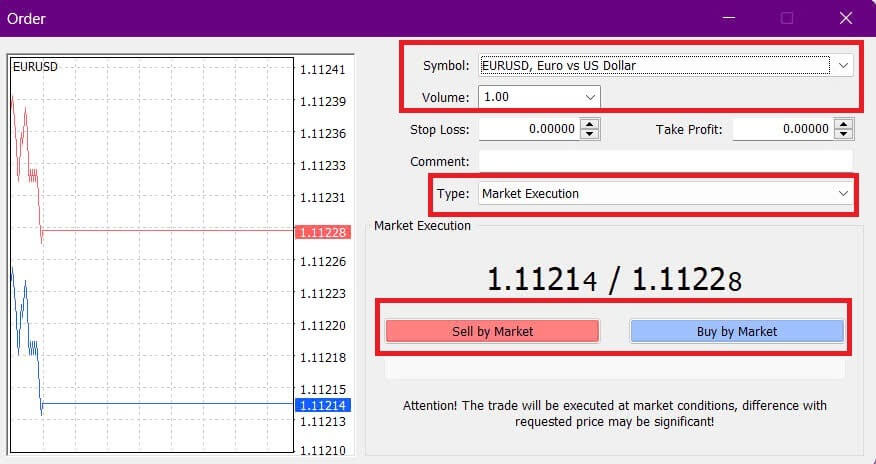
Once you click on either Buy or Sell, your order will be processed immediately. You can check the status of your order in the Trade Terminal.

How to place a Pending Order on FxPro MT4
How Many Pending Orders
Unlike instant execution orders, where trades are placed at the current market price, pending orders allow you to set orders that will be executed once the price reaches a specific level chosen by you. There are four types of pending orders, which can be grouped into two main categories:
-
Orders expecting to break a certain market level.
-
Orders are expected to bounce back from a certain market level.
Buy Stop
This order allows you to set a buy order above the current market price. For example, if the current market price is $20 and you set a Buy Stop at $22, a buy (or long) position will be opened once the market reaches $22.
Sell Stop
This order allows you to set a sell order below the current market price. For instance, if the current market price is $20 and you set a Sell Stop at $18, a sell (or short) position will be opened once the market reaches $18.
Buy Limit
This order is the opposite of a Buy Stop, allowing you to set a buy order below the current market price. For example, if the current market price is $20 and you set a Buy Limit at $18, a buy position will be opened once the market reaches the $18 level.
Sell Limit
This order allows you to set a sell order above the current market price. For instance, if the current market price is $20 and you set a Sell Limit at $22, a sell position will be opened once the market reaches the $22 level.
Opening Pending Orders
You can open a new pending order by double-clicking on the name of the market in the Market Watch module. This will open the new order window, where you can change the order type to "Pending Order".
Next, choose the market level at which the pending order will be activated and set the position size based on the volume.
If needed, you can also set an expiration date (Expiry). Once you have configured all these parameters, select the desired order type based on whether you want to go long or short and whether you’re using a stop or limit order. Finally, click the "Place" button to complete the process.
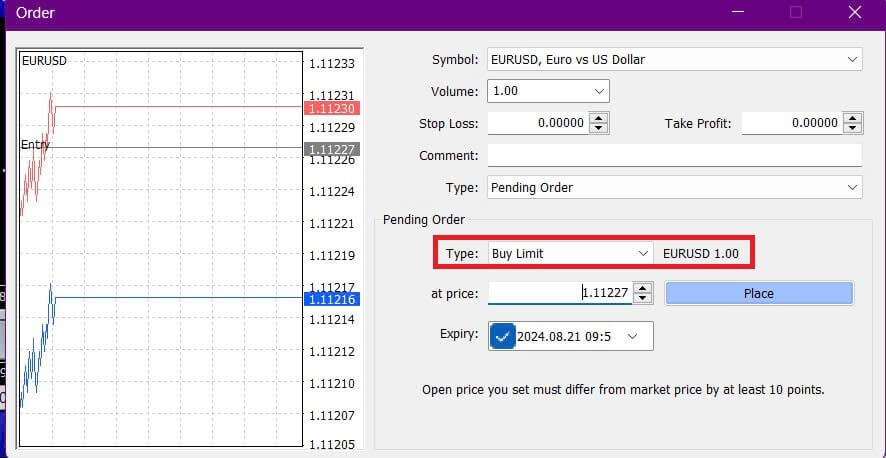
Pending orders are powerful features of MT4. They are especially useful when you can’t constantly monitor the market for your entry point or when the price of an instrument changes quickly, ensuring you don’t miss the opportunity.
How to close Orders on FxPro MT4
To close an open position, click the "x" in the Trade tab of the Terminal window.

Alternatively, right-click the line order on the chart and select "Close".
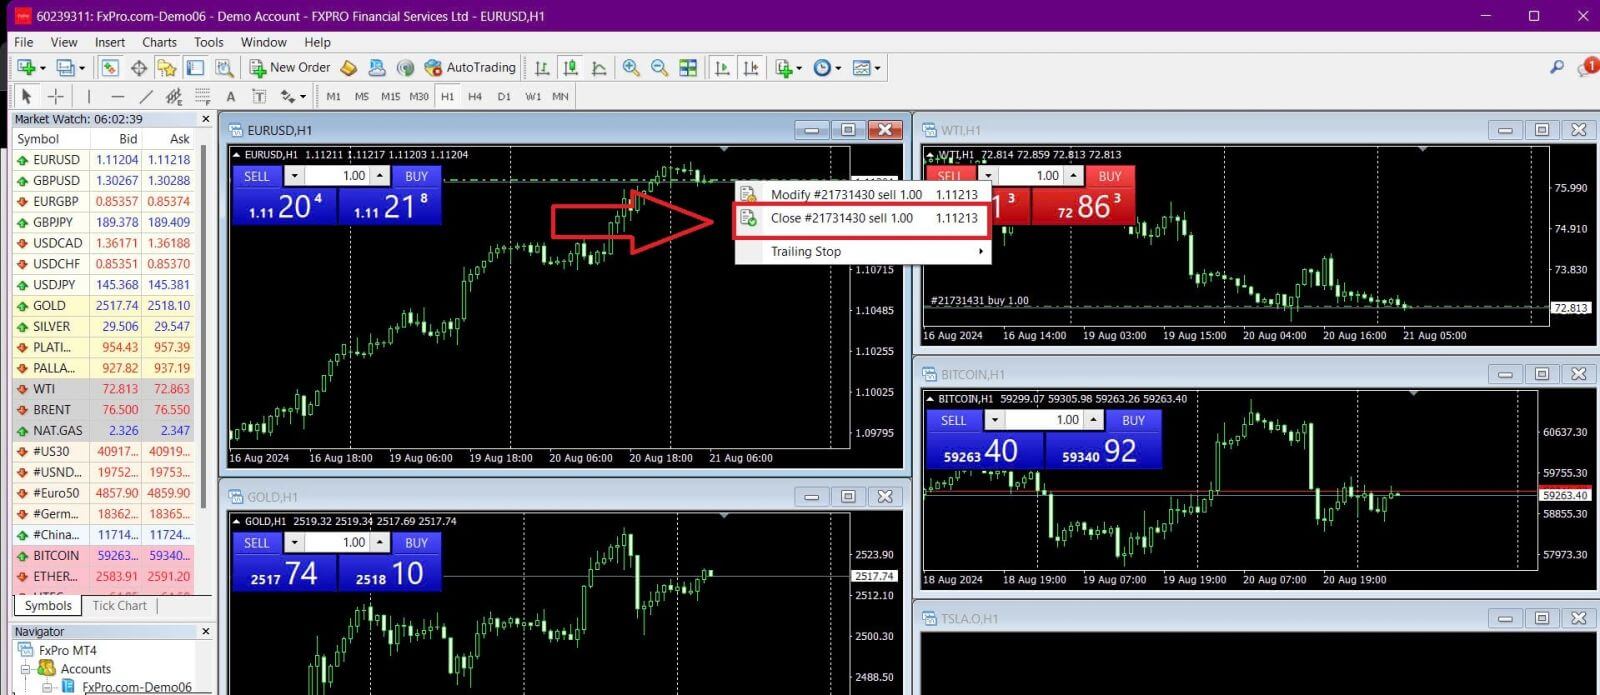
If you want to close only a part of your position, right-click on the open order and select "Modify". In the Type field, choose instant execution and specify the portion of the position you want to close.
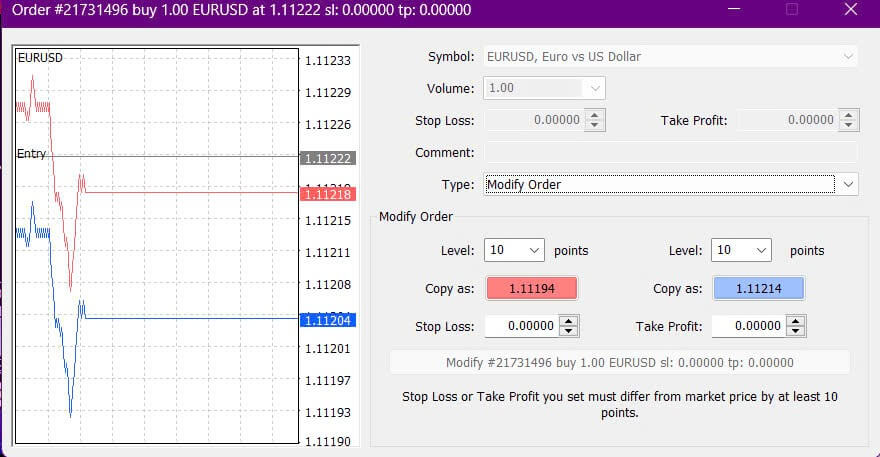
As you can see, opening and closing trades on MT4 is very intuitive and can be done with just one click.
Using Stop Loss, Take Profit, and Trailing Stop on FxPro MT4
One of the keys to long-term success in financial markets is effective risk management. Therefore, incorporating stop losses and taking profits into your trading strategy is essential.
Let’s explore how to use these features on the MT4 platform to help you limit risk and maximize your trading potential.
Setting Stop Loss and Take Profit
The simplest way to add a Stop Loss or Take Profit to your trade is by setting it up when placing new orders.
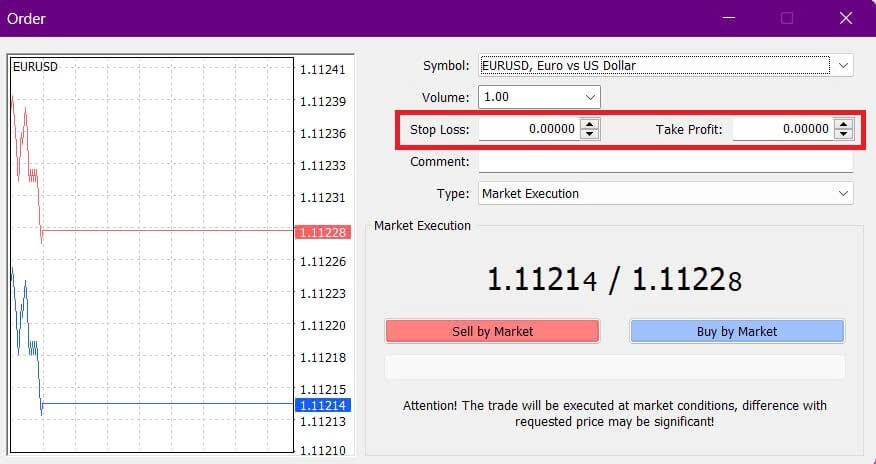
To set a Stop Loss or Take Profit when placing a new order, simply enter your desired price levels in the Stop Loss and Take Profit fields. The Stop Loss will automatically trigger if the market moves against your position, while the Take Profit will trigger when the price reaches your specified target. You can set the Stop Loss level below the current market price and the Take Profit level above it.
Remember, a Stop Loss (SL) or Take Profit (TP) is always linked to an open position or a pending order. You can adjust these levels after opening a trade while monitoring the market. Although they are not mandatory when opening a new position, adding them is highly recommended to protect your trades.
Adding Stop Loss and Take Profit Levels
The easiest way to add SL/TP levels to an already open position is by using the trade line on the chart. Simply drag and drop the trade line up or down to your desired level.
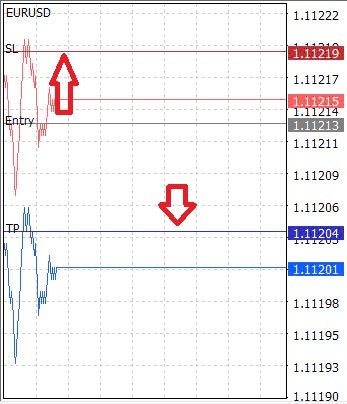
Once you’ve set the SL/TP levels, the SL/TP lines will appear on the chart, allowing you to easily modify them as needed.
You can also adjust SL/TP levels from the bottom "Terminal" module. To do this, right-click on your open position or pending order and select "Modify" or "Delete" order.
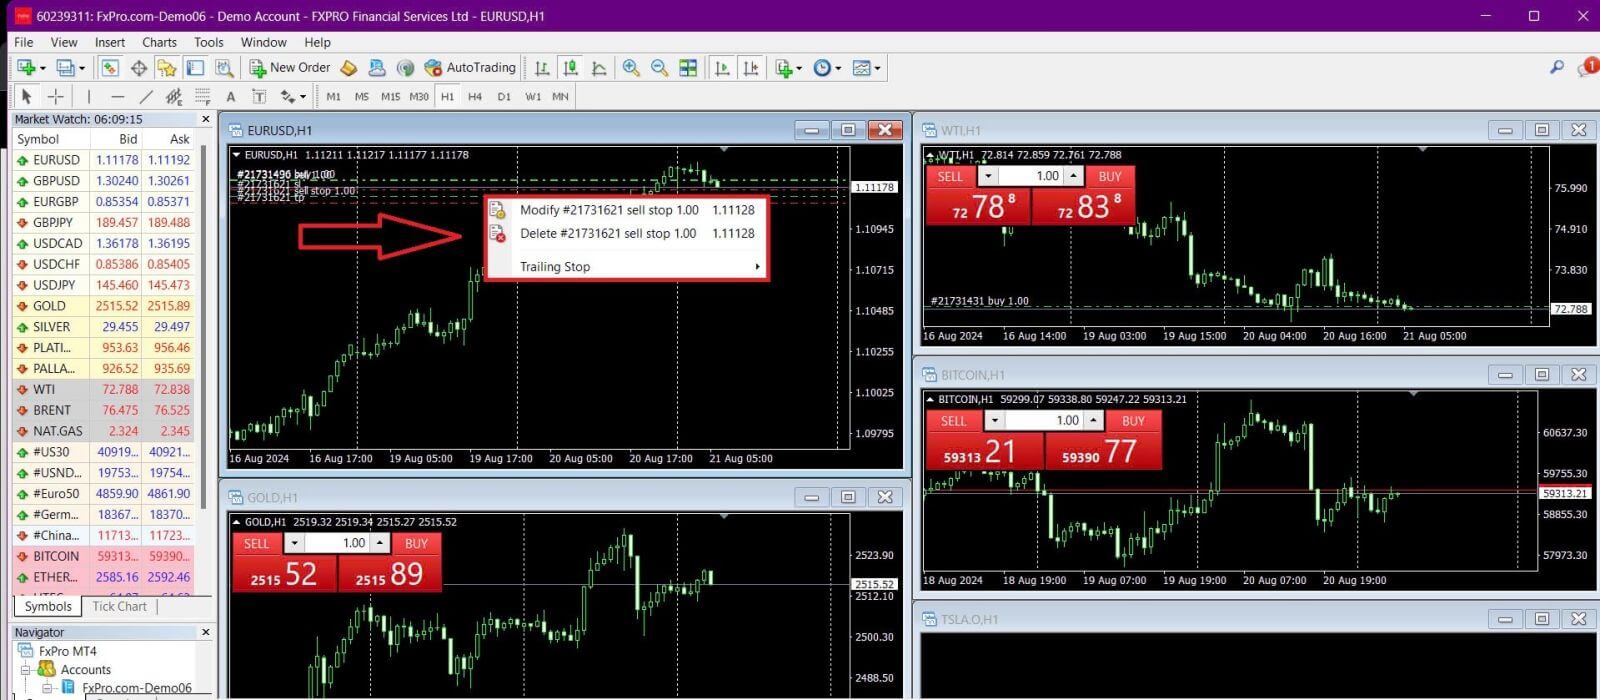
The order modification window will appear, allowing you to enter or adjust SL/TP levels either by specifying the exact market price or by defining the points range from the current market price.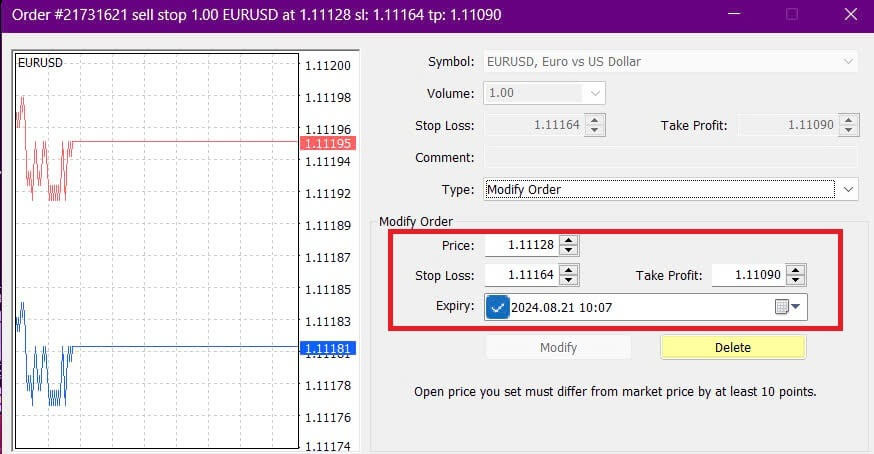
Trailing Stop
Stop Losses are designed to limit losses when the market moves against your position, but they can also help you lock in profits.
While it may seem counterintuitive, this concept is easy to understand. For example, if you’ve opened a long position and the market moves favorably, making your trade profitable, you can move your original Stop Loss (set below your open price) to your open price to break even, or even above the open price to secure a profit.
To automate this process, you can use a Trailing Stop. This tool is particularly useful for managing risk when price movements are rapid or when you can’t constantly monitor the market. As soon as your position becomes profitable, the Trailing Stop will automatically follow the price, maintaining the previously set distance.
Please remember that your trade must be profitable by a sufficient amount for the Trailing Stop to move above your open price and guarantee a profit.
Trailing Stops (TS) are linked to your open positions, but keep in mind that MT4 needs to be open for the Trailing Stop to be executed successfully.
To set a Trailing Stop, right-click the open position in the "Terminal" window and specify your desired pip value for the distance between the TP level and the current price in the Trailing Stop menu.
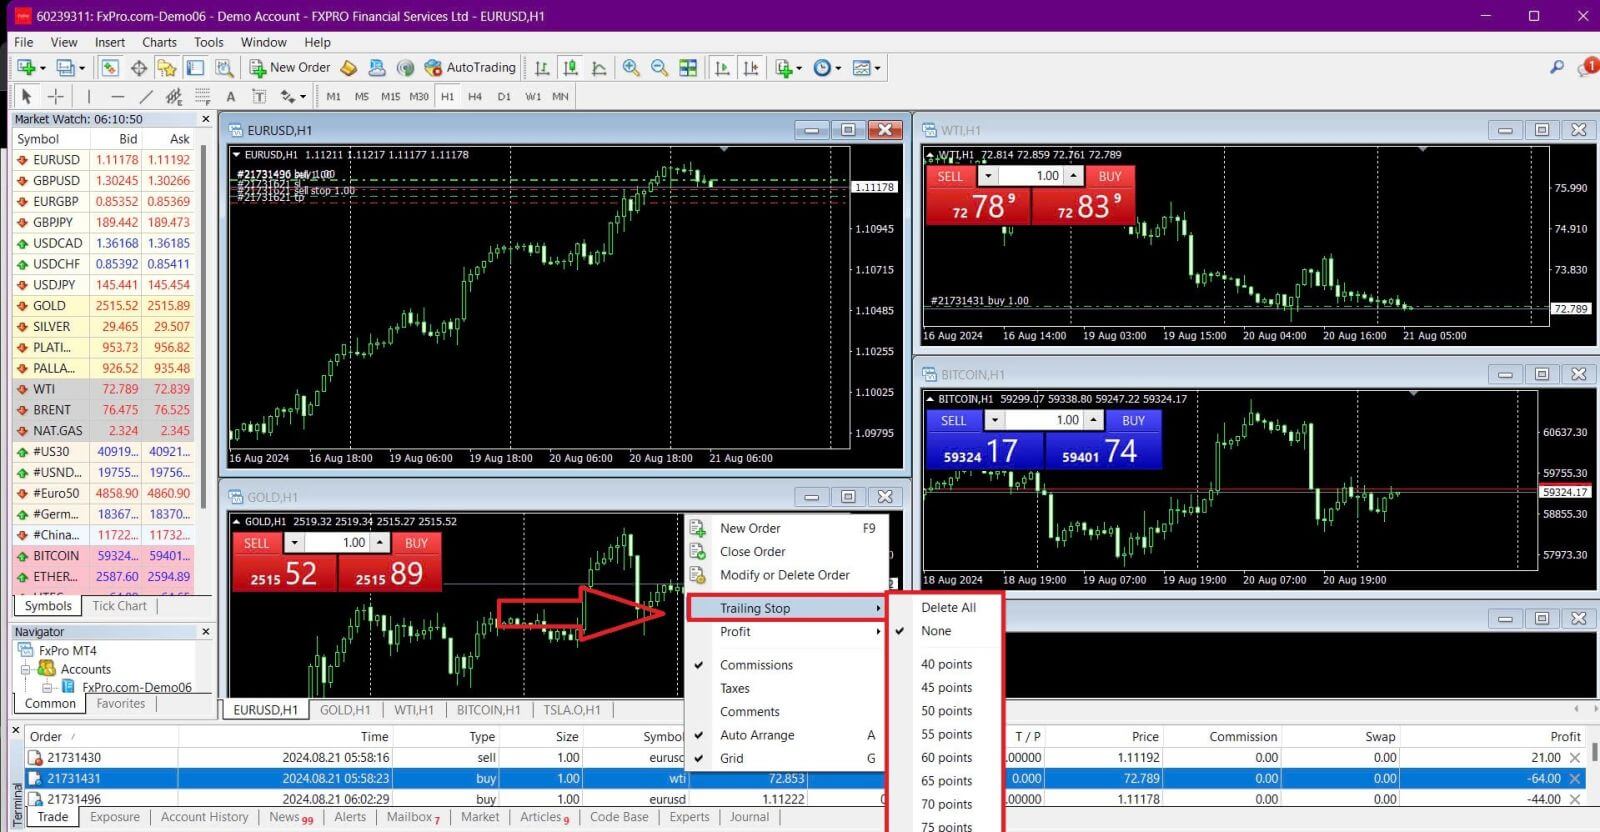
Your Trailing Stop is now active, meaning it will automatically adjust the stop loss level if the price moves in your favor.
You can easily disable the Trailing Stop by selecting "None" in the Trailing Stop menu. To quickly deactivate it for all open positions, choose "Delete All".
MT4 offers multiple ways to protect your positions quickly and efficiently.
While Stop Loss orders are effective for managing risk and keeping potential losses in check, they don’t offer 100% security.
Stop losses are free to use and help protect your account from adverse market moves, but they cannot guarantee execution at your desired level. In volatile markets, prices may gap beyond your stop level (jump from one price to the next without trading in between), which can result in a worse closing price than expected. This is known as price slippage.
Guaranteed Stop Losses, which ensure your position is closed at the requested Stop Loss level without the risk of slippage, are available for free with a basic account.
How to Withdraw Money from FxPro
Withdrawal rules
Withdrawals are available 24/7, giving you constant access to your funds. To withdraw, visit the Withdrawal section in your FxPro Wallet, where you can also check the status of your transaction under Transaction History.
However, keep in mind the following general rules for withdrawals:
-
The maximum withdrawal amount is 15,999.00 USD (this is applied for all the withdrawal methods).
-
Kindly be informed that to withdraw via the Bank Wire method, you should first refund all your recent Credit Card, PayPal, and Skrill deposits. The funding methods that need to be refunded will be clearly displayed to you in your FxPro Direct.
-
Please note that for the withdrawal to be successful, you should transfer your funds to your FxPro Wallet. For the method using Bank Cards and Cryptocurrencies, the withdrawal amount must be equal to the deposit amount, while the profit will be automatically transferred via Bank Transfer.
-
You must follow our withdrawal policy which instructs that clients must withdraw via the same method used to deposit unless that method has been fully refunded or refund limits have expired. In this case, you may use a bank wire method, or an e-wallet previously used to fund (as long as it can accept payments) to withdraw profits.
-
FxPro does not charge any fees/commission on deposits/withdrawals, however, you may be subject to fees from banks involved in the case of bank transfers. Please note that for e-wallets, there may be a fee for withdrawals, if you have not traded.
How to Withdraw Money [Web]
Bank Card
First, log in to your FxPro Dashboard. Then, select FxPro Wallet from the left sidebar and click the "Withdrawal" button to start.
Please note that we accept Credit/Debit cards including Visa, Visa Electron, Visa Delta, MasterCard, Maestro International, and Maestro UK.
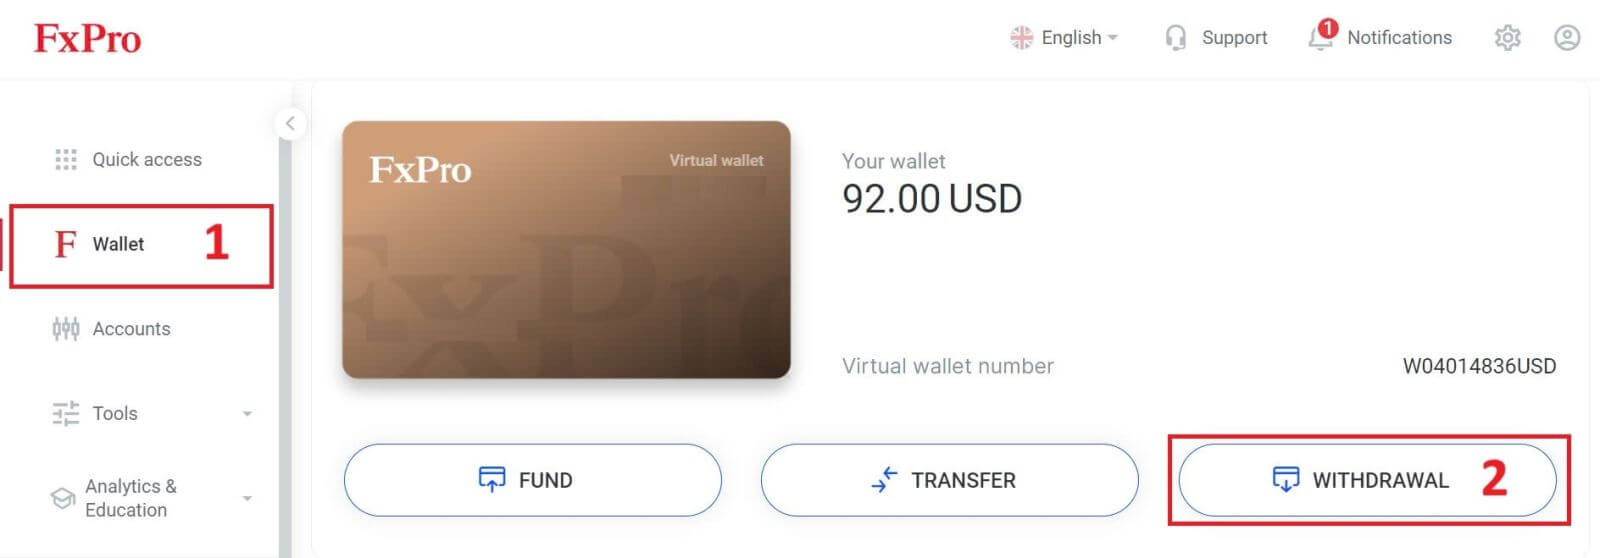
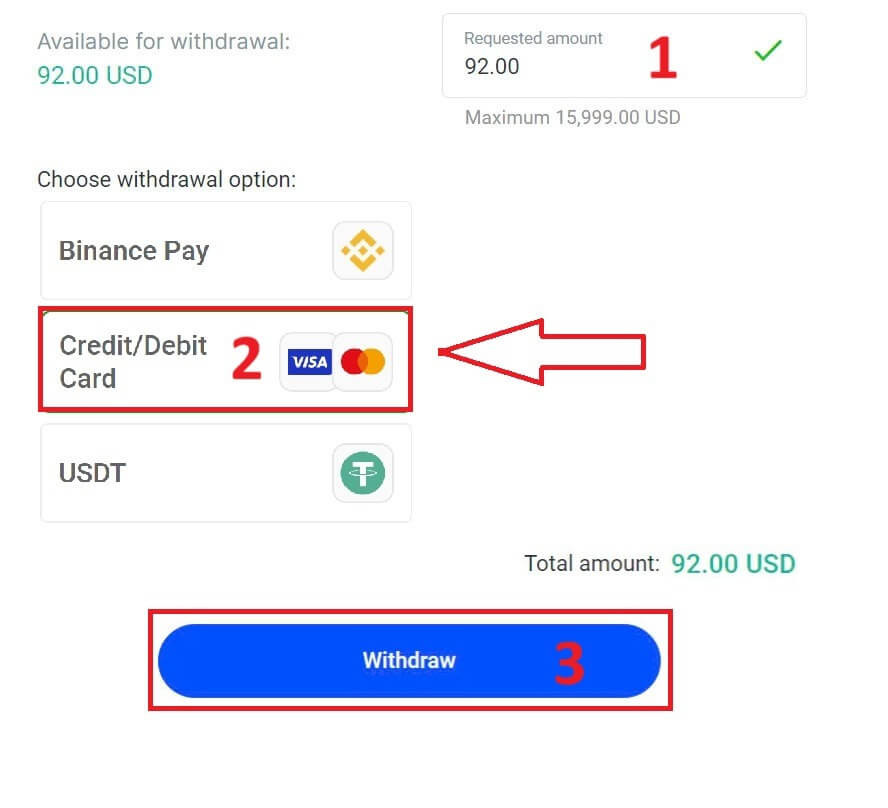
Next, enter the amount you wish to withdraw in the corresponding field. Then, select the "Withdraw" option as "Credit/Debit Card" and click the "Withdraw" button to continue.
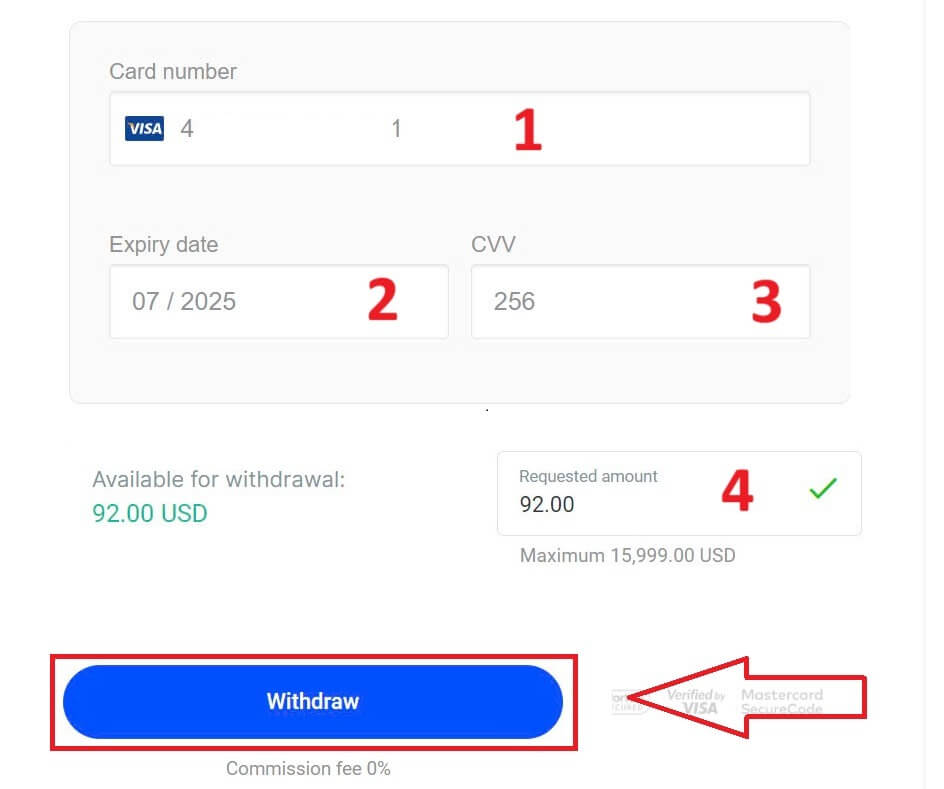
Next, a form will appear for you to enter your card information (if you’re using the same card that you previously used to deposit, you can skip this step):
-
Card number
-
Expiry date.
-
CVV.
-
Please carefully check again the withdrawal amount.
Once you make sure every field is correct, click "Withdraw" to proceed.
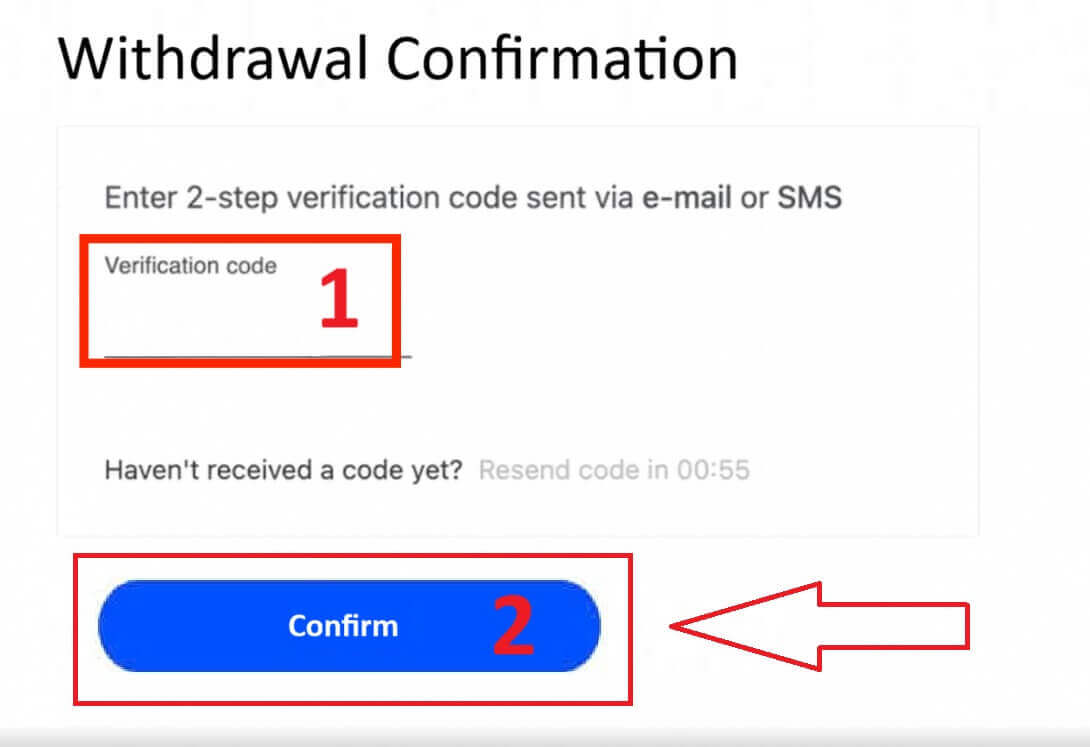
Input the verification code that was sent to you via email or SMS, and then click "Confirm".
A message will confirm the request is complete.
Electronic Payment Systems (EPS)
To get started, log into your FxPro Dashboard. Once inside, navigate to the left-hand sidebar, find FxPro Wallet, and hit the "Withdrawal" button to initiate the process.
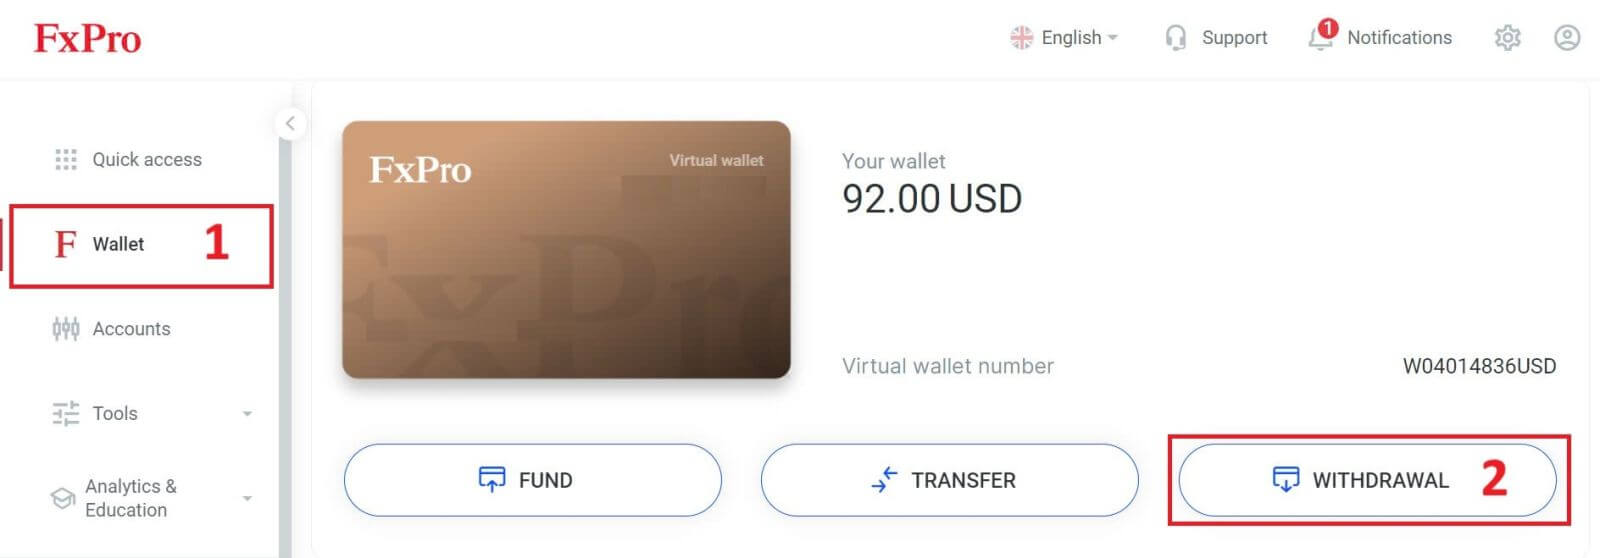
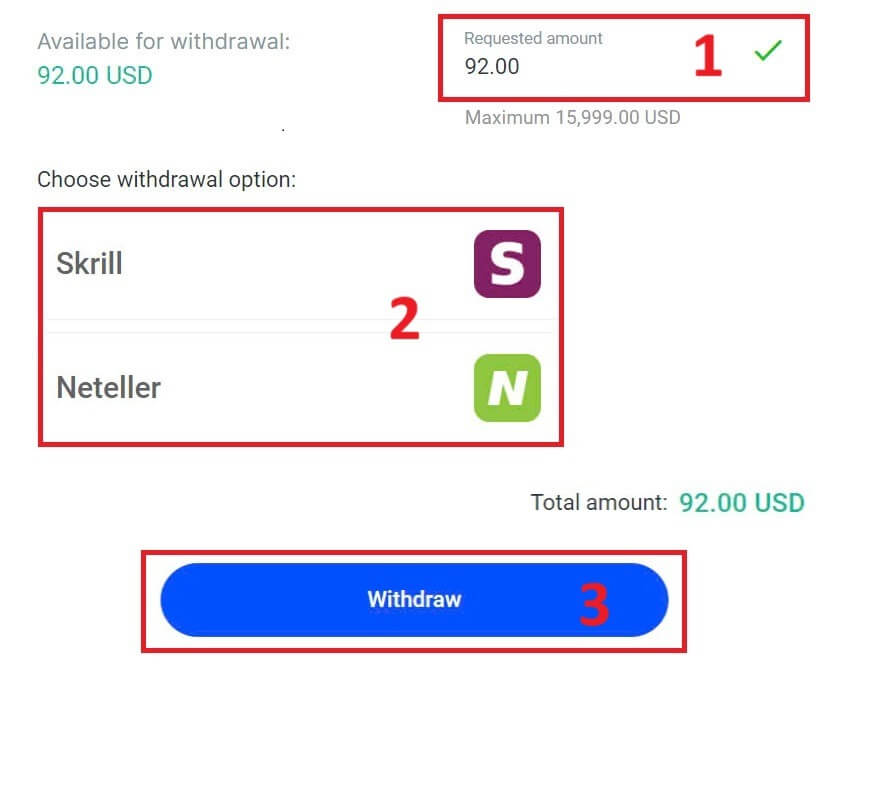
Now, input the desired withdrawal amount in the designated field. Choose one among the available EPS such as Skrill, Neteller,... as your withdrawal method, then proceed by clicking the "Withdraw" button to move forward.
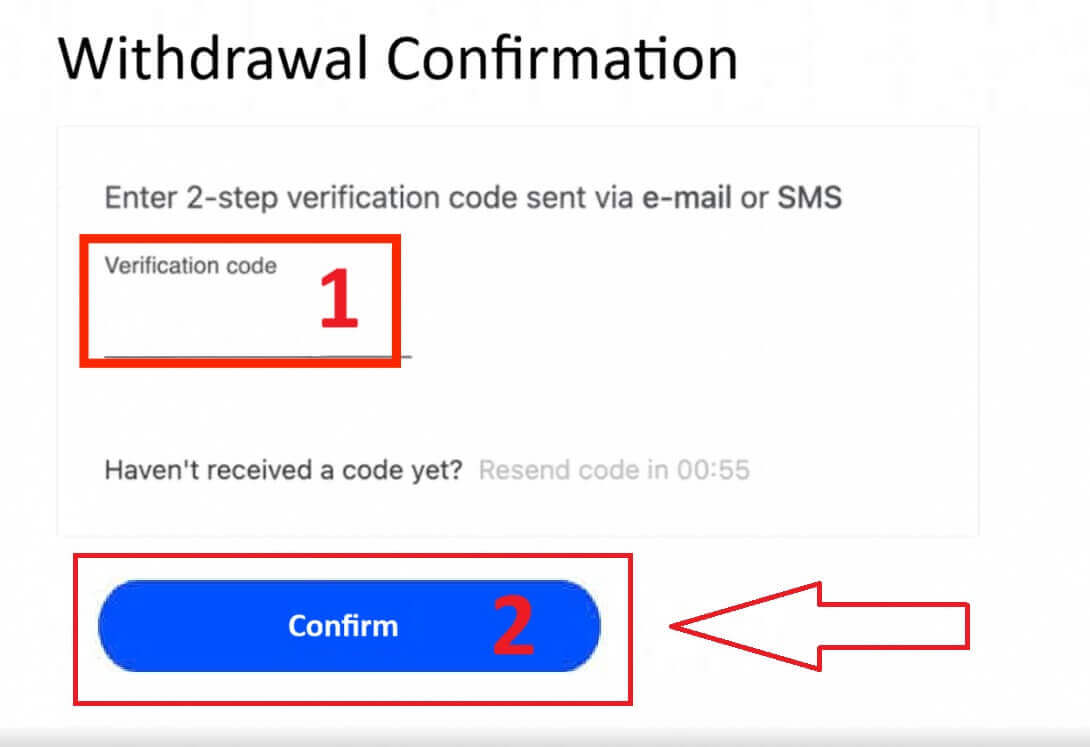
Enter the verification code you received through email or SMS, and then click "Confirm" to proceed.
Congratulations, your withdrawal will now begin processing.
Cryptocurrencies
To begin, access your FxPro Dashboard. From there, locate the left-hand sidebar, find FxPro Wallet, and press the "Withdrawal" button to initiate the withdrawal process.
Please note that the External Wallet you used for your deposit will also be the default destination for your withdrawal (this is mandatory).
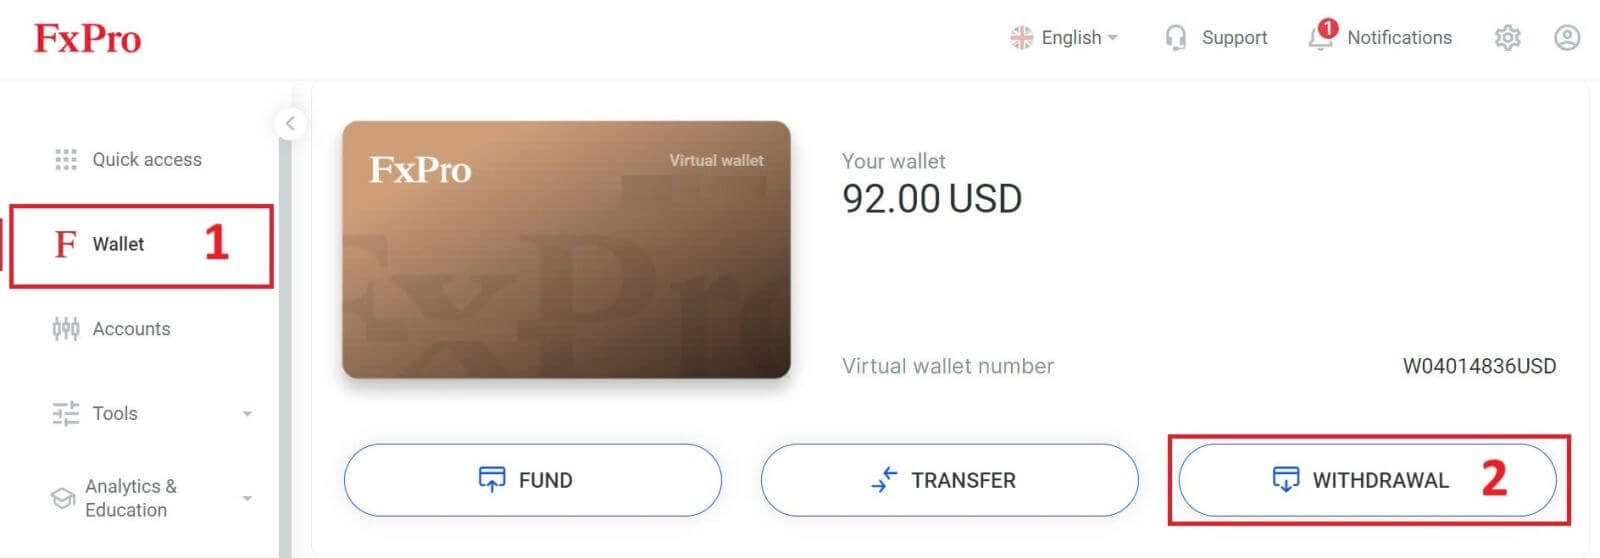
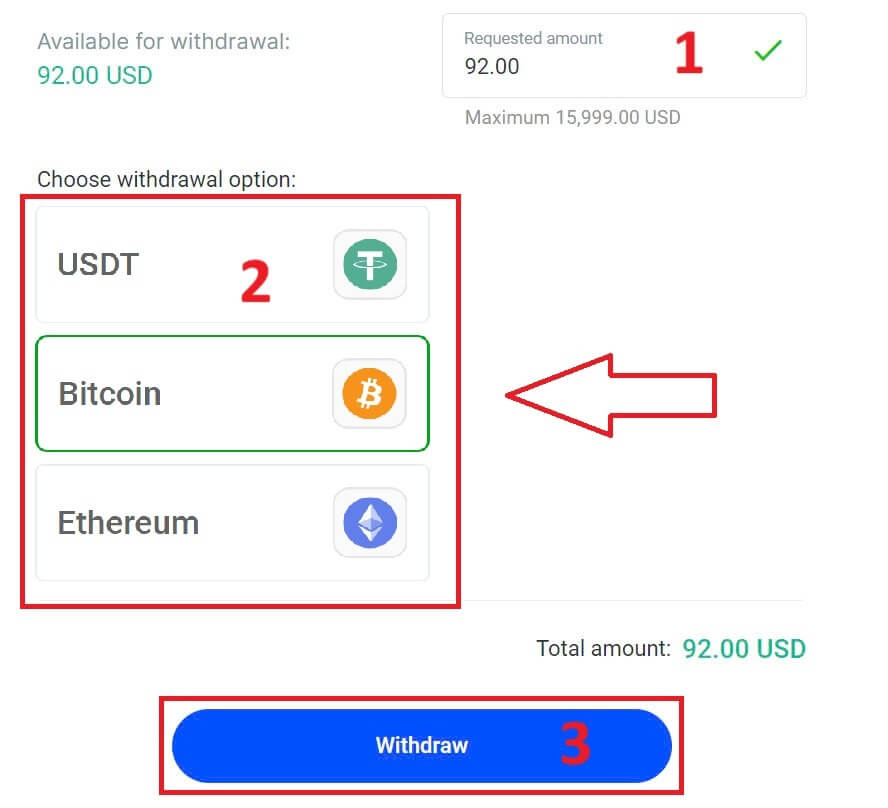
Now, enter the amount you wish to withdraw in the designated field. Select one of the available currency options like Bitcoin, USDT, or Ethereum as your withdrawal method, and then click the "Withdraw" button to proceed.
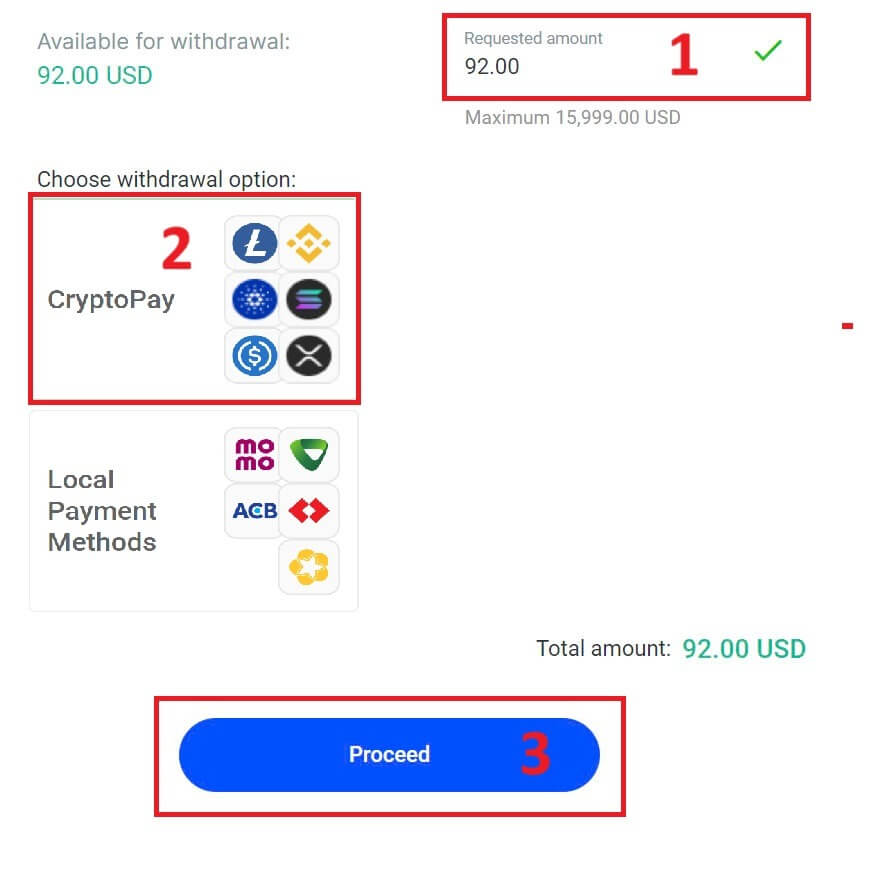
You can also refer to some other cryptocurrencies in the "CryptoPay" section. Please click "Proceed" to come to the scroll-down menu.
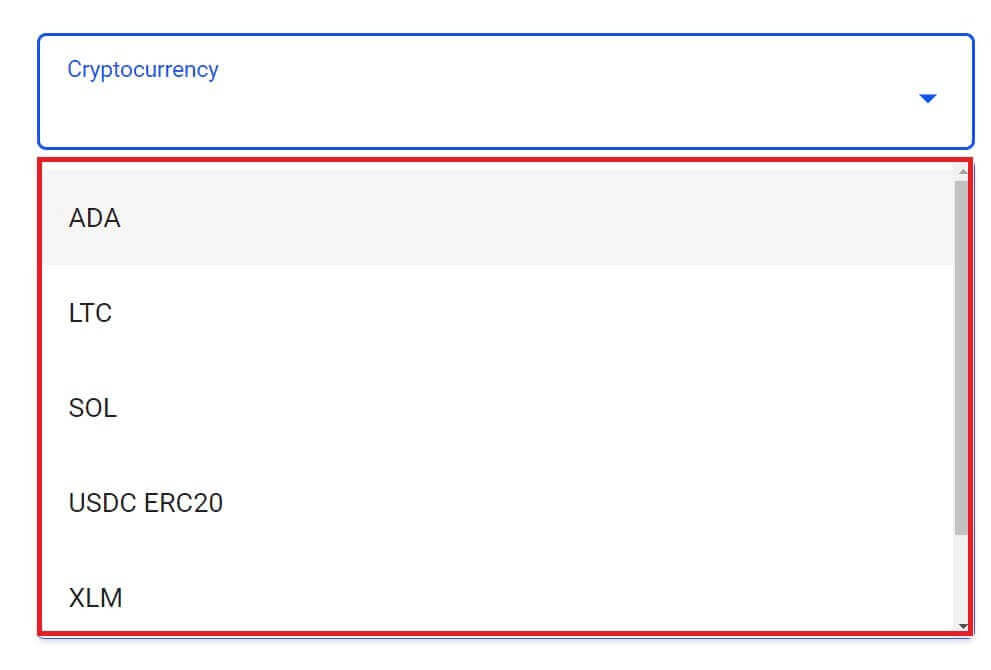
They have a variety of cryptocurrencies for you to select.
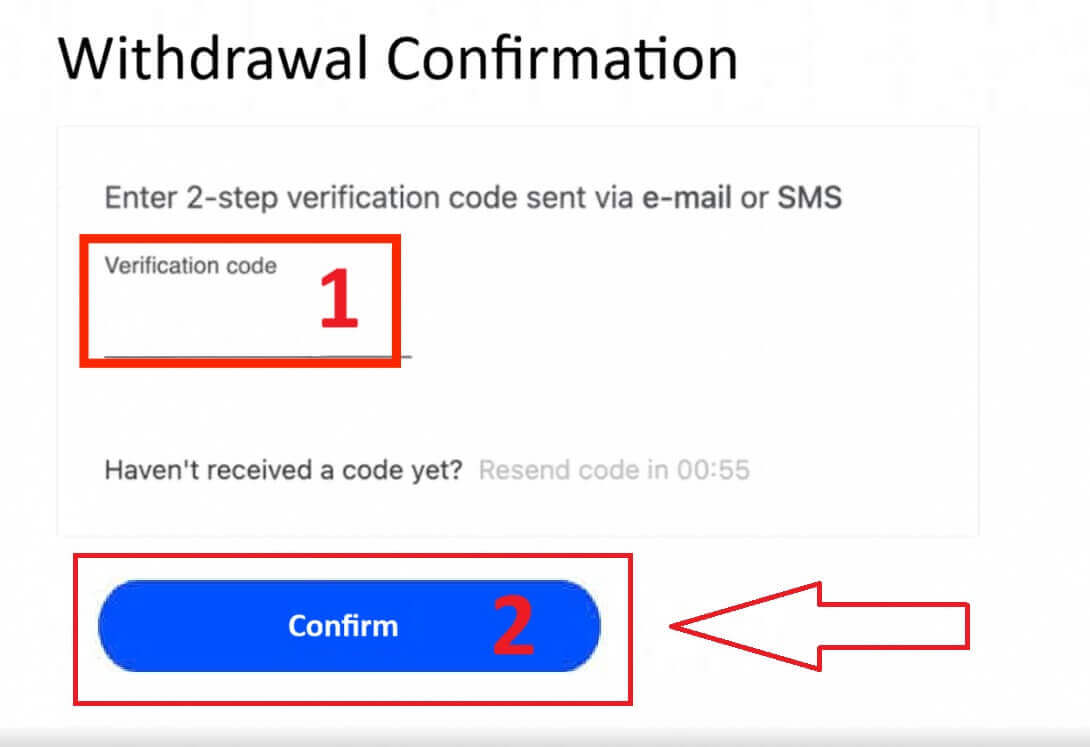
Next, please input the verification code sent to you via email or SMS, and then click "Confirm" to continue.
Local Payment - Bank Transfers
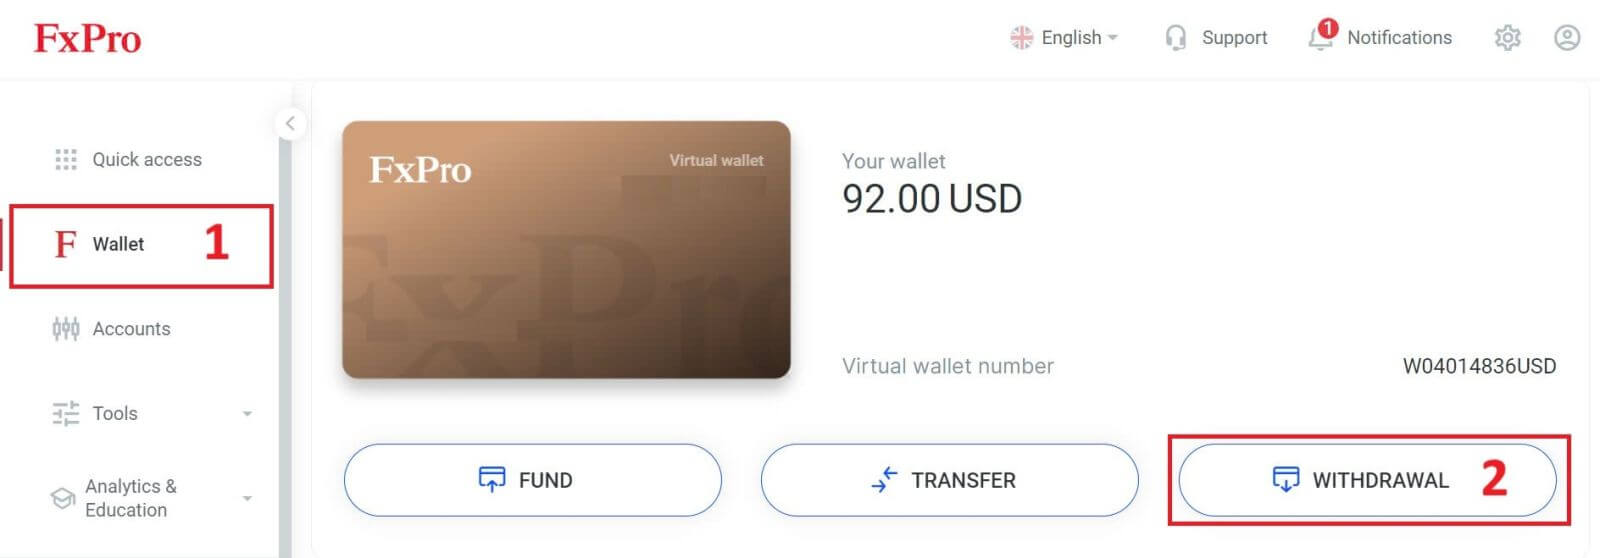
To get started, log into your FxPro Dashboard. Once inside, navigate to the left-hand sidebar, find FxPro Wallet, and hit the "Withdrawal" button to initiate the process.
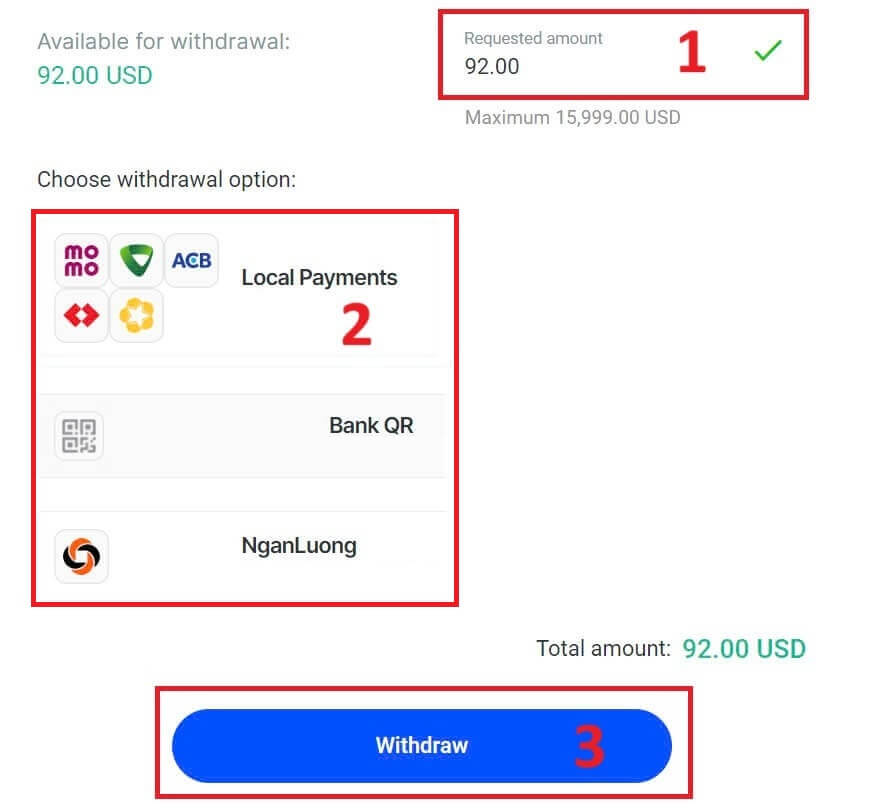
Now, input the desired withdrawal amount in the designated field. Choose one among the available options in Local Payment or Bank Transfer as your withdrawal method, then proceed by clicking the "Withdraw" button to move forward.
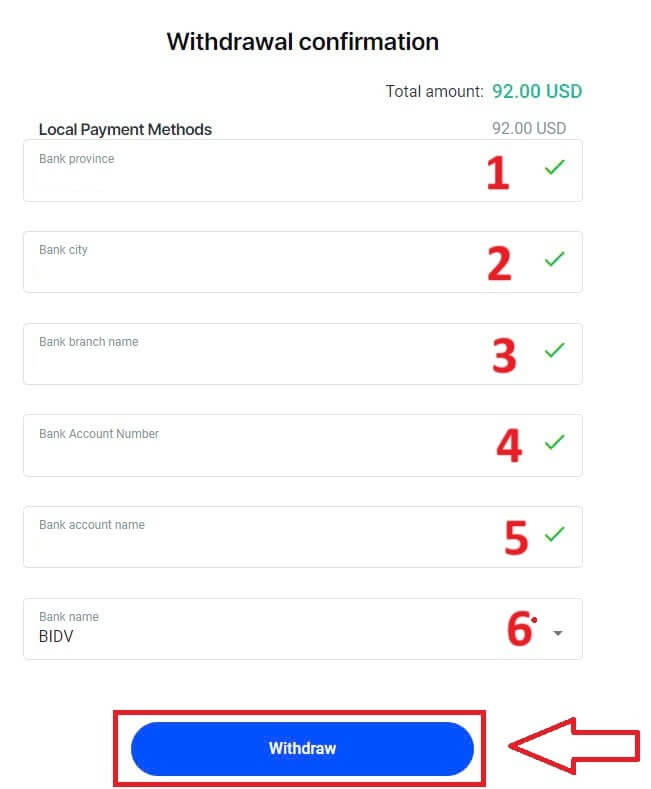
On the next page, a form will appear for you to fill in (if you chose the bank details same as the one you used to deposit, you can skip this form):
-
Bank Province.
-
Bank City.
-
Bank Branch Name.
-
Bank Account Number
-
Bank Account Name.
-
Bank Name.
Once you complete the form as well as make sure every field is correct, please finish by clicking the "Withdraw" button.
A final screen will confirm that the withdrawal action is complete and the funds will be reflected in your bank account once processed.
You can always track the transaction status in the Transaction History section.
How to Withdraw Money [App]
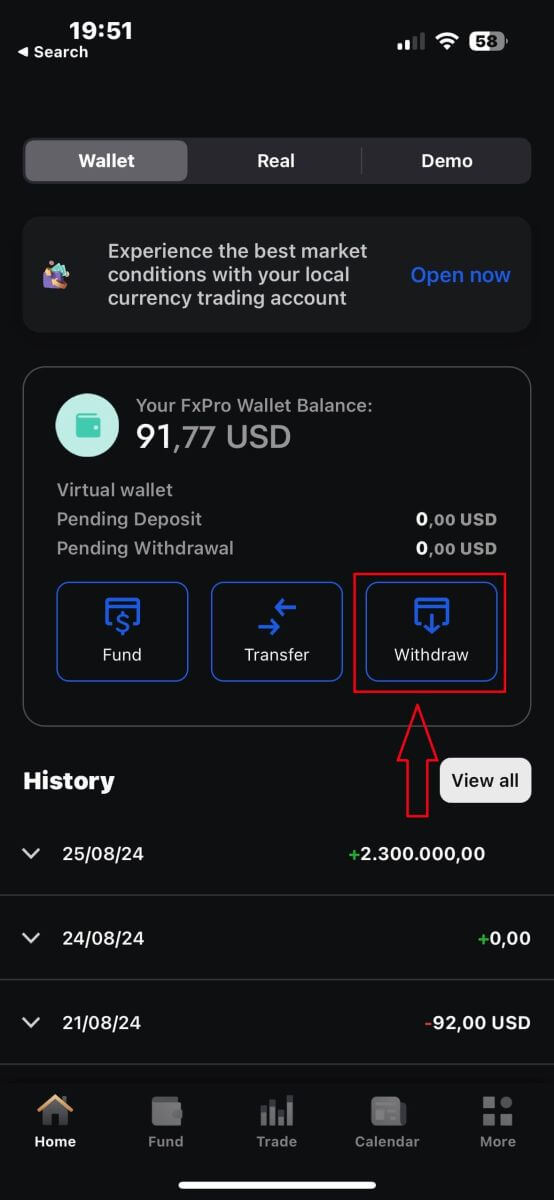
To begin, please open the FxPro Mobile App on your mobile devices, then click the "Withdraw" button in the FxPro Wallet section.
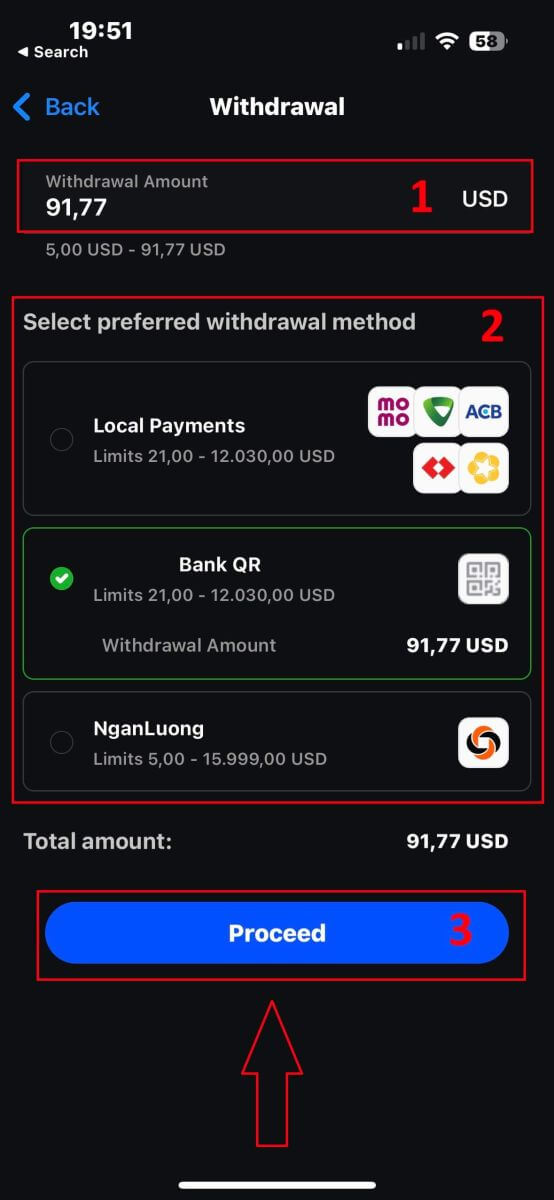
On the next page, you will need to:
-
Fill in the field the amount of money that you wish to withdraw, which must be at least 5.00 USD and less than 15.999 USD, or your FxPro Wallet balance (the minimum and maximum of the withdrawal amount would vary up to the withdrawal method).
-
Please select the payment method that you wish to use. However, please note that you can only choose the ones that you used to deposit (this is mandatory).
Once you finish, please click "Proceed" to go to the next page.
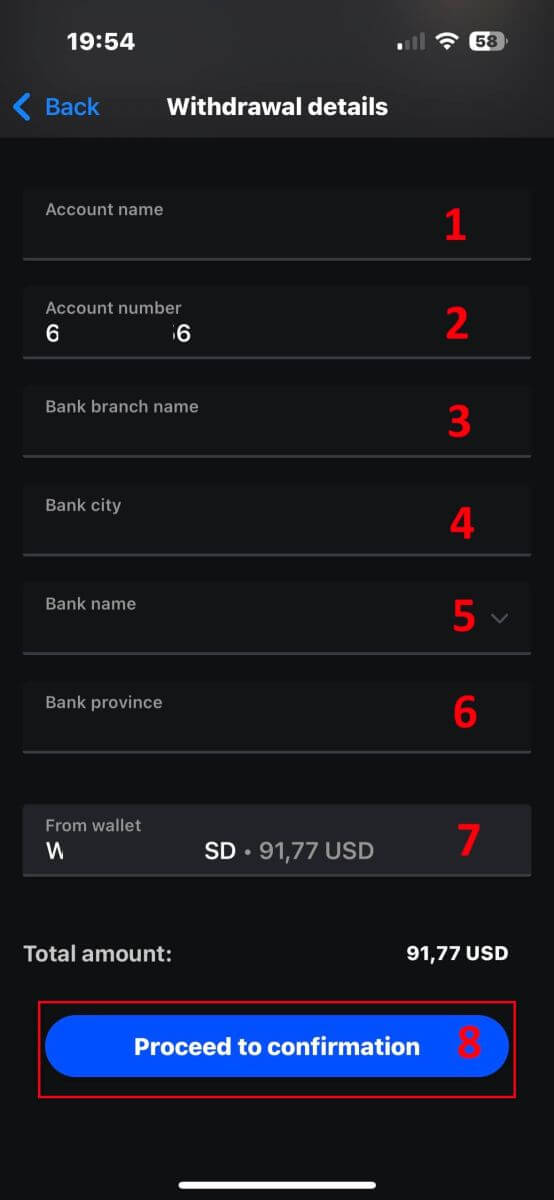
Depending on your withdrawal method, the system would require some necessary information.
With the QR Bank Transfer, we have to provide:
-
Account name.
-
Account number.
-
Bank branch name.
-
Bank city.
-
Bank name.
-
Bank Province.
-
The Wallet you wish to withdraw from.
After carefully checking all the fields and making sure they are correct, please tap the "Proceed to confirmation" to finish the process.
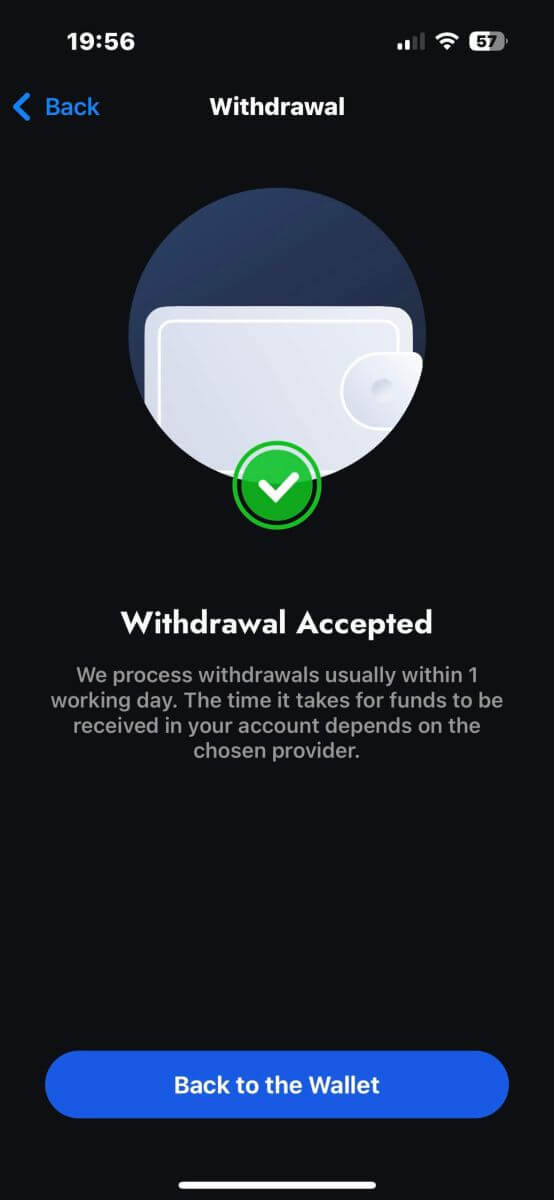
Congratulations! With just a few simple steps, you now can withdraw your funds from the FxPro Wallet so quickly with the mobile app!
Frequently Asked Questions (FAQ)
Account
Can I open a corporate account?
You can open a trading account on your company name via our usual sign-up procedure. Please enter the personal details of the person who will be the authorized representative and then log into FxPro Direct to upload official company documentation such as a certificate of incorporation, articles of association, etc. Once we receive all necessary documents, our Back Office Department will review them and assist in the completion of the application.
Can I open more than one account with FxPro?
Yes, FxPro allows up to 5 different trading accounts. You may open additional trading accounts via your FxPro Direct.
What base currencies can I open an account in?
Clients of FxPro UK Limited may open a trading account in USD, EUR, GBP, AUD, CHF, JPY, and PLN.
Clients of FxPro Financial Services Limited FxPro Global Markets Limited may open a trading account in EUR, USD, GBP, AUD, CHF, JPY, PLN, and ZAR.
It is recommended that you select a Wallet currency in the same currency as your deposits and withdrawals to avoid any conversion fees, however, you can select different base currencies for your Trading Accounts. When transferring between a Wallet and an account in a different currency, a live conversion rate will be displayed to you.
Do you offer swap-free accounts?
FxPro offers swap-free accounts for religious purposes. However, fees may be applied once trades on certain instruments are open for a specific number of days. To apply for a swap-free account, please send an email request to our Back Office Department at [email protected]. For further details on FxPro swap-free accounts, please contact our Customer Support.
Can I open a joint account?
Yes. To open a joint account, each person must first open an individual FxPro account and then fill out a Joint Account Request Form which can be obtained by contacting our Back Office Department at [email protected].
Please note that joint accounts are only available to married couples or first-degree relatives.
How many trading accounts can I open in the FxPro App?
You can create up to five live trading accounts with different settings in the FxPro App. They can be in different currencies and on various platforms.
Simply select one of the available trading platforms (MT4, MT5, cTrader, or the integrated FxPro platform), and choose the preferred leverage and account currency (AUD, CHF, EUR, GBP, JPY, PLN, USD, or ZAR). You can also transfer funds between the accounts using your FxPro Wallet.
For newcomers, FxPro provides comprehensive instructions on how to install the MT4, MT5, and cTrader applications with direct links to AppStore and Google Play.
Please note, that if you need additional accounts (including a Demo account), you can open them through FxPro Direct Web or by contacting our Customer Service Team.
Verification
What documents do you require?
We require a copy of your valid International Passport, National ID card, or Driver’s Licence to verify your identity.
We may also request a Proof of residence document showing your name and address, issued within the last 6 months.
The document(s) required and their current verification status can be seen at any time via FxPro Direct.
Are my personal details secure with you?
FxPro takes serious precautionary measures to ensure that your personal details are held in absolute confidence. Your passwords are encrypted and your personal details are stored on secure servers and cannot be accessed by anyone, except a very small number of authorized members of staff.
What should I do if I fail the appropriateness test?
As a regulated broker, we are required to assess the suitability of our clients regarding their understanding of CFDs and knowledge of the risks involved.
If it is deemed that you do not currently have the experience required, you can proceed with a demo account creation. Once you feel that you are ready and experienced enough to open a live account, and are fully aware of the risks involved, please contact us so we can reassess your suitability.
If the information you provided to us on the registration form was inaccurate, please let us know so we can contact you to clarify any errors.
Deposit
How do you keep Clients’ funds safe?
FxPro takes the safety of client funds very seriously. For this reason, all client funds are fully segregated from the company’s own funds and kept in separate bank accounts in major European banks. This ensures that client funds cannot be used for any other purpose.
In addition, FxPro UK Limited is a member of the Financial Services Compensation Scheme (FSCS) and FxPro Financial Services Limited is a member of the Investor Compensation Fund (ICF).
What are the available currencies for my FxPro Wallet?
We offer Wallet currencies in EUR, USD, GBP, CHF, JPY, PLN, AUD and ZAR. (Depending on your jurisdiction)
The currency of your FxPro Wallet should be in the same currency as your deposits and withdrawals to avoid conversion fees. Any transfers from your FxPro Wallet to your trading accounts in a different currency will be converted as per the platform rates.
How do I transfer funds from my FxPro Wallet to my trading account?
You can instantly transfer funds between your FxPro Wallet and your trading accounts by logging in to your FxPro Direct and selecting ’Transfer’
Select your Wallet as the source account and the target trading account and enter the amount you wish to transfer.
If your trading account is in a different currency than your FxPro Wallet, a pop-up box will appear with a live conversion rate.
What currencies can I use to fund my FxPro Account?
Clients of FxPro UK Limited may fund Wallet in USD, EUR, GBP, AUD, CHF, JPY, and PLN.
Clients of FxPro Financial Services Limited may fund in USD, EUR, GBP, AUD, CHF, JPY, PLN, and ZAR. Funds in RUB are also available, yet funds deposited in RUB will be converted to the currency of the client’s FxPro Wallet (Vault) upon receipt.
Clients of FxPro Global Markets Limited may fund in USD, EUR, GBP, CHF, AUD, PLN, ZAR, and JPY. Funding in RUB is also available, yet funds deposited in RUB will be converted to the currency of the client’s FxPro Wallet (Vault) upon receipt.
Please note that if you transfer funds in a different currency from your FxPro Wallet, the funds will be converted into your Wallet currency using the exchange rate at the time of the transaction. For this reason, we suggest you open your FxPro Wallet in the same currency as your funding and withdrawal methods.
Can I transfer funds between my FxPro Wallet and trading accounts during the weekend?
Yes, as long as the specific trading account you are transferring from does not have any open positions.
If you have an open trade during the weekend, you will be unable to transfer funds from it to your Wallet until the market reopens.
Weekend hours begin on Friday at market closure (22:00 UK time) until Sunday, at market opening (22:00 UK time).
Why has my Credit/Debit card deposit been declined?
There are several reasons why your Credit/Debit card may have been declined. You may have gone over your daily transaction limit or exceeded the card’s available credit/debit amount. Alternatively, you may have entered an incorrect digit for the card number, expiry date, or CVV code. For this reason, please verify that these are correct. Also, make sure that your card is valid and has not expired. Finally, check with your issuer to make sure that your card has been authorized for online transactions and that there are no protections in place that are preventing us from charging it.
Trading
Currency Pair, Cross Pairs, Base Currency, and Quote Currency
Currency pairs represent the exchange rate between two currencies in the foreign exchange market. For example, EURUSD, GBPJPY, and NZDCAD are currency pairs.
A currency pair that does not include USD is referred to as a cross pair.
In a currency pair, the first currency is known as the "base currency," while the second currency is called the "quote currency."
Bid Price and Ask Price
The Bid Price is the price at which a broker will buy the base currency of a pair from the client. Conversely, it is the price at which clients sell the base currency.
The Ask Price is the price at which a broker will sell the base currency of a pair to the client. Similarly, it is the price at which clients buy the base currency.
Buy orders are opened at the Ask Price and closed at the Bid Price.
Sell orders are opened at the Bid Price and closed at the Ask Price.
Spread
The spread is the difference between the Bid and Ask prices of a trading instrument and is the primary source of profit for market maker brokers. The spread value is measured in pips.
FxPro provides both dynamic and stable spreads across its accounts.
Lot and Contract Size
A lot is a standard unit size of a transaction. Generally, one standard lot equals 100,000 units of the base currency.
Contract size refers to the fixed amount of base currency in one lot. For most forex instruments, this is set at 100,000 units.
Pip, Point, Pip Size, and Pip Value
A point represents a price change in the 5th decimal place, while a pip signifies a price change in the 4th decimal place.
In other words, 1 pip equals 10 points.
For example, if the price moves from 1.11115 to 1.11135, the change is 2 pips or 20 points.
Pip size is a fixed number that indicates the position of the pip in the instrument’s price. For most currency pairs, such as EURUSD, where the price is displayed as 1.11115, the pip is at the 4th decimal place, so the pip size is 0.0001.
Pip Value represents the monetary gain or loss for a one-pip movement. It is calculated using the formula:
Pip Value = Number of Lots x Contract Size x Pip Size.
Our trader’s calculator can help you determine these values.
Leverage and Margin
Leverage is the ratio of equity to borrowed capital and directly affects the margin required for trading an instrument. FxPro provides up to 1
leverage on most trading instruments for both MT4 and MT5 accounts.
Margin is the amount of funds held in the account currency by a broker to keep an order open.
Higher leverage results in a lower margin requirement.
Balance, Equity, and Free Margin
Balance is the total financial result of all completed transactions and deposit/withdrawal operations in an account. It represents the amount of funds available before opening any orders or after closing all open orders.
The balance remains unchanged while orders are open.
When an order is opened, the balance combined with the profit or loss of the order equals Equity.
Equity = Balance +/- Profit/Loss
Part of the funds is held as a Margin when an order is open. The remaining funds are referred to as Free Margin.
Equity = Margin + Free Margin
Profit and Loss
Profit or Loss is determined by the difference between the closing and opening prices of an order.
Profit/Loss = Difference between closing and opening prices (in pips) x Pip Value
Buy orders profit when the price rises, whereas Sell orders profit when the price falls.
Conversely, Buy orders incur a loss when the price drops, while Sell orders lose when the price increases.
Margin Level, Margin Call, and Stop Out
The Margin Level represents the ratio of equity to margin, expressed as a percentage.
Margin Level = (Equity / Margin) x 100%
A Margin Call is a warning issued in the trading terminal, indicating that additional funds need to be deposited or positions need to be closed to prevent a stop-out. This alert is triggered when the Margin Level reaches the Margin Call threshold set by the broker.
A Stop Out occurs when the broker automatically closes positions once the Margin Level drops to the Stop Out level established for the account.
How to check your trading history
To access your trading history:
From Your Trading Terminal:
-
MT4 or MT5 Desktop Terminals: Navigate to the Account History tab. Note that MT4 archives history after a minimum of 35 days to reduce server load, but you can still access your trading history through log files.
-
MetaTrader Mobile Applications: Open the Journal tab to view the history of trades performed on your mobile device.
From Monthly/Daily Statements: FxPro sends account statements to your email daily and monthly (unless unsubscribed). These statements include your trading history.
Contacting Support: Reach out to the Support Team via email or chat. Provide your account number and secret word to request account history statements for your real accounts.
Is it possible to lose more money than I deposited?
FxPro offers Negative Balance Protection (NBP) for all clients, regardless of their categorization jurisdiction, thereby ensuring that you cannot lose more than your total deposits.
For more details please refer to our ‘Order Execution Policy’.
FxPro also provides a stop-out level, which will cause trades to be closed when a certain margin level % is reached. The stop-out level will depend on the account type and jurisdiction under which you are registered.
Withdrawal
Can I change my FxPro Wallet (Vault) currency?
To avoid potential conversion fees, your FxPro Wallet should be in the same currency as your deposits and withdrawals.
What conversion rates do you use?
FxPro clients benefit from some of the most competitive exchange rates on the market.
For deposits from an external funding source (i.e., from your credit card to your FxPro Wallet in another currency) and withdrawals to an external funding source ( i.e., from your FxPro Wallet to a credit card in another currency), funds will be converted as per the daily bank rate.
For transfers from your FxPro Wallet to a trading account of a different currency, and vice versa, the conversion will be made as per the rate displayed on the pop-up screen at the time you click confirm.
How long should I wait for my withdrawal to reach my bank account?
Withdrawal requests are processed by our Client Accounting Department within 1 working day. However, the time needed for the funds to be transferred will vary, depending on your payment method.
International Bank Wire withdrawals may take 3-5 working days.
SEPA and local bank transfers may take up to 2 working days.
Card withdrawals may take around 10 working days to reflect
All other payment method withdrawals are usually received within 1 working day.
How long does it take to process my withdrawal request?
During normal working hours, withdrawals are usually processed within a few hours. If the withdrawal request is received outside working hours, it will be processed the next working day.
Bear in mind that once processed by us, the time taken for your withdrawal to reflect will depend on the payment method.
Card withdrawals can take around 10 working days and International Bank Transfers may take 3-5 business days depending on your bank. SEPA and local transfers usually reflect within the same business day, as do e-wallet transfers.
Please note that although card deposits are processed immediately, this does not mean that funds have already been received in our bank account as the bank clearing procure usually takes some days. However, we credit your funds immediately to be able to trade instantly and protect open positions. Unlike deposits, the withdrawal procedure takes longer.
What should I do if I have not received my withdrawal?
If you have made a withdrawal request via Bank Transfer and have not received your funds within 5 working days, please contact our Client Accounting Department at [email protected], and we will provide you with a Swift Copy.
If you have made a withdrawal request via Credit/Debit Card and have not received your funds within 10 working days, please contact our Client Accounting Department at [email protected] and we will provide you with the ARN number.
Conclusion: Empowering Your Trading Start with FxPro
FxPro offers a supportive environment for beginners, ensuring that your first steps into trading are confident and well-guided. The platform’s step-by-step approach helps you navigate the complexities of trading, making it accessible and understandable. With FxPro, you’re equipped with the tools and knowledge to start trading successfully, paving the way for your growth as a trader.


